Showing posts with label clean studio. Show all posts

Thursday, September 26, 2024

The Big Clean


Not only did I get the stash organized, but I cleaned the whole damn studio. (Well, 85% of it.) It started in this corner, where the return for the central A/C is located. It's getting to be that time of the year, and the heat has kicked on once or twice in recent days, so it was time to cover it up. As long as I was back there I decided to clean the area, and moved everything to do it. I also cleaned the shelf that runs along that wall under the windows.

You know how it is, you get on a roll and keep going.

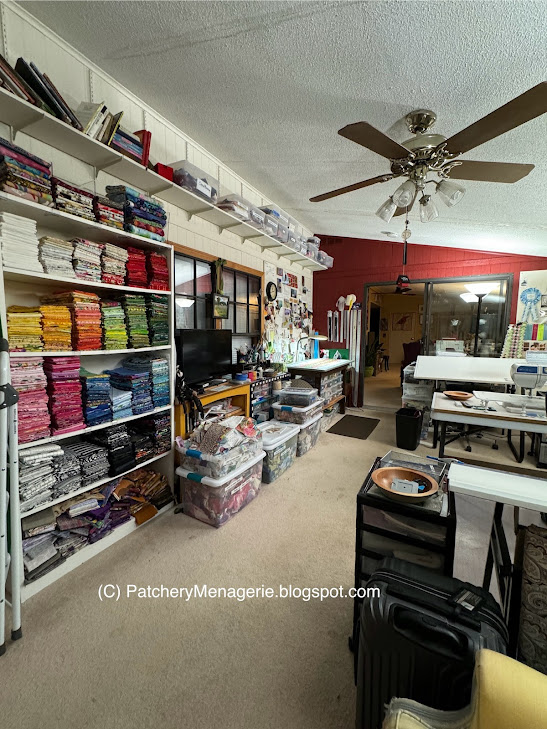
This was what the studio looked like "Before." Sure, it was nice to work on the stash, but that was the least of my problems. This was late last Thursday.

This is the "After," taken just before midnight on Saturday.

SO much better. At least now my stress level doesn't INCREASE when I walk into the room.

This is good, because I picked up the Peonies Scrap Slab Triangle quilt from the long-arm quilter and now I have room to lay it out and add the binding to it. This quilt has a home, so I have to get it ready to go.

This is the eleventh Scrap Slab quilt I have made, and they are all different, and made from scraps. If you want to use up your scraps, this is a good, fun way to do it. You can get the tutorial here, if you are interested.


Monday, January 30, 2023

Cleaning the Studio!

 In order to get working in the studio I had to do some clean up so I had room to work. It turned out that I had to do some DEEP cleaning.

Because it is getting harder for me to reach things that are stored up high, I've put a bookshelf behind my cutting table. I've put all the things related to my tutorials there. It meant I had to move my work tables a bit, but the space there was wasted so now it isn't.


Next I cleaned everything on the long shelf under the windows. I cleared everything off, washed the big shelf, dusted the stuff, and then reorganized everything on it.


I lowered the shelf Philip lives on. Now he's at my eye level, and isn't in the dark. I also hung my selvage bag below it because I wanted to show it off.


Then I cleaned my work tables, and I dusted everything. Then I sat down and took a good hard look around. What did I WANT to sew? Well, I wanted to finish the pink bird quilt, and I could see where I wanted to add more small birds. 


 To do that I needed to make a set of small bird legs, so I made several leg panels. 

Then I made a small bird, although it's hard to tell. If you want to make one (or a few dozen, you can get my tutorial here, at my Etsy shop. It's an instant download, so you can get started right away.


Thursday, September 9, 2021

More Studio Challenge Birds

I did a bit more cleaning in the studio. I have more scraps from which to make birds,

I found a whole stack of batiks I used in my Colorwash quilt a year or two ago. The size makes them perfect for bird breasts.

Like this one.

Or this one.

I always say working with limitations forces you to be more creative. Running to the quilt shop to find the right fabric when you need something can be the easy way out. I'm not sure I would have combined the fabrics in this bird if my entire stash had been at my disposal. But it's a hell of a bird, and I'm glad I was forced to really LOOK.

And check out this bird. Yellow and blue, right?

You have to look at your fabrics not just for what you see initially, for what you think it is...

But for what it can BECOME... 

The answers are in the fabric itself. All you have to do (you know, that irritating "all") is to notice, to pay attention, to really LOOK.

We had a family barbecue this weekend, and we ate outside. This was the view when I looked up. A brilliant, cloud free blue sky and the wind blowing the trees around. Sure, ALL ("all") it is is blue and green. But yeah! How BLUE! How GREEN! And how brilliant they both are. 

Most of us know exactly what this looks like. Most of us know this so well we don't even see it any more. Consider this a kick in the pants to sit up and take notice.


If you want to make birds, you can get my tutorial here, at my Etsy shop. It's an instant download so you can get started right away. I made the birds above, with my scraps. You can too.

If you would like to submit one of your birds to my Student Bird quilt, I welcome it! Email me at PatcheryMenagerie AT Gmail DOT com for my mailing address. Birds from around the world are welcome. How about some of you make a bird that lives in your area and send it along?


Monday, March 15, 2021

Critical Mess


I hate it when my studio is messy. It can be a reason to keep me out of it, but more importantly, it makes it hard to work in. AFTER I finished the layout of the Blue Ice (or Ice Blue) quilt, this is what the studio looked like. I had had it.

My friend Buffy sent me an email Saturday morning, did I know VPR was broadcasting "The Marriage of Figaro" starting at 1 PM that day? I did not, but I quickly figured out how to get it, plugged in my iPad, and started to clean the studio as I listened. It took the better part of the day. On Sunday morning  I went back in, and started organizing the mountain of fabric scraps and leftover bits. I just couldn't handle all of it, so some of it went back into the bins to be dealt with another day.

But in the end, I got it to a place I could live with.

I brought out the big vacuum cleaner, moved things around, and gave the room a good vacuum. I even dusted!

So now I can take a deep breath, and when I go in there later to start sewing the Blue Ice* quilt together, I will feel much more at peace than I did a couple of days ago.

*Speaking of which, I looked at my final layout all Saturday afternoon, and all Sunday morning, and I don't think I am going to change anything.


Friday, June 26, 2020

The Door Fix

After I posted about the door last week two readers wrote to me to suggest I purchase an ODL Add-On Blind for the door. So I checked it out and found it at Home Depot. It wasn't in stock in either of the stores near me, so I ordered it online and had it delivered.

I had watched the installation video so I had a pretty good idea what to do.

It took less than 20 minutes to install, and I did it in my nightgown, before I even had breakfast.

The mini blinds are behind the glass, so they won't get dusty or dirty. On one side is a slider that raises and lowers the blinds.

On the other side is a slider that opens and closes them.

I am a happy camper.

I had forgotten I ordered this decorative window film as an option for the studio door. So I put it on the small window in the "water closet" part of my bathroom.

This whole project opened my eyes to window films. I did not realize that some window films could protect UV rays from fading fabrics inside the house, or to keep hot sun out in summer and hold the heat in in the winter. I ordered some to put in the skylight in my entrance hallway, where my Quick Brown Fox hangs. I am pretty sure it does affect the color of the light that comes into the house, so that makes it a definite maybe not for use in the windows in the studio, but I'll keep looking. Many of these films look like a mirror on the outside during the day, giving lots of privacy. I have three skylights so I'll be putting the film on the other two, but I don't have to worry about privacy there. If somebody is on my roof looking in I have bigger problems.

BTW, this post was written with the "Legacy" Blogger. I have done nothing to my pictures. It will be interesting to see if they are just as bad or better than the pictures in yesterday's post.

I have one more window to wash, and that's behind my sofa, so that will happen this weekend. The mechanism to swing the windows down to wash the outside of the windows is broken so that one may be a quick job. I might have to wash it from outside, and that entirely depends on my energy level and the height of my ladder!

Friday, June 19, 2020

The Studio Tour

Standing in front of the door with the curtain and looking back into the studio, this is the view. The design wall is to the immediate left, then the stash and the small bookcases, then my ironing table. Across to the far right is my large cutting table. It is a drafting table and I use it at an angle. It is much easier on my back to cut at an angle, and since I am five feet tall, this is a big deal. Then there is the table with my sewing machine, then the small cutting table, and you can see the comfy chair in the lower right of the photo.

Standing at the other end of the room in the doorway looking back, this is the room. The big windows are on the left.

I  bought a second hand chair only to discover it was a recliner. TOTAL WIN! It is great to have a very comforable chair in the studio. I sit in that chair to study what's on the design wall.  You can see Millie's kitty condo in the corner.

From just behind the big chair, you can see the design wall, my fabric stash, the bookcases with books and tools and the TV and the Traveling Millies, my ironing table and the inspiration wall above it. And you can also see the long shelf at the top of the room on the left. It stores things I need to keep, but don't need handy.

From Millie's kitty condo in the corner this is the long low shelf that runs the length of the room under the windows. There are a couple of kitty quilts for Millie. It's where I keep a box of kleenex near my sewing machine and my little bin of bobbins, both within arm's reach.

I keep the most used rulers at arm's reach, on the shelf near the big cutting table.

To the side of the sewing table, between two windows, are some of my most commonly used rulers. When I am not cutting strips, the 4-1/2" x 12-1/2" ruler is always in use, as is the 2-1/2" x 6" ruler. I have a few of those. They were cheap and to rationalize the shipping costs when I bought (one) I decided to get four or five. It made sense at the time.

Between the last two windows hang my specialty rulers. I don't buy a tool unless I have a plan to use it, so I don't have every cutting ruler under the sun. The curved wooden dressmaker's ruler belonged to my grandmother. ('Nuff said!)

I store my long metal rulers near the ironing table. I use them mostly when I am preparing backings.

A studio is more than a collection of tools and materials. I want to have things I love around me, and here are some of them.


When I stand at my cutting table I can see this wall. It's nice to have the memory of a hug on my son's wedding day. That is also him when he was 14 in that photo to the right. The blue ribbon was given to me by my best pal, Julie.

The wall behind the ironing table is out of my reach to store anything there, so I use it as a wall of encouragement. I have thank you notes from people who received my quilts and loved them. I have photos of loved ones. I have letters from friends, I have drawings from my granddaughter and postcards of my favorite paintings.

One exception is a magnetic knife rack that I use to store scissors and my binding tape tools.

When your kid leaves you a note like the one above the clock, you keep it. I have no idea what I did to earn that compliment, but I love seeing it every day.

I bought this little painting when I was in Colorado three years ago. It was hanging about three feet above my head, so it wasn't until I paid for it and had it in my hand that I realized it had a barn in it. I'm pretty sure I heard Julie laughing all the way in Tennessee when I sent her the picture. The little stuffed owl above it is a pincushion that is far too cute to be stabbed with pins!

So that's pretty much it. My favorite room.

Thursday, June 18, 2020

Window Solution

This is the door without the curtain. Yes it is nice to see outside and all, but this door is at the back of my house. It's kind of secluded back there, and as such it is somewhat a security hazard, so I don't want a wide open view into my house.

DOROTHY! OMG, you were right on the money, except I don't want to permanently block the view, so I decided to use some of that window film you can get at the hardware store. I have some on the window in my dining room so I don't have to look out on the trash (or my neighbor mowing the lawn shirtless with his beer gut hanging over his belt.)

It was the perfect solution for the back door. I went online, ordered the stuff (one roll = 15USD) and drove to the hardware store after work to pick it up. After dinner (and btw, Melissa Clark's Dinner is worth every cent.) I went into the studio and washed the windows on the door and measured the lights.

First one, OK, second and third one ok too. I decided I wanted the pattern on the film to continue pane to pane so I had to pay attention to how I cut it.


Of course I cut the second row way too big, which meant I didn't have enough for the top row. Dumb, dumb, dumb.

But I had used a more plain film to cover one of the skylights in my house, so I used that for the top row. Here's what it looks like from outside. It's OK. I'll have to see it in daylight to see how much it bugs me, because if I rip a quilt apart because I don't like the way it looks, there's no way this is staying like it is now.

And I have to say it's kind of plain. There are some with colors, so I'll have to look around.


Wednesday, June 17, 2020

Curtains! Bins! Floors! WFH! Oh My!

I think I have two curtains in my whole house, and one of them covers the door in the studio. I don't need folks peeking into my house, so I put a curtain there.

Those red things are tomato pincushions. The fabric is appropriate, except when I take a picture of anything on my design wall the curtain is distracting, so I have to crop it out. I thought I would make a curtain that was light, creamy and would disappear. I actually did some shopping online, but never got very far. 

In my cleaning I found this, a curtain I had used in the last place I lived. I thought it might work, so I hung it up, and OMG I thought it was the ugliest, plainest, most boring thing I had ever seen. So I took it down and looked over at my stash. CLEARLY I didn't want beige or cream, but I also didn't want anything really really busy.

This is part of a line of fabric I fell in love with, and bought lots of. This is why I generally do not buy fabric I fall in love with. Because I never cut into it and it ends up being a waste of money. I might have had some vague plans for this but they never came to fruition. I think this will make a perfect curtain for the door. It will give me some privacy and it isn't too busy.  Over the next few days or so, I will make the curtain. You know, eventually.


In yesterday's post, you may have noticed that the floor in front of the fabric bookshelf was clear of piles of fabric.

That is because I made an Executive Decision. I decided that it would take me WAY TOO LONG to sort through all that stuff and that I would lose my mind and my patience before I got to the end of it. Most of it is too big for the scrap bins, and too small to fold properly and store in the shelves above.

The bin on the top is full of all the leftover striped triangles from the Zebra quilts, along with all the scraps and strips from making them. The bin in the bottom is full of all the bits that were lying on the floor and cluttering up my cutting table. Now that it has been confined to one bin, I can sit down some day and sort through it and decide if it is worth keeping or not.

The big bin on the top of the bookshelf is all the leftover backing fabric from the quilts I have had quilted. (Yes, I am well aware that is not the best place for it, but storage is at a premium in this house, so this is where it will stay.) That stuff is long pieces of odd sizes that are hard to fold. There's all kinds of good stuff up there.


I got home last night and washed the last two windows, and the shelf, and then cleared the room of everything I could. I even moved the kitty condo. I got everything up off the floor, and let the Roomba (the REAL Roomba) do its thing. Then I put everything back.

NOW, it's clean. I have some backing fabrics I have to iron and get ready for their quilts. I have some other fabric that was draped over an armchair in my living room that needs to get ironed and put away properly. I have to organize the fabric in the bookshelf stash. I have a few other smallish things to do, but now I have room to do them and I won't feel angry or irritated every time I walk into the studio.

In other words, I can relax. I will give you the full tour tomorrow.

Thank you JustGail for complimenting me on showing my messy studio. Except I didn't. I did a lot of picking up and putting away before I took that before picture. It was much worse, and I was very embarrassed.

But I just had to prioritize. I had had readers begging for the Zebra tutorial, and I had some nagging issues I had to resolve before I could write it.

I can count on the fingers of one hand the number of negative reviews my tutes have received, and those are mostly because they did not read the description that said "these are not paper pieced." It's very important to me that whoever buys one of my tutes has all the information they need to make whatever I am teaching successfully. It takes a TREMENDOUS amount of work, and I had to keep figuring out how to get those great big striped triangles to fit together perfectly no matter who made them. So it was work on figuring that out, and the hell with the way the studio looked. Now that the studio is clean I can move on.

Note I did not say "back to normal." "Normal" for my studio would be somewhat messy, indicating creative work is being done.


One final note. I have been WFH - working from home - since mid March. I learned today I will be continuing to do so for at least another couple of months. In the CEO's words to me in an email I received a few hours ago "...we are being super careful and cautious about looking at everyone individually - health risk wise, extended family situation, particular role you are playing - and creating very tailored solutions on how we run the business and attempt to keep everyone safe. Sounds simple, but clearly not easy. But well worth it, it is the only way to do it."

And folks ask me why I have stayed with this company more than 30 years.