Showing posts with label barn. Show all posts

Saturday, January 30, 2021

Larkspur - The Pink Barn


I finally picked up the Pink Barn from Janet-Lee Santeusanio, my fabulous long-arm quilter. For this I told Janet-Lee I wanted it special, and to go all out. I am a firm believer that when you are working with an artist who knows what the hell she is doing, that you let her use her skills. JL and I have a standard set of instructions: She has my permission to quilt anything I give her differently than what she and I originally chose if she thinks there is a better solution. 

JL quilted the stripes in the barn.

She outlined the trim in the windows, and she carried the vertical quilting lines in the body of the barn itself. She also quilted the diagonal lines of the barn doors. This is the way real barn doors are often made here in NH.

Such glorious details!

What I just love about it is how barn-y it is. It is quilted like a barn, not a house or a decorative building. Now JL lives down the street from the inspiration barn (shown below) so she knows what it looks like. I am like, beyond thrilled with it, and now have to figure out what to use as a binding for my barn wall hanging, which I have decided to call "Larkspur."

This is the inspiration barn.

Sunday, September 22, 2019

OOOH PINK!

Here's a closeup of the pink barn.You can see the detail in the sky fabric, and the trim I used around the roofline. Every part of this barn is pieced. The black windows and the grey muntins* are also pieced.

In the example above, I like that the pink stripes do not line up above the LARKSPUR panel and that they go crosswise on either side of it. If you don't know why I chose the sky fabric I did, notice how the turquoise in the sky picks up the blue details in the roof trim and the inset square, and the green in the sky fabric also picks up the green background of the butterfly block. And notice the blue roof trim is NOT the same fabric that surrounds the butterfly block. You do NOT have to be slavishly matchy-matchy.

 The blue acute angle near the roofline, shown here in the blue, is something I see in virtually every NH barn, but it took me a long time to figure out how I could include it in a barn block. Very often this angled shape is the same color as the body of the barn.

All the little colorful details in the top part of this barn read as feminine so I really wanted to use a fabric for the barn doors that would keep that feeling. I wanted it to include the colors I'd been using, and be a stripe, so I could use it at an angle, since so many barn doors around here have doors constructed this way. I've had this fabric in my stash for some time, and it is beyond perfect.

This is part of the bottom panel that includes the ramp up to the barn doors. The supports on either side of the ramp are usually stone, so I chose a fabric that looked like that.


Here is the finished barn. It is about 38" square, and uses 16 different fabrics. I'm pretty happy with it. If you need an idea about the scale, the black windows are 1" tall by 3/4" wide. I've kept this photo pretty big, so you can click it, then double click it again to see all the little details.


*muntin: the strip separating panes of glass in a sash

Saturday, September 21, 2019

More Pink Barn!

I'm back working on the pink barn. I created the row of lights above the door.

Then I made the doors and the sides and put them together. Many barns in New England have doors constructed with angled strips of wood, so I wanted to find a decorative fabric that would give me that feeling. The fabric I picked for these doors is a jeweled stripe, and I cut the doors on the bias. The jewels pick up the colors of the barn as well as the blue I've used as highlights. 

Here I have trimmed the sides and added the blue trim on the corners of the barn. My inspiration barn lives in the woods, so I put some green fabric to one side to see what it looks like.

Here's my inspiration barn. As you can see, I've taken a lot of liberties.

PS: Happy Birthday to my barn-building quilting buddy, Julie Sefton.

Saturday, September 14, 2019

I Went Shopping... and Another Thing.

I needed more pinks for the pink barn, so this morning I got up early and drove to my favorite quilt shop, Quilted Threads.

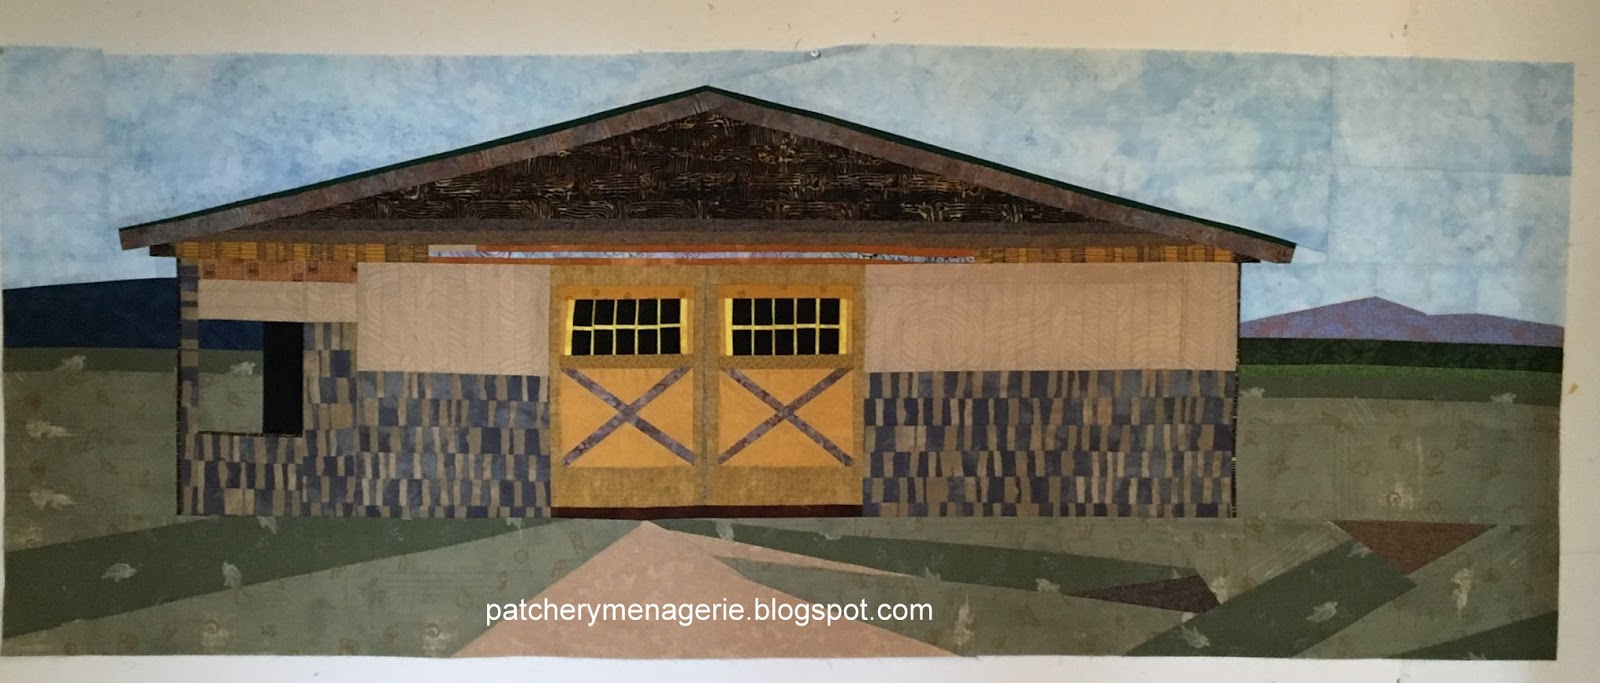
I really like the pink in the middle with the little bursts of color. I'll use one or more of these for the body of the barn. I haven't decided yet.

These three were in the sale room, and I may use one or more as accents.

 I know the batik I looked at the other day would be nice, but I really liked the happy feel of this fabric, which I will probably use for the sky. Remember, we don't want to be TOO LITERAL!

So now my fabrics are taking a spin in the washing machine. I'll get to work on the barn later, but first, a confession.

Last week, I needed something from the top shelf in one of the kitchen cabinets. I'm five feet tall, so I have to use a stool. Instead of getting the step stool, I grabbed a small footstool from the living room. I got what I needed, but my foot caught the edge of the stool, overbalancing it, and I fell. The upper half of my body landed on the counter, and my left wrist hit first. I couldn't grab anything to steady myself, and I fell over backwards onto the floor.

Aside from feeling stupid, I wasn't hurt. My left wrist was sore, but I could move all my fingers and hand in any direction. I took some ibuprofen and put some ice on it and then continued about my day. My wrist was swollen, but that was to be expected.

Most of the swelling went down after a day, but some remained, a funny kind of bump. My wrist only hurt when I bent it far backwards.

After several days, the swelling was still there, and I knew I'd have to get medical advice. I have osteoporosis as well as arthritis. Sigh.

So yesterday I went to the local Urgent Care facility and got it looked at and X-rayed. Blessedly, there is nothing broken. "But you have a lot of arthritis in your hand," the nurse practitioner told me, "and that interferes with the swelling going down, so it may take some time." She checked my grip and mobility and told me to go home and treat the symptoms. If the swelling doesn't go down in 2 to 3 weeks, I'm to give them a call. The radiologist will review the X-rays on Monday and will call me if something is discovered.

Yes, I know. I am lucky.


Friday, September 13, 2019

A Little Trim...

I've added a thin strip of the decorative stripe I showed you a few days ago to the edge of the barn roof. I like it a lot. It just goes to show that you have to really LOOK at your fabrics to see the possibilities. I wrote a tutorial about that, and you can get it here. It's everything you've ever heard me say about fabric all in one place.

I also like the blue batik as the sky. It's sky-ish and looks windy and cloudy, which happens here in New England.

And I still prefer this geometric print of all the fabrics I currently have for the body of the barn. It also reminds me of the siding in many barns. I know several of you liked the white stripe better, but this is going to be a PINK barn. (But there's nothing that says I can't use it for the barn doors....)

Sunday, September 8, 2019

Thinking Pink

This is a garage I pass on my way to the grocery store. I like the reddish trim. This reminds me that less can be very much more.


So I decided to add a contrasting trim to the top half of my pink barn, but that leaves me a conundrum. Now that I've added so much blue, the options for the bottom half of the barn have (of course) changed.

Before I added anything blue, I had chosen this fabric which has woven elements, but now I am not sure.

So I decided to audition some other fabrics. This one is too much the same value as the pink stripe for my taste.

This stripe seems a bit busy. There's already a lot going on in this barn.

I wanted to try it with a blue door. It's too many stripes, but I wanted to see if a blue door would work.

I like this grunge pink, but I don't have enough of it. I have to decide if I want to wait while I order more.

I really like this geometric print. Pretty sure I'll use a white door, but I will definitely use a few bits of blue to tie the bottom part of the barn to the top part.

And one last thing, the blue along the top of the barn will be significantly narrower than it is right now, so it won't be QUITE as dominant as it appears right now.


Saturday, September 7, 2019

Adapt & Improvise...

When I am making a barn out of my head, like this one, I don't draw it out first and I don't plan it. I just "wing it." I had not planned to add this LARKSPUR element to the upper part of the barn, but when I arranged the windows underneath the butterfly panel, there was a lot of space between them.

So I looked through my stash for something that would fit that space in an interesting way. I've had this fabric for several years and the colored words were just the right size...

As I laid out the pieces, I thought it might be more fun to make the stripes go sideways instead of vertically. (Besides, I had a couple of fabric scraps I could use...)

So here is the (untrimmed) roof section.

I might add a thin strip of this stripe above as an accent. I haven't decided yet.

Tuesday, March 6, 2018

Tuesday Toss Up


This is a view of the short side of the Sparkling Winkel quilt, showing how the backing fabric looks like it rolls over and surrounds that end of the quilt. I am really happy I didn't go with the light blue.


This is Marie's barn. Marie took the Barns class at QT in February and worked all day on the main part of this barn, then took it home and added the side shed, the overlapping trees on either side, the wavy sky and all the other details. I think she knocked it right out of the park. This barn is OUTSTANDING, especially for her first one!


A friend of my gave me a gift certificate to Home Goods for Christmas, and I finally got around to spending it. I bought this summery wreath for my front door. Gosh, I'm tired of winter.


This is the maintenance building of the community I live in. I was taking beauty shots of the Snow Day quilt when I turned to the right and really saw it. It isn't a barn, but I like it a lot.

Saturday, November 25, 2017

The Colorado Quilt at Home in Colorado

The Colorado Quilt has arrived in the high desert of Colorado and now it lives on P & J's bed.


My extremely loquacious brother (sarcasm mine) sent this photo yesterday with the following comment:

"This is one beautiful quilt. Thank you so much."


If you want to make birds like these, you can get my tutorial here, at my Etsy shop. It's an instant download so you can get started right away. I have a tutorial for the butterflies too.

Friday, November 3, 2017

Why Green?

You're probably wondering... Why did I choose GREEN for the binding of the Colorado Quilt? After all, the background of the quilt is white, and the backing is a light brown with gold.  So why choose a dark binding?


It's a good question, and perfectly valid.

Sometimes the reasoning for things is less visual and more emotional. Such it is with the backing and binding choices for the Colorado Quilt. P & J are very quiet, very reserved, very private people. They live where they live because it is beautiful and they live as one with the landscape that surrounds them. The colors for the backing and binding simply had to be earthy tones.


The fabric for the backing was a beautiful, yet subdued, organic design in earth tones - browns and golds. The flowers were a nod to J's work with flowers, and to the tones of the wood that my brother uses to build his furniture pieces.


Sure I could have used white, but the design needed to be contained somehow. Blue would have been too bright, as were Yellow, Orange, Red, and Purple. Gray would have been too dull and dreary, and the tertiary shades of the so-called "Civil War Prints" would not have worked well either. Plus I hate them. To me they are dull and dead.

Brown would have been OK, but we had brown on the back, and wanted J to be a part of the choice for the binding. Things that grow are green. While the high desert of Colorado is not as lush and green as summer in New Hampshire, my feeling of the area was GREEN, so green it simply had to be.

And yes, the binding is sewn on all four sides and attached to the front with at least six million pins spaced probably about three-quarters of an inch apart. I use a lot of pins. So what?

Tuesday, October 31, 2017

Colorado Quilt, Quilted


That's me (on the right) with Janet Lee Santeusanio of Woodland Manor Quilting, who quilted the Colorado Quilt. It is all hand guided free motion, and she did an outstanding job. Janet Lee brought it to me at Quilted Threads so my students could see it. This photo also shows just how big the quilt is.


.
Here is a closeup of the quilting on the barn block. It's really spectacular. I particularly love the pebble quilting on the ground in front of the barn.

.
Here some of my students check out the signature panel on the back of the quilt.


Here's a detail shot of the quilting. You ought to be able to click on this photo to see a larger detail of the quilting.


I've chosen this warm grunge green as the binding for the Colorado Quilt.


If you would like to make your own free pieced birds, you can get my bird tutorial here. Each bird represents something I saw in Colorado when I visited in June. (Scroll back through my blog to see each one in detail and what inspired it.)  I also have a tutorial to make the free pieced butterflies. I modified the flowers from the Old MacDonald Mystery Sampler Block Lotto and interpreted my brother's post and beam barn in Colorado into fabric using Julie Sefton's Build a Barn book as inspiration. As usual, the quilt is completely original and designed by me, Lynne Tyler, without the use of patterns, templates or paper piecing. There will  NOT be pattern for this quilt available, EVER. I am much more interested that you make your OWN quilts.

It's not that scary! Happy Halloween!

Monday, October 2, 2017

Interpretations

 Most free pieced barns are imaginary, or inspired by real barns. Most free pieced barns are not meant to be accurate representations, but when I saw my brother's barn in Colorado, I knew I had to make a free pieced barn based on it. I've been all over the country and never seen a barn like it. I think it's the most beautiful barn I have ever seen.

He designed and built it. It's post and beam construction, and he built it low on purpose, so as not to obstruct the view of the 14,000 foot mountains of Colorado that surround it.


When I make my free pieced barns (or birds, or anything else I make that way) I don't measure with a ruler, I measure by eye. It's a skill I learned while learning how to draw. I know I'm good at it, but sometimes it surprises me. When I put the picture of my free pieced barn next to a picture of my brother's barn, I was amazed I got the scale and general proportions just right. I also didn't want to clutter up the design with the bins and planters, picnic table, furniture, grill or gates. I knew that those elements could clutter up and obscure what I meant to be the central focus - the barn.

I didn't want to make an exact representation, but I wanted my barn to be close enough so you'd know which barn inspired it. As in all such interpretations, decisions have to be made about what to include and what to leave out, and what fabrics to use to suggest the original. Fabric choices were based on what fabrics I had in my stash, and what were available to purchase, so I did the best I could.

I was very happy with the way the barn turned out.

Saturday, September 9, 2017

Birds on the Barn

These birds are sewn to the barn block.

I've set the row of birds that go above the barn so I can check it out before I sew it together.

The quilt is wider than my design wall, so I have to lay it out on the floor.

 I take a lot of pictures so I can figure out what I want it to look like. I don't like the placement of the top three on the right. I don't like the way they look like they are directly above the ones on the row below.

I slid the row to the left, and liked the way it looked, so I sewed it down.

 So how do I get them all to look the way they do? I set the blocks next to a long straightedge.

 This helps me to see how much extra fabric I need to add to each block. The blue flower needs extra fabric sewn on all four sides, but the red bird only needs it added to the bottom.

The green bird on the left needs strips added to the top and bottom, the blue one on the end needs it just on the top.


Once I add the strips wherever it has to go, I straighten up the edges, then sew the blocks together. Then I get to check and double check the row is the same height from one end to the other. This is fussy, but definitely worth it. Once that's done, I can sew the row to the rest of the quilt.

And so on and so on and so on. Or maybe I should say, "and sew on, and sew on and sew on."

(you all know how much I love a good pun.)