Showing posts with label Colorado. Show all posts

Friday, May 31, 2019

Barns on Saturday

I'll be teaching a free-pieced barns class on Saturday, at Quilted Threads, based on Julie Sefton's book Build-a-Barn. You can see pictures and get the book here. The class is full and we are going to have a good day.

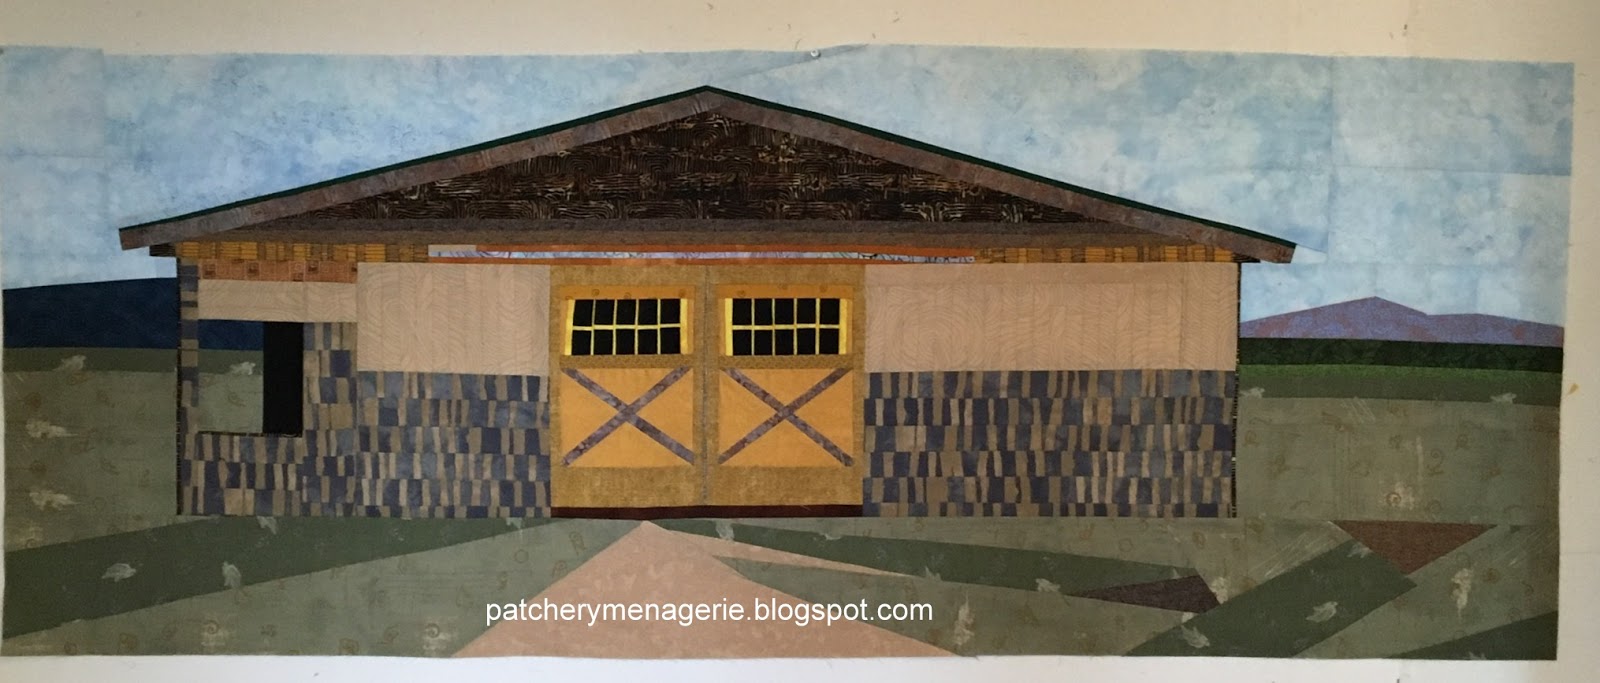
This is the barn I made for the Colorado Quilt, and it is based on this barn that my brother built.


Monday, December 11, 2017

Colorado Quilt Book

Many of you asked if I would send my brother and his wife the inspiration photos for the Colorado Quilt. I did one better. I made a booklet, because although I know what each bird represents, my brother and his wife wouldn't have any way of knowing that.

I created a power point presentation.

Each page had the inspiration photo,

 the bird that I made as a result, 

and a little story about what attracted me to it.

Even the things that weren't birds.

The booklet is 61 pages long and includes every bird, chicken, butterfly and flower in the quilt. It also includes the barn and a few other comments. I printed it in color then brought it to Staples to have it bound. I'll be mailing it to my brother and my SIL along with their Christmas present. 

And yes, of course I made a copy for myself.


Saturday, November 25, 2017

The Colorado Quilt at Home in Colorado

The Colorado Quilt has arrived in the high desert of Colorado and now it lives on P & J's bed.


My extremely loquacious brother (sarcasm mine) sent this photo yesterday with the following comment:

"This is one beautiful quilt. Thank you so much."


If you want to make birds like these, you can get my tutorial here, at my Etsy shop. It's an instant download so you can get started right away. I have a tutorial for the butterflies too.

Monday, November 20, 2017

Wrap It Up!

It's time to send the Colorado Quilt to my brother & his wife. If you remember how the box was packed when I received it, you'll understand why I'm wrapping the quilt in one of my flannel shirts. 
.
All buttoned up...
.
 Arms crossed and linked together...
 
 
Now it's wrapped in a plastic bag, which is a requirement for shipping a quilt.
.
I've included a box of Color Catchers, as well as washing instructions and the quilt's appraisal in the box.

If I am really lucky, I'll get a picture of it when it arrives in Colorado, but I'm not holding my breath.


Our family's Thanksgiving dinner went very well. The house is back to normal now and I am looking forward to getting back into the studio to work on the next quilt.

Friday, November 10, 2017

Value


When I studied the Philosophy of Art in college, the professor told us, "If you think artwork A is truly better than artwork B, then you are correct."  Of course it isn't that simple. I know the Colorado quilt is a beautiful quilt. I know it's well made, and well designed, but it's worth... I don't know.


That's why I needed to have the quilt professionally appraised by Gerald Roy, the country's leading quilt expert.

He counted the birds, he measured the size of the barn block. He turned the quilt over and checked out the signature panel on the back.

He loved the quilt, thought the birds were great and the barn was terrific. He thought the quilting was "perfect." Then he gave me the appraisal - much higher than I expected, and the highest of any of my quilts.

OK!

Knowing the quilt's value is nice, but being validated is ever so much better.


Monday, November 6, 2017

Colorado on the Rocks

The Colorado Quilt is finished.

I'll get a few more beauty shots, have it appraised, show it off to my students at QT this coming Saturday, my family at Thanksgiving and then it will fly across the US to the high desert where my brother & sister-in-law live. There the quilt will live a life of a bed quilt.

Sunday, November 5, 2017

Two Feet Left

I spent a lot of Saturday sitting on the couch sewing the binding of the Colorado Quilt.

It's always gratifying to turn the fourth corner.

Should get this done soon!

Saturday, November 4, 2017

The Box and The Shirt


The Box from my brother and sister-in-law, not surprisingly, arrived in a bigger box.


Removing the crushed paper and extra cardboard, I uncovered this. The box was wrapped in one of my brother's old corduroy shirts.

 Really. Notice the buttons on the shirt are all buttoned up!


I actually had to unbutton the shirt to get the box out. I texted my brother "You are too funny by half."

His reply? "You can keep the shirt."

I DON'T THINK SO!

Like I told one of my colleagues later, "I'm going to send the quilt to them wrapped in his shirt."

"Oh no," she replied. "You send it to them wrapped in one of YOUR shirts."

"Oooo... what a good idea!" I told her, "That's EVEN BETTER!!!" (Gee, I hope I have a shirt big enough to wrap around the quilt...)


Oh, you want to see pictures of the box itself? Sorry, gonna have to wait on that. I have some binding to sew.


Friday, November 3, 2017

Why Green?

You're probably wondering... Why did I choose GREEN for the binding of the Colorado Quilt? After all, the background of the quilt is white, and the backing is a light brown with gold.  So why choose a dark binding?


It's a good question, and perfectly valid.

Sometimes the reasoning for things is less visual and more emotional. Such it is with the backing and binding choices for the Colorado Quilt. P & J are very quiet, very reserved, very private people. They live where they live because it is beautiful and they live as one with the landscape that surrounds them. The colors for the backing and binding simply had to be earthy tones.


The fabric for the backing was a beautiful, yet subdued, organic design in earth tones - browns and golds. The flowers were a nod to J's work with flowers, and to the tones of the wood that my brother uses to build his furniture pieces.


Sure I could have used white, but the design needed to be contained somehow. Blue would have been too bright, as were Yellow, Orange, Red, and Purple. Gray would have been too dull and dreary, and the tertiary shades of the so-called "Civil War Prints" would not have worked well either. Plus I hate them. To me they are dull and dead.

Brown would have been OK, but we had brown on the back, and wanted J to be a part of the choice for the binding. Things that grow are green. While the high desert of Colorado is not as lush and green as summer in New Hampshire, my feeling of the area was GREEN, so green it simply had to be.

And yes, the binding is sewn on all four sides and attached to the front with at least six million pins spaced probably about three-quarters of an inch apart. I use a lot of pins. So what?

Wednesday, November 1, 2017

Beginning Binding

Last night I sewed the binding to the Colorado Quilt. You know I sew it to the back of the quilt,

and then fold it over to the front, where I will sew it down with a blindstitch. You can read about how I do it here and here. And if you want to know WHY I sew my binding down on the front of my quilts by hand, (even though that's the way I was taught to do it - make the binding lie flat, make it even and make your stitches invisible) you can read this story that makes me smile to this day, some thirty plus years later.

I find the whole discussion so amusing. All my students freak out when I tell them. Even the vaunted Gerald Roy popped up out of his chair like a jack-in-the-box when I told him I did my binding on the front of my quilts, and that I did it by hand! Later, I asked my pal Julie why he did that?  "Because he missed it," she said. "He's an expert. He's supposed to be able to NOTICE things like that."

Heh!

So anyway, I've got a week's worth of tv watching to do while I sew the binding down on this quilt. I've been planning another scrap slab triangle quilt for when this quilt is finished. I will teach another Barns class at Quilted Threads on January 27th, and another Birds class on February 10. If you want to attend, you better sign up now. Apparently my classes fill up fast, which both surprises and pleases me. 

Tuesday, October 31, 2017

Colorado Quilt, Quilted


That's me (on the right) with Janet Lee Santeusanio of Woodland Manor Quilting, who quilted the Colorado Quilt. It is all hand guided free motion, and she did an outstanding job. Janet Lee brought it to me at Quilted Threads so my students could see it. This photo also shows just how big the quilt is.


.
Here is a closeup of the quilting on the barn block. It's really spectacular. I particularly love the pebble quilting on the ground in front of the barn.

.
Here some of my students check out the signature panel on the back of the quilt.


Here's a detail shot of the quilting. You ought to be able to click on this photo to see a larger detail of the quilting.


I've chosen this warm grunge green as the binding for the Colorado Quilt.


If you would like to make your own free pieced birds, you can get my bird tutorial here. Each bird represents something I saw in Colorado when I visited in June. (Scroll back through my blog to see each one in detail and what inspired it.)  I also have a tutorial to make the free pieced butterflies. I modified the flowers from the Old MacDonald Mystery Sampler Block Lotto and interpreted my brother's post and beam barn in Colorado into fabric using Julie Sefton's Build a Barn book as inspiration. As usual, the quilt is completely original and designed by me, Lynne Tyler, without the use of patterns, templates or paper piecing. There will  NOT be pattern for this quilt available, EVER. I am much more interested that you make your OWN quilts.

It's not that scary! Happy Halloween!

Thursday, October 12, 2017

Colorado Quilt Backing Done


While this may not be the best photo of the finished backing for the Colorado Quilt, this is very accurate in terms of color.  The backing is done and I will bring it to the longarm quilter on Sunday.

The signature block is 21-1/2"  wide by 32" tall. The lower case letters are 3" tall.

The blue straightedge in yesterday's post can be bought at Home Depot, here. Like anything long and straight, you have to be careful not to bend it so it will stay "true." It works for me and I am happy. It's only 20 USD, so it's a heck of a deal. You will want to find a place to store it.

More ruler fun here.

Wednesday, October 11, 2017

Back Back...

It's getting there...

I bet you thought this was going to be easy.

Nope. Although I want the signature panel to be at the lower edge of the quilt, I don't want it to be under the barn block, so I had to do some calculations to work out where to place it on the back.  The hard part is done though. Tomorrow I'll just sew a WOF (width of fabric) piece to either side of this center panel and I will be finished.

I'll be able to show the quilt to my students on Saturday and then I'll bring it to the longarm quilter on Sunday. I am hoping to have it back to show the Barn Building class at QT on the 28th (also full.) Then I'll add the binding (still to be determined), take beauty shots (because my brother sure won't), show it off to my family on Thanksgiving and then mail it to Colorado.

Time to start thinking of the next quilt!


Hey, Sue of the Monarch Quilter's Guild.... email me! The address is in the sidebar!


Tuesday, October 10, 2017

This and That


The signature panel is done. Now "all" I have to do is sew it into the backing. I'll get there. The last few days have been spent doing all the things I avoid doing when I am sewing. I prepared the Birds class I'll be teaching at Quilted Threads on Saturday, Oct 14th (It's full).

I worked out in the garden a bit on Saturday, pulling out weeds and dead plants in the so-called herb garden, and I dumped out some annuals I had in pots. They were past their prime. We haven't had a frost yet, so the perennial garden still looks good, and I won't trim it down until it's all dead.

I cleaned the house, did the laundry, vacuumed every room and washed the kitchen floor. I did the groceries and paid the bills, cleaned the litterbox and Millie's water fountain. I made bread and lunches for the week and had dinner with my dad and saw a movie (Battle of the Sexes, very good).

At any rate I want to have the backing ready so I can bring the quilt to Janet Lee for quilting next Sunday.

And oh yeah, I upgraded my iPhone. Now I have an iPhone 8.

Thursday, October 5, 2017

Options, Options...

I'm almost done the signature panel for the Colorado Quilt.

This one isn't right. The dark numbers make it too visually heavy on the right.

Too top heavy.

This is good. Doesn't take up too much space on the back of the quilt.

This is nice, almost the same as in the first bird quilt, Flight of Fancy, but I don't want it to take up so much space on the back of the quilt.

I have decided on the third one.


If you want to make your own flock of birds, get my tutorial here, on Etsy. It's an instant download, so you can get started right away.

Wednesday, October 4, 2017

Contrary

Last night I made the numbers 2-0-1-7 for the year and then sewed them together, then sewed my surname together. Tonight I'll finish the rest of the name panel, and assemble the backing for the Colorado quilt.

Oh, you are looking at the back of these panels. And yes, the back of every quilt I make looks just like these - neat, threads trimmed, pressed, and flat.


Tuesday, October 3, 2017

Signature Letters


I really want to get the Colorado Quilt quilted, so I am working on the signature panel for the back. I have made the letters of my name, and now I have to make the year - 2017. Then I will trim it all down to size and sew them together into a panel, then I'll assemble the backing.


If you'd like to make your own free pieced birds, click this link to my Etsy shop. The bird tutorial is an instant download so you can get started right away!


Monday, October 2, 2017

Interpretations

 Most free pieced barns are imaginary, or inspired by real barns. Most free pieced barns are not meant to be accurate representations, but when I saw my brother's barn in Colorado, I knew I had to make a free pieced barn based on it. I've been all over the country and never seen a barn like it. I think it's the most beautiful barn I have ever seen.

He designed and built it. It's post and beam construction, and he built it low on purpose, so as not to obstruct the view of the 14,000 foot mountains of Colorado that surround it.


When I make my free pieced barns (or birds, or anything else I make that way) I don't measure with a ruler, I measure by eye. It's a skill I learned while learning how to draw. I know I'm good at it, but sometimes it surprises me. When I put the picture of my free pieced barn next to a picture of my brother's barn, I was amazed I got the scale and general proportions just right. I also didn't want to clutter up the design with the bins and planters, picnic table, furniture, grill or gates. I knew that those elements could clutter up and obscure what I meant to be the central focus - the barn.

I didn't want to make an exact representation, but I wanted my barn to be close enough so you'd know which barn inspired it. As in all such interpretations, decisions have to be made about what to include and what to leave out, and what fabrics to use to suggest the original. Fabric choices were based on what fabrics I had in my stash, and what were available to purchase, so I did the best I could.

I was very happy with the way the barn turned out.

Tuesday, September 26, 2017

The Box


This is the handmade box my brother P is trading me for the Colorado Quilt.


This is the inside. Isn't it lovely? I told you he made it, didn't I?


Here's a detail of the beautiful dovetails in one corner.

I already know where I am going to put it when it arrives. Since the quilt has to be quilted before I send it to Colorado, it will be a while before this makes the trip across the country.

I can be patient.

Update from my brother:
"The box is made with Mahogany, the bottom is California Nutmeg and the lid is Eastern Walnut. All the joinery is cut by hand with a small hand saw and chisel. When possible everything has a hand planed finish. There you have it."