Showing posts with label colorado barn. Show all posts

Saturday, November 25, 2017

The Colorado Quilt at Home in Colorado

The Colorado Quilt has arrived in the high desert of Colorado and now it lives on P & J's bed.


My extremely loquacious brother (sarcasm mine) sent this photo yesterday with the following comment:

"This is one beautiful quilt. Thank you so much."


If you want to make birds like these, you can get my tutorial here, at my Etsy shop. It's an instant download so you can get started right away. I have a tutorial for the butterflies too.

Tuesday, October 31, 2017

Colorado Quilt, Quilted


That's me (on the right) with Janet Lee Santeusanio of Woodland Manor Quilting, who quilted the Colorado Quilt. It is all hand guided free motion, and she did an outstanding job. Janet Lee brought it to me at Quilted Threads so my students could see it. This photo also shows just how big the quilt is.


.
Here is a closeup of the quilting on the barn block. It's really spectacular. I particularly love the pebble quilting on the ground in front of the barn.

.
Here some of my students check out the signature panel on the back of the quilt.


Here's a detail shot of the quilting. You ought to be able to click on this photo to see a larger detail of the quilting.


I've chosen this warm grunge green as the binding for the Colorado Quilt.


If you would like to make your own free pieced birds, you can get my bird tutorial here. Each bird represents something I saw in Colorado when I visited in June. (Scroll back through my blog to see each one in detail and what inspired it.)  I also have a tutorial to make the free pieced butterflies. I modified the flowers from the Old MacDonald Mystery Sampler Block Lotto and interpreted my brother's post and beam barn in Colorado into fabric using Julie Sefton's Build a Barn book as inspiration. As usual, the quilt is completely original and designed by me, Lynne Tyler, without the use of patterns, templates or paper piecing. There will  NOT be pattern for this quilt available, EVER. I am much more interested that you make your OWN quilts.

It's not that scary! Happy Halloween!

Monday, October 2, 2017

Interpretations

 Most free pieced barns are imaginary, or inspired by real barns. Most free pieced barns are not meant to be accurate representations, but when I saw my brother's barn in Colorado, I knew I had to make a free pieced barn based on it. I've been all over the country and never seen a barn like it. I think it's the most beautiful barn I have ever seen.

He designed and built it. It's post and beam construction, and he built it low on purpose, so as not to obstruct the view of the 14,000 foot mountains of Colorado that surround it.


When I make my free pieced barns (or birds, or anything else I make that way) I don't measure with a ruler, I measure by eye. It's a skill I learned while learning how to draw. I know I'm good at it, but sometimes it surprises me. When I put the picture of my free pieced barn next to a picture of my brother's barn, I was amazed I got the scale and general proportions just right. I also didn't want to clutter up the design with the bins and planters, picnic table, furniture, grill or gates. I knew that those elements could clutter up and obscure what I meant to be the central focus - the barn.

I didn't want to make an exact representation, but I wanted my barn to be close enough so you'd know which barn inspired it. As in all such interpretations, decisions have to be made about what to include and what to leave out, and what fabrics to use to suggest the original. Fabric choices were based on what fabrics I had in my stash, and what were available to purchase, so I did the best I could.

I was very happy with the way the barn turned out.

Sunday, September 10, 2017

The Colorado Quilt Flimsy is Complete!

I finished sewing the bird blocks together and finished the Colorado Quilt flimsy.

It's about 78" x 87" or so. I'm really happy the way it turned out.  There are 53 birds, one butterfly, seven flowers and one amazing barn.


I needed one final bird for the Colorado quilt. I wanted a darkish bird, so I looked through my photos until I found just the right one.

I took a picture of this older barn on a day the sky was hazy because of the smoke from a forest fire in Utah.


This is the bird I made based on the dark brown barn.

Thursday, September 7, 2017

All Lined Up!

I wanted to line up all the chicken birds in a row at the very bottom of the Colorado quilt, underneath the big barn block. I made all the chickens with grey legs and red beaks. I wanted there to be a big boss chicken facing the rest of them. "They don't call it the pecking order for nothing," my brother told me when I asked him if there was one chicken who ruled the roost.


Here you can see the row of chickens at the bottom, and the big chicken to the far right.

 Everybody always asks how big the finished bird blocks are, but since the size of the bird can vary, so can the size of the block. Besides, I usually have to add fabric to make the block fit where I want it to go. The more important thing, however, is that the block is SQUARE and the edges are STRAIGHT. This ensures the flimsy lies flat.

When you have a really big block though, it can be tough to get it right.  

As you can see it takes some really big rulers to do this.


Now you know why I always make things BIGGER. (Please notice the long blue straightedge, the long metal triangle and the two plastic 90 degree triangles that help me get this thing SQUARE.)

 When it comes to sewing a seam this long, I use pins, and lots of them. It's too easy for a long edge to get a bit distorted.

 This is what is sewn together.


This is what will go on that top edge of the barn block.

Wednesday, July 19, 2017

To The Ground - the Finished Colorado Barn

I knew I didn't want the ground on the Colorado Barn block to be just one fabric. I wanted, somehow, to indicate the scrubby texture of the ground around the real barn in Colorado.


So here it is, the finished Colorado Barn block. It's 23" tall x 58" wide. I am very happy with it, and so are my brother and SIL.

In case you need a reminder into just how big 23" x 58" really is, here is the block on my design wall. It will be part of quilt I am making for my brother and SIL. It will have birds based on the colors and things I saw when I visited Colorado, and it will have flowers too. This barn will be prominently featured on the front.

For more barn building information, get Julie Sefton's book, Build-a-Barn, here. It's awesome.

The students at this Saturday's Build-a-barn class at Quilted Threads on Saturday will be able to see this block. I can't wait.
 

Tuesday, July 18, 2017

Raising the Roof


This is part of the roof of the Colorado barn. You can see how I've used several fabrics to indicate the variation in values and textures. The real barn has a green metal roof, so I've added a thin bit of green along the top edge to suggest that. You can find out more about how I make my fabric do the "heavy lifting in my Making Your Fabrics Work For You tutorial, in my Etsy shop.

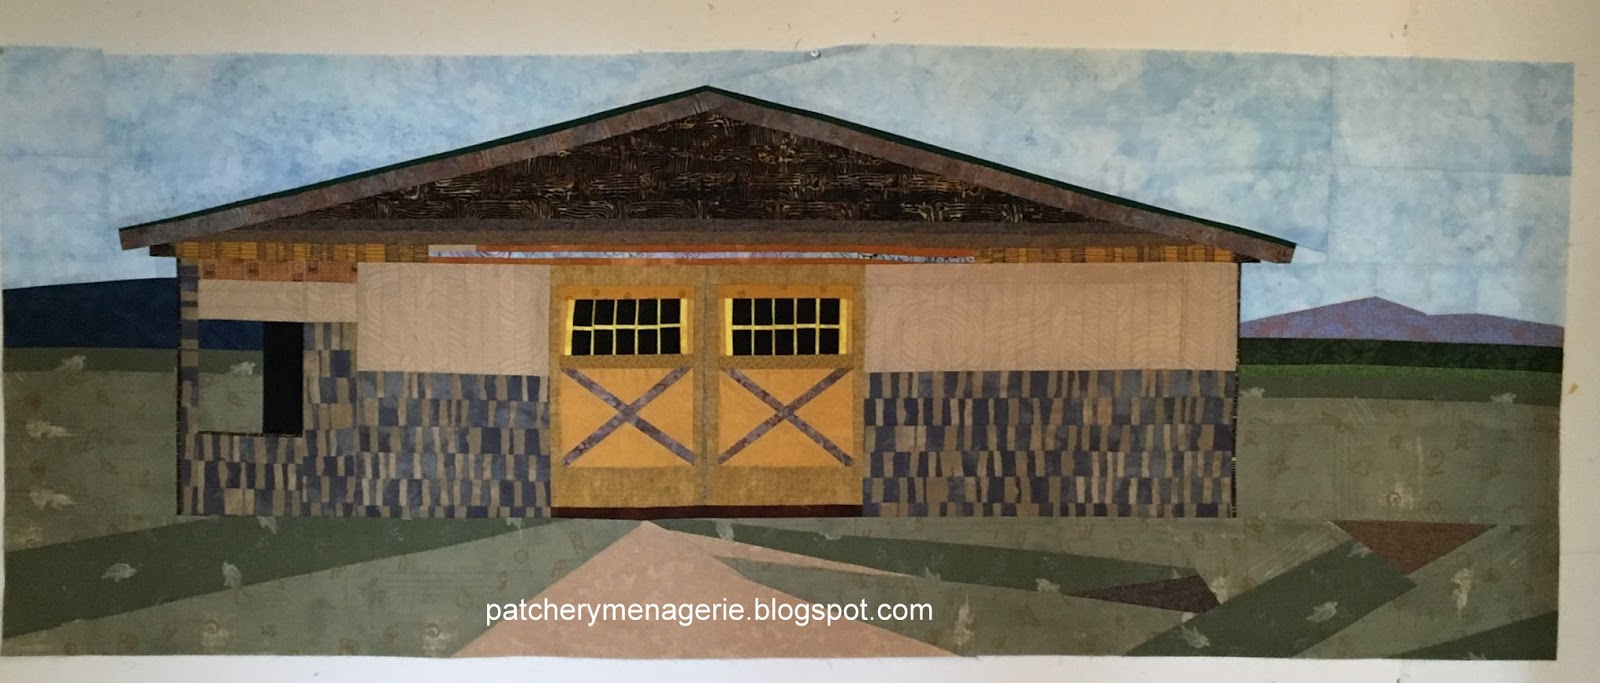
 There are twelve different fabrics in this photo of the barn. See that light cream piece just above the light blue strip, above? That's a boo boo. That whole thin strip of gold, blue, gold, accidentally got sewn upside down. There was a lighter patch of barn that I wanted to highlight - to indicate the real barn wasn't fussy perfect. That it got sewn upside down simply re-iterated that idea, so I left it alone.

That and the fact that I didn't want to rip a 50" seam apart.

In this overexposed photo of the real barn, you can see the shingles under the eaves. I didn't add that horizontal support beam across the front of the roof's extension because I felt it would confusing to the viewer. Knowing which details to include and which to leave out is crucial to the success of a barn block like this one.


 Remember this sucker is over 45" wide. That's a lot of length on the bias.  Once I add the sky fabric to the roof I'll straighten it all out and then sew it to the barn body (after I center it, of course.)

 Here I am adding the sky to the roof. When both pieces are on the bias, I use pins. I use a lot of pins. I add my sky the way I do so the top edge of the block is on the straight of the grain.


Here's a detail of one of the corners of the roof. One of the disadvantages of a very very long straight line on the bias is that it gets stretched out very easily. Since I'd rather my quilts like flat than have a bubble, I had to trim that long edge straight, so accuracy went out the window. (I've been having problems with the tension and the feed dogs on my sewing machine all week, but I wanted to sew so badly, I tried to work around it.) Still, it's a free pieced barn and no measuring was involved, and on the whole it looks awesome, and I'm good with it.

If you want the eaves of your barn to extend wider than the barn itself, you have to do a lot of planning. And if you want something to be underneath those eaves, you have to plan a bit more. This is not difficult, but it does alter the way you THINK things are going to get sewn together. That's the most tricky thing about building a free pieced barn. (Or house or whatever.)

Here's the block with the roof sewn on. on top. Now it's time to set this barn on the ground.

Don't forget to check Julie Sefton's Build-a-Barn blog, and you should definitely get the book.

You can click the photos to supersize and see all the details.


Monday, July 17, 2017

The Body of the Barn

When you build a barn in fabric, you have to divide it into three chunks - body, roof and foreground. If you build it this way, you can easily sew it with straight seams and without sewing into corners.

Yes, this thing is enormous. It's 58" (147cm) wide.

 I'm really happy with a lot of details in this barn. I'm happy with how this window came out. When I first saw the barn, the horse Daisy was looking out this window. Here I have used a dark fabric to indicate the edge of the building, as well as the lower edge of the window. I was unsure about using the black batik to indicate the inside of Daisy's stall, but I went with it because it was the same black I used in the windows of the doors. It "sits" back in the background and allows you to read it as a space back there, and that makes me happy too.

Saturday, July 15, 2017

A Little Background

This is the right side of the Colorado barn. You can see the mountains in the distance. I knew I'd have to include them, but how to do that?

Actually I wasn't worried at all.  Here I've sewn two strips of fabric together - a blueish (actually this is a blue with an orange design printed over it, and a suitably pale blue for the sky.

A little judicious cutting and sewing got me to this.

After adding a few greens to suggest the scrub that covers most of the land surrounding the farm, I have this, and I am happy with it.