This is part of the roof of the Colorado barn. You can see how I've used several fabrics to indicate the variation in values and textures. The real barn has a green metal roof, so I've added a thin bit of green along the top edge to suggest that. You can find out more about how I make my fabric do the "heavy lifting in my Making Your Fabrics Work For You tutorial, in my Etsy shop.
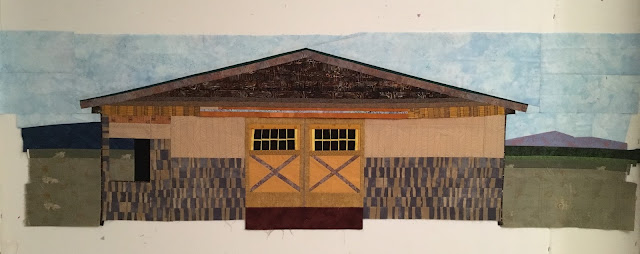
There are twelve different fabrics in this photo of the barn. See that light cream piece just above the light blue strip, above? That's a boo boo. That whole thin strip of gold, blue, gold, accidentally got sewn upside down. There was a lighter patch of barn that I wanted to highlight - to indicate the real barn wasn't fussy perfect. That it got sewn upside down simply re-iterated that idea, so I left it alone.
That and the fact that I didn't want to rip a 50" seam apart.
In this overexposed photo of the real barn, you can see the shingles under the eaves. I didn't add that horizontal support beam across the front of the roof's extension because I felt it would confusing to the viewer. Knowing which details to include and which to leave out is crucial to the success of a barn block like this one.
Remember this sucker is over 45" wide. That's a lot of length on the bias. Once I add the sky fabric to the roof I'll straighten it all out and then sew it to the barn body (after I center it, of course.)
Here I am adding the sky to the roof. When both pieces are on the bias, I use pins. I use a lot of pins. I add my sky the way I do so the top edge of the block is on the straight of the grain.
Here's a detail of one of the corners of the roof. One of the disadvantages of a very very long straight line on the bias is that it gets stretched out very easily. Since I'd rather my quilts like flat than have a bubble, I had to trim that long edge straight, so accuracy went out the window. (I've been having problems with the tension and the feed dogs on my sewing machine all week, but I wanted to sew so badly, I tried to work around it.) Still, it's a free pieced barn and no measuring was involved, and on the whole it looks awesome, and I'm good with it.
If you want the eaves of your barn to extend wider than the barn itself, you have to do a lot of planning. And if you want something to be underneath those eaves, you have to plan a bit more. This is not difficult, but it does alter the way you THINK things are going to get sewn together. That's the most tricky thing about building a free pieced barn. (Or house or whatever.)
Don't forget to check Julie Sefton's Build-a-Barn blog, and you should definitely get the book.
You can click the photos to supersize and see all the details.


4 comments:
You just don't think about the detail and planning to get it right when you see these marvelous projects. Thanks for sharing how you are achieving the details.
xx, Carol
Great post with super photos!!
This is coming along so great! I appreciate your tips!
Yep!
Post a Comment