Showing posts with label Parade of Zebras. Show all posts

Friday, November 1, 2024

The Updated Zebra


I love taking an idea and pushing it around, seeing where I can go with it. 

When I made my son a chessboard out of fabric way back in 2000 (can it really be 24 years ago?) I never expected to make a quilt out of the leftovers, or that I'd be selling a tutorial about making them 20 years later.

At any rate, I have made nine of the so-called "Zebra" quilts, and since I published the tutorial in 2020 I have made three more quilts, which have taught me things I didn't know when I wrote the tutorial.

I have been working on updating the Zebra tute with those things, and have added ten pages of information. I've figured out how to fix a triangle if you have cut the wrong one (there are four different triangles and they aren't easily interchangeable); a more efficient way of cutting them out, and I've included instructions on how to make the Fourth of July quilt.

The new Zebra tutorial is live!


You can get all my tutorials here, at my Etsy shop.


Tuesday, September 8, 2020

Corinne's Zebra Quilt


I am always interested to see quilts made from my tutorials. This Zebra quilt was made by Corinne, who lives in Fairbanks Alaska.

Corinne wrote, "Thanks for the inspiration... I've used several of your ideas to create my own quilts.

"This is a wall hanging for my daughter to hang on her living room wall above her couch. It's about 50 inches by 70 inches. I ended up making my strips 1.5" wide finished... I spent a few days coloring in multiple variations of page 59 from the tutorial and then had discussions with my daughter about what colors she wanted the quilt to be. It was a really fun project to work on and went together so quickly!!

"The tutorial was great. It explained things very well. I've been quilting for a lot of years so usually can figure out the pattern once I see it but [the tutorial] still made things easier for me. I did buy the ruler you recommended and it made life so much easier. I usually make scrap quilts and this quilt ended up with 16 fabrics plus the black but I still like the way it came out. Now to try something more scrappy."

What excited me the most about Corinne's quilt is that she took an idea of mine and made it uniquely her own. If you would like to make a Zebra quilt, you can get my tutorial here, in my Etsy shop.


Monday, August 24, 2020

Tutti Frutti in the Sun

 It's hard to see the true colors of something in a photograph, especially a quilt that's five feet wide and six feet tall from a distance of ten feet away in an enclosed space. If  you take a picture of the same quilt outside in the sun, a lot of the colors are a bit washed out. If you take a picture of the same quilt on a sunny day with the quilt in the shade, the colors will have a bluish cast because of the reflection of the blue of the sky. If you take a picture of a quilt when it is overcast, the colors are much closer to reality.

LAST WEEK, the Firebird quilt was photographed on an overcast day.  

As you can see it was sunny the day I took these pictures of Tutti Frutti. But I needed to show that this is not a dark quilt, that it is bright and fun and cheery.


I live in New England, in the northeastern US. It's very green. It's something that's easy to take for granted. So when I have an opportunity to take a picture of one of my quilts in very green New England, I do it. So yeah, if you visit me, when you are in the driveway and look up, you see this.


Tutti Frutti is a Zebra quilt. If you are interested in making a Zebra quilt, you can get the tutorial here, at my Etsy shop.

Sunday, August 23, 2020

Tutti Frutti is Finished


The Tutti Frutti quilt is finished. I'll take it outside tomorrow and hang it up so you can see the whole thing.


I really like this one. I like the pizzazz.


This is a Zebra quilt. If you would like to make one, you can get my tutorial on my Etsy shop, here.


BTW, the Firebird quilt now lives at my sister's house. (Yes, the same sister who helped me build my ironing table. I only have one sister.) She has a yellow living room and a red sofa, so the quilt is right at home. She loves it. I can't visit her at her house (sigh) so I don't have a picture of it, but I'm working on it!

Wednesday, August 19, 2020

Yellow Ribbons

 I added a border to the Yellow Ribbons quilt. I didn't want one that was too light or too dark. This was just right. Now I will hunt for a backing.


This is a Zebras quilt. If you would like to make one, you can get my tutorial here, at my Etsy shop.

Sunday, August 16, 2020

Firebird Outside


Here is the Firebird quilt, all finished, hanging outside so you can see the real colors. 

It looks good from across the street too.

Tuesday, August 11, 2020

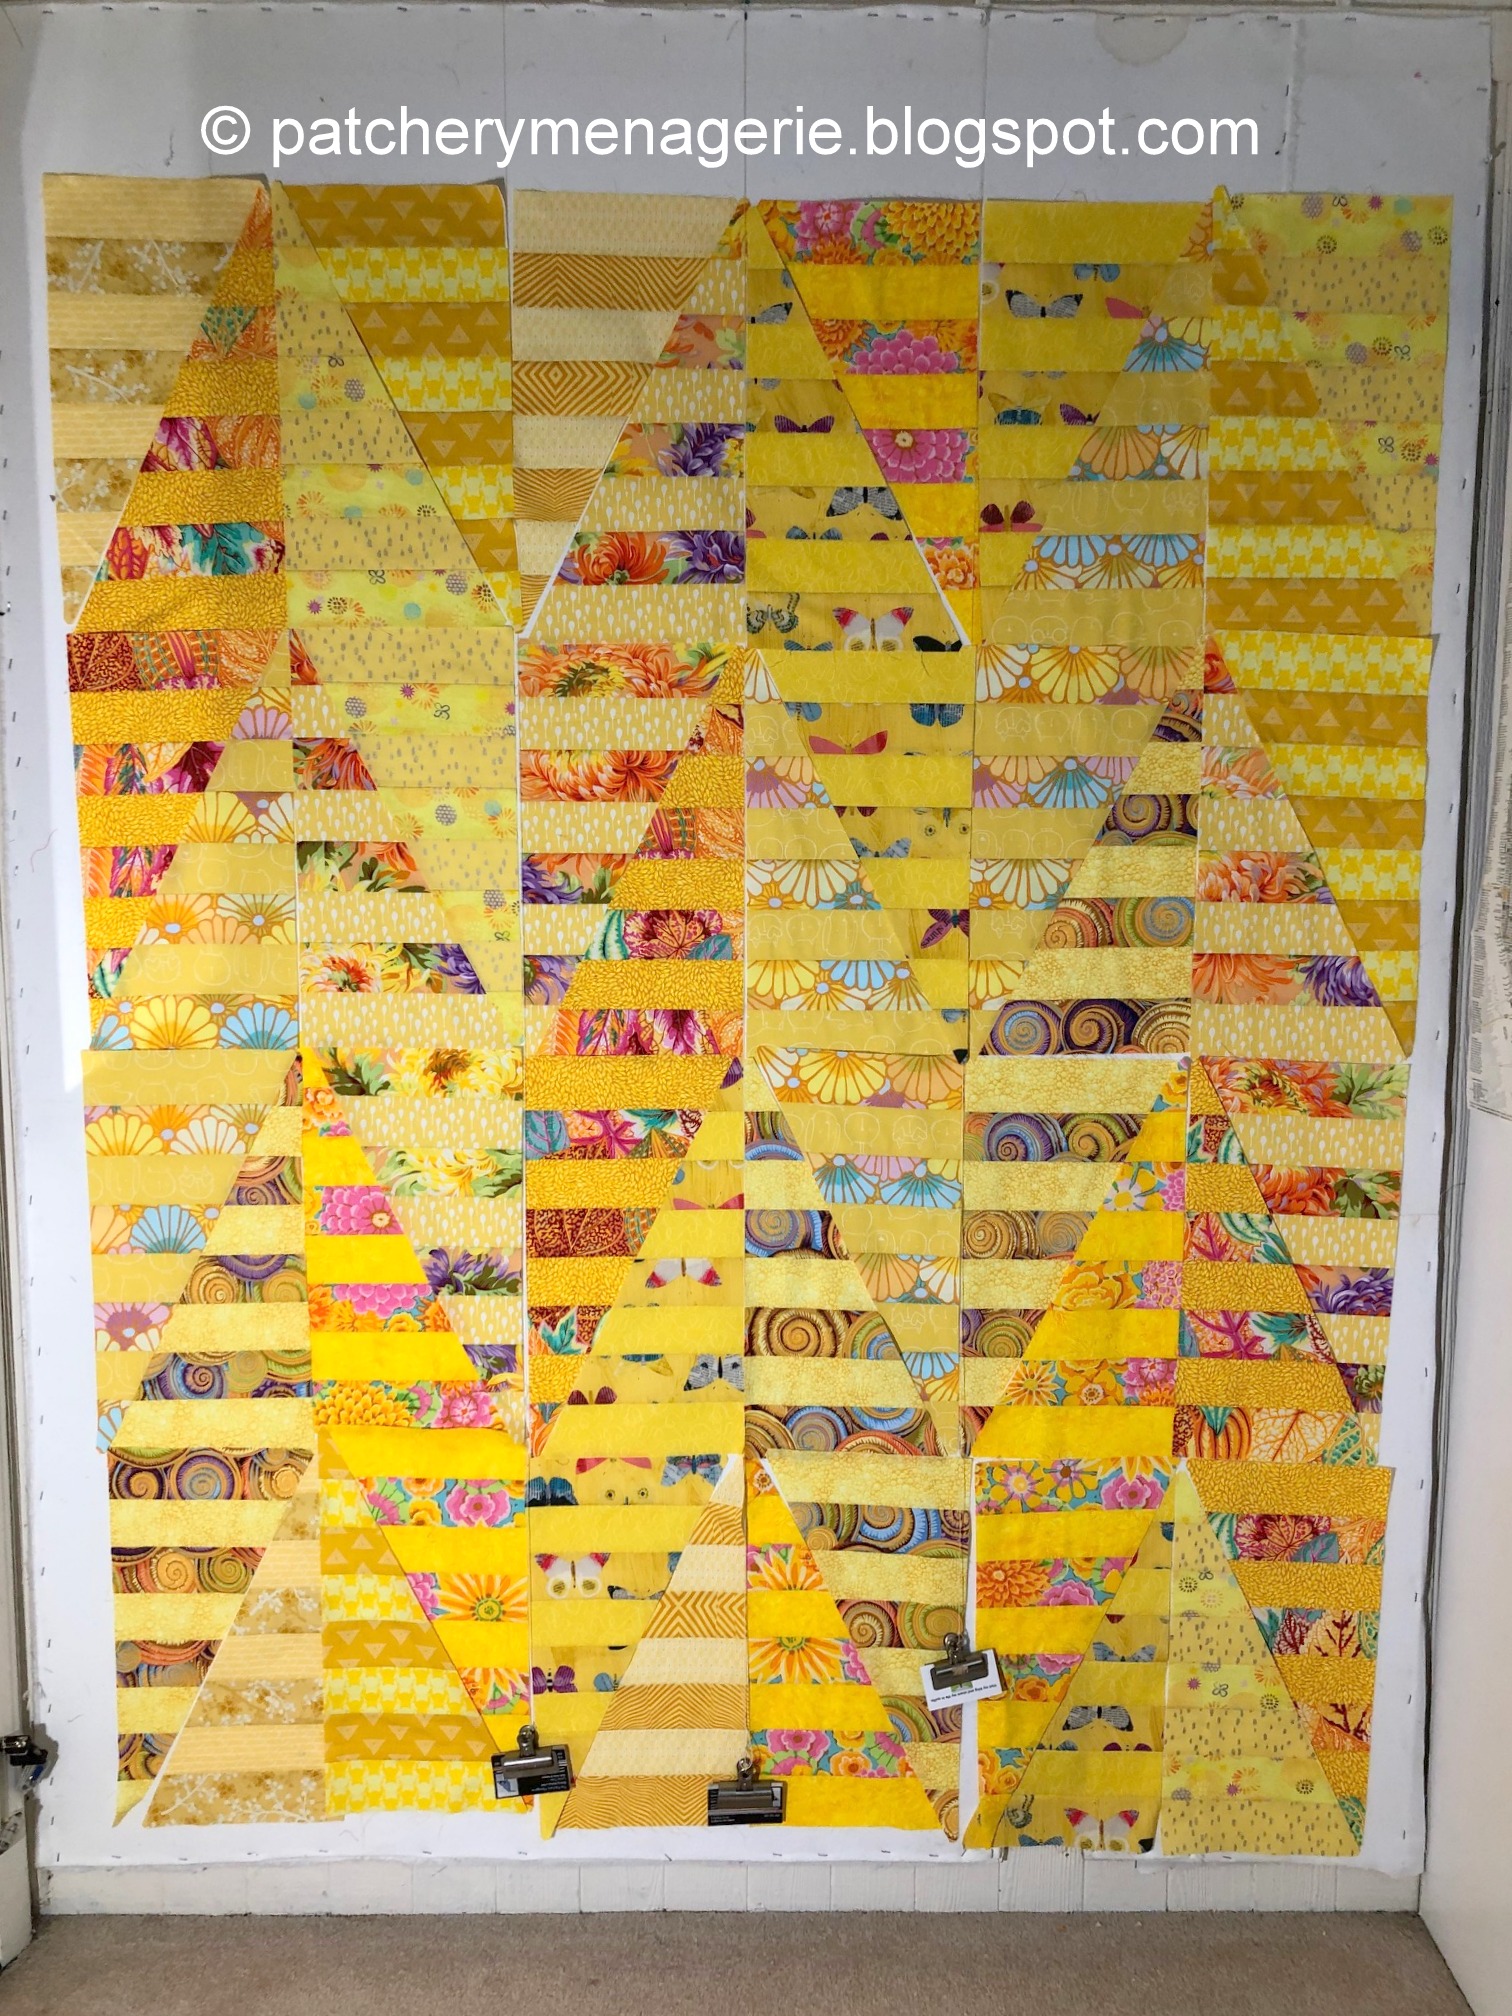
Yellow Ribbons Flimsy Complete

 The Yellow Ribbons flimsy is complete. The picture is a little bit dark, and the quilt is yellower than this. The flimsy is about 55-1/2" by 72"inches. The Zebra quilts tend to need a border, so that is my next trick.

Monday, August 10, 2020

Yellow Ribbons

 As soon as I backed up and looked at this from across the studio, I liked the way the bland blenders made a waving shape up and down the quilt. I immediately wondered if they were getting TOO much attention. Should they be swapped with the big busy prints? Only one way to find out.

Starting at the right I began to shift the triangles. As soon as I had done two columns I knew this was better and that it was a layout I would sew together.

But OOPS, I saw a mistake (again!)

This is almost it. The layout is all set, but I am a bit concerned about the light streak in the middle and the slightly too heavy right side. But this is 95% there. I wasn't sure I'd EVER like these fabrics all together, but now I do.


THIS IS IT! And it has a name. Yellow Ribbons.


THIS, believe it or not, is a Zebras quilt. If you would like to make your own Zebra quilt, you can get my tutorial here, at my Etsy shop.


Sunday, August 9, 2020

Break It! Break It Good!

 It is said that before you can get out of a rut you have to know you're in one. When the wind blew the blocks off my design wall it was as if Fate was sending me a sign. MOVE ALONG. But where?

I sat at my sewing table, looking back at the mess on the design wall. I shifted in my seat, knocking something to the floor. I bent down and picked up this page. It's a page of triangles from the Zebra tutorial, designed to be cut out so students could design their own arrangements. I looked at it and saw six distinct vertical columns. Maybe I should arrange my big prints in half diamonds facing in one direction and the blander ones facing in the other...

I got up and took all the blocks off the wall and stared to lay out the big colored triangles. but then I remembered this, from the Parade of Zebras quilt, where, if placed correctly, a series of four big triangles could suggest a curve.

So I arranged my big prints

and used the bland blenders to fill in around them. As soon as I did I knew I had an arrangement I liked. I rearranged the blenders a bit to get the best effect.

This wasn't quite IT, but I liked it A LOT better than anything else I had tried. I stepped back and realized I had made a mistake.

The big triangles with the big prints weren't directly above and beneath each other, as they needed to be to make that S shape I wanted, so I fixed them. I really liked this, but it was late, and I was tired. Something was jiggling in my head, but I knew if I didn't get to bed I'd stay up another hour or two.

Sleep matters, so I went to bed. I knew what I would do next, and I could wait.


Saturday, August 8, 2020

Slogging Away

There's an old saying, "You have to kiss a lot of frogs before you find a prince."

I discovered a few fabrics that just didn't fit. They were too brown or too orange or too pale.  Ok, no problem. Those went.
 
I was not happy with this. I worked all day long and just couldn't get it to come together.
It wasn't like I didn't know where I was going. I had a plan. (Thank you Cathy, for making me make outlines to draw on for the Zebra Tutorial.)

I kept at it. Finally, after almost 12 hours, I surrendered and went to bed.

The next morning I bowed to the inevitable, and admitted my previous plan just wasn't working. I began to arrange the blocks in the Golden Zebra layout.

But that didn't thrill me either. It wasn't even OK. I didn't even LIKE it!

But me being me, I persisted.

And persisted.

And persisted. Finally I just walked out of the studio and ignored it for a couple of days.

When the big storm Isaias (?) blew through, the winds knocked some of the blocks off the wall.

I left them there.

Good riddance, I thought. It's BROKEN! HAHAHA! Let it stay broken.

Then I remembered that sometimes you have to BREAK something in order to FIX it. Break it again, and break it good.

As usual, when I get stuck, I walk away. I spent the rest of the evening on the couch reading. I could fix it TOMORROW.


And I did.


Friday, August 7, 2020

It's A Start

 Anybody who tells you that sitting down to sew 112 strips together into 8 strip panels is easy has rocks in their head.

It's a lot of hard work. But when all my strip sets were sewn together I could cut them into big triangle and place them on the design wall. That's the fun part.

I was pretty happy with the fabrics too. This is a Zebra quilt variation. If you are interested in making your own Zebra Quilt, you can get the tutorial here, in my Etsy shop.

 
As usual I went around in circles for a bit. (Dammit I hate the new blogger. I want my pictures centered and the text left justified. I think text that is centered looks amateurish and cutesy. I hate loathe and despise "cute.")


After a whole day's work I had this and I was not thrilled. Oh well, such is life. Fortunately stuff like this, while it may piss me off, doesn't stress me out.


Monday, August 3, 2020

Sewing Strips


Last week was, shall we say, a very interesting week on this blog. I want to thank all my regular readers for their support, and new ones for visiting.

I have been working on a yellow-ish quilt and have a lot to tell about it, but for today, this photo of pairs of strips sewn together is going to have to do. I am making another Zebra quilt.

Sunday, June 7, 2020

Wednesday, May 27, 2020

Zebra Tutorial Progresses

The Zebra tutorial is humming right along. I've already received terrific feedback from some of my beta testers and I have modified the tutorial accordingly. It covers everything from fabric selection, to design variations, hints on sewing, and all kinds of other stuff my head is full of right now. There's even a gentle rant on so-called perfection and how I keep my design straight when I am tinkering on the design wall.

As usual I tell you why I do everything.

There are pages that describe how to make the Zebra quilts that I designed, and there's even a page that tells you how you can design your own variation.


If I had to guess I would say it will be out by the end of June. Maybe sooner. It depends on how much sleep I plan to get between now and then. I still have lots of work to do. (Making sure the elements are centered on the page; making sure the footer is consistent; the formatting of the fractions is consistent; the headers are correct; the grammar and spelling is OK; the page numbers that refer to other pages in the tute are correct; the spacing between words and sentences is consistent and proper...  You know, the kind of stuff you NOTICE if it's done wrong.

Monday, May 18, 2020

The Six

I wanted to see the Zebra quilts all lined up, but I don't own them all. So I did my best in making a virtual show.


Top row, from left: Parade of Zebras; Golden Zebras; Tutti Frutti. All these are made from the same layout.

Second row, from left: Jealousy, Aquamarine, Firebird. The first two are made with the same layout. The Firebird quilt is a slight variation.

It's interesting to see them all together.

Friday, May 15, 2020

Make it Yours

I got up yesterday morning, very excited about playing with this. I moved a few things around. I did not like the bland blenderinsh light blues in the blue diamonds on either side of the center one.

I really liked the center diamond, and it is BUSY, so I decided to make the other two blue diamonds busy too. I cut strips of these fabrics...

So here are the big diamonds. Now I have to shuffle around the lights.

Some of the light creamy fabrics were just too bland and too light. They looked like holes.

So I had to replace them. That means I made new ones.

So this is the almost final version, and I am pretty happy with it. The middle section is all sewn up, otherwise I would swap one of the white lozenges with another one. I have to decide how important it is to do that. Ripping out a long bias edge doesn't always end well. But you know me. If it annoys me, it's got to go. And if it annoys me now and I leave it in, I'm going to be even more annoyed with it every time I look at it in the future. (And, by the way, that is how you know something has to change. If it fits that definition, fix it.)


Wanda (you know, the closest thing we have to a Quilt Goddess), pointed out that my original layout was striking, and the changes I made were all about what was singing for me in my own head. She's spot on right. Very often, there are no bad options, and many good ones. There is never only ONE way to do it. Like I tell every single class I teach, and every single group I speak to, "Don't copy my quilts. MAKE YOUR OWN."


Saturday, May 2, 2020

Size Matters


See this chessboard? It is one of the forty I made about eighteen years ago after my son learned chess at college, came home one weekend and asked if I could make him a chessboard. (Well, duh!)

My son took photos of me making the very first one and the photo I use in my blog's header, above.


Pretty sure I've told this story before. I made one, thought it was okay, then made another and improved on the first. Made a third that was much improved, made another one because I wanted one for myself in pretty colors and then had so much fun with them I kept going. (I called them "a symphony in four fabrics.")


Somebody asked a good question the other day, if I would change the quantity of the stripes in these big blocks. Answer = No.

I am sure you are wondering WHY. The size of the rows of this block (2-1/4") is for a very specific reason. When I made the first chessboard for my son, I did a bit of research. It turns out the size of the squares on a chessboard is directly related to the size of the chess pieces. (You can look it up.) 2-1/4" squares were most common. So I made the chessboards with 2-1/4" squares.

 And when I made the chessboard quilt, I used the leftover strip sets. I didn't get all worked up about how I put the blocks together (it was a SCRAP quilt).

I didn't get all worked up about how the blocks went together either. Then as now, I sewed about a third of my triangles into blocks, played with them on the floor, and then cut and sewed blocks I'd need to fit any space I had (a left leaning block with a dark stripe on the bottom).

I didn't get very worked up about how the blocks worked together, and if I had stripes that went across several triangles, that was fine by me. This quilt is big, about 76" x 94" and it is long gone. It is also tied and not quilted, but it lives in the southern US so it's perfect.

I always liked the quilt's inherent rhythm, the size of the blocks and the strips across, so when I resurrected this idea seventeen years later, I kept those basic "design bones."


And yes, I am working on the tutorial for these "Zebra" quilts. It's taking longer than I expected, but then, the world has thrown us all for a hell of a loop.