Showing posts with label Black and White. Show all posts

Tuesday, August 23, 2022

Black Abacus


I named the quilt. It is called "Black Abacus" and that's me with it, above. I was trying to get a crumpled picture for Julie because she thinks quilts show off best when they are crumpled. I am not totally convinced, but she's right far more than she is wrong, and she's my best bud, so she can have this point.

I ordered the backing for this quilt before started sewing it together, which is always dangerous (for me, anyway) but it looks OK, so I'm sticking with it.

I don't usually brag, but here is where I make an exception. This is the wrong side of one corner of the Black Abacus flimsy.

And yes, the whole quilt looks like this. Threads trimmed, all seams pressed flat.

When you trim your threads, press your seams and square your blocks before you sew them together, then you get this, a quilt that lies flat as a pancake. No wrinkles, no ripples.

Your long arm quilter will love you.

And you (and I) deserve bragging rights.


MY NEXT PROJECT...

Will involve words, and writing. (And probably lots of cursing on my part). I am going to rewrite my Making Your Fabric Work For You tutorial. I have a lot I want to say, and I'm not sure about anything  yet, except that I want to expand on my belief that the success or failure of any quilt depends (all other things being equal) on the fabric selection. I believe that the answers are in the fabrics. I just happen to think some of you aren't listening to what your fabrics are saying. So I guess I am going to (try) to tell you how to figure that out.

And I'm gonna finish the student birds quilts. 

Monday, August 22, 2022

Finito!


I added a narrow border around the edges of the quilt. I used eight of the light fabrics that were already in the quilt. I arranged them quiet, busy, quiet, busy... I added strips 1-1/2" wide and I joined them at a 45 degree angle.

I needed eight and a half WOF strips of the dark fabrics for the border. This was a bit harder because the black fabrics were all scraps from my stash and I didn't have yardage of most of them. If you look at these strips, one of them doesn't fit - the one with the glasses and olives with the straight white lines - so I didn't use it. The same rule applied here - the dark fabrics had to be used in the quilt. 


I cut these strips 2-1/2" wide by about about 18-20: long, sewed them into one strip by joining the strips at a 45 degree angle, and then sewed them to the quilt.

So here it is - all finished. The quilt measures about 65" x 78" or so. I left this picture enormous so you can click it and then click it again, so you can really see the fabrics working together here.


This is a scrap slab triangle quilt. If you want to make one you can get my tutorial here, at my Etsy shop. 


PS, the quilt needs a name. Suggestions welcome.


Saturday, August 20, 2022

Almost...


I have sewn the last quarter of the quilts together, and then sewed the bottom two quarters together so now all I need is to sew the two halves together and the flimsy will be complete.

Almost.

I think I want this quilt to have a dark border, and I like it, but it will need a smaller light border first so the triangles on the edge of the quilt at the top and bottom don't look like they are stuck to that border.

The borders won't be as you see them now. As usual, I will cut the dark fabrics into strips about 20" or so long, and arrange them randomly. I'll do the same for the lighter border in between.

I already have the backing fabric for this, so I will leave it for quilting with Janet-Lee Santeusanio when I visit her at the end of this month.


I'm re-reading The Emerald Mile. I'm finding it every bit as thrilling the second time around as it was the first.


Tuesday, August 9, 2022

Half


I sewed up the second quarter of the black and white scrap slab triangle quilt. Although when I add the side white triangles I press them to the side, when I sew the blocks and rows I have been pressing the seams open.


 Here's the top half of the quilt. I am enjoying being back in the studio.


Sunday, August 7, 2022

A Quarter


Here is the top left quarter of the quilt, all sewn together.

Here is the finished quarter next to the rest of it. I like this a lot.


This is a scrap slab triangle quilt. You can get my tutorial here, at my Etsy shop,

Friday, August 5, 2022

Twenty


I've started sewing the black and white scrap slabs quilt together. Since none of the blocks are sewn together, I start by sewing one white side triangle to a black triangle. I keep the blocks in order while I sew and then press. Then I sew the second side triangle, and then sew the blocks together. 

I started at the top, and since each row is so wide I'd have to move the step ladder back and forth, I decided to sew half a row at a time. This is a completed row, above. I counted all the different fabrics in one of these five block rows (actually when they get to be multi block size, I call them "panels.") and there were 28 different fabrics. I can't even imagine how many different fabrics will be in the whole quilt. But hey, it's a scrap quilt!

Here are the first four rows of five blocks across. The blocks are sewn to each other, but only the two two rows are sewn together.

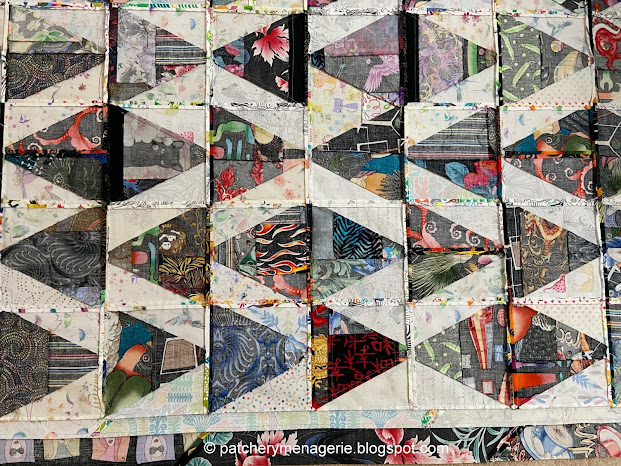
I am really happy with the way it is turning out. One of the things I wanted was to make the individual block shapes disappear. I'm doing that by placing similar light fabrics next to each other so they almost appear the same, which blurs the edges of the individual blocks. I also throw in a curve ball or two (as usual). In this example it is the white triangle in the bottom row. Instead of two side triangles, this is a full triangle.

This is one energetic quilt (some would call it "busy") but that is what I think is exciting about it. It's got a lot of color, and it's happy.

Works for me!


This is a scrap slab triangle quilt. It's built from scraps. I think it's wicked easy to do, but every time I say that my son rolls his eyes. "BUT MOM...." he says, "you're so good that everything IS easy for you." In this case, he's wrong. This is an easy quilt. You have to pay attention to cutting your blocks and sewing your seams, but hey, what else is new? At any rate, if you want to make a scrap slab triangle quilt you can get my tutorial here, at my Etsy shop. You'll need the Tri-Recs ruler set, which you can get at any LQS or Amazon. And scraps. You'll need those, but I'm guessing you do.  Enjoy.


Wednesday, August 3, 2022

Black & White & Tribal


I've been spending time with the black and white scrap slab triangles quilt in the studio. I'm pretty happy with most of it. As you can see I have to fill in at the bottom. But the top part is mostly done and I will in all likelihood sew it together as it is. Hopefully that will start happening this weekend.

I've left this photo pretty big so you can click and click again to enlarge it so you can see all the fabrics that are in it.

This is a scrap slab triangle quilt, and you can get my tutorial here, at my Etsy shop. It's a heck of a flexible design. There are lots of different things you can do with it, and it's great for using up scraps.


For whoever asked the other day, the wallpaper for the kitchen came from Home Depot, and yes, it is peel and stick.

Wednesday, June 22, 2022

A Start


Much as I like the quilts I make, I try not to do the same thing twice. I really, really, really love the All Together Now quilt, and although I want to repeat the black and white thing, I don't want it to look like that quilt.

I knew I wanted the triangles to be arranged in horizontal rows like this, with the flat base of the triangles at the bottom. Now, you can't do anything really creative until you START, and since this quilt will be twelve rows of ten blocks, I have to put all the blocks on the design wall before I can figure out what's going on, so at this point I was just putting them up on the wall, trying to keep blocks with the same prints away from each other. But DAMN, this was boring.

So I flipped a couple of blocks. Already this was better.

So as I added blocks, I flipped them now and again.

I really like this so far, but I have to keep adding blocks before I really know what this quilt is going to do. This is my favorite part of making a quilt. Actually that's not true. All parts of making a quilt are my favorites.

So this is where I was when I had to go to bed last night. I shall continue later.

This is a Scrap Slab Triangle Quilt. It's pretty simple to make, and has so many design possibilities. (I should know, I've made eight, all different.) You start with your scraps. You can get my tutorial here, at my Etsy shop. You'll need the Tri-Recs ruler set.


Wednesday, March 23, 2022

Black & White

I keep telling people that I love the combination of Black & White, and that I love checkerboards. For example, did you know that every cat I have ever had has been black and white? (This photo of Millie was taken back in 2009.) But I digress...

You should go back and read this post about the bathrooms in my house from last Christmas. In that post I showed you the tiny shower in my main bathroom. It and the toilet live in a small L shaped room. One leg of the room is the shower and the toilet, and the other is a sort of closet of shelves that hides behind the bathroom door.

So now that you have "the lay of the land" as they say, this is what you see when you enter that little room. The shower is on the left, the toilet is on the right. This is the curtain I made. Look closely.

Yes, these are black and white bras and panties. What else is more perfect for a lady's bathroom?

This is an African mask I bought at Pier One a million years ago. I got it for my son's room back when he was in his last year of high school. He went to work with my brother in Colorado for the summer and asked me to spruce up his room when I was gone. So I did. When he moved out, he left the mask. Thank you son. Now it hangs in my bathroom.

You've seen this before. It's Seminole Patchwork and for the life of me I don't understand why it isn't more popular than it is because I think it is absolutely spectacular. Then again we all know I love the graphic (abstract) quality of quilts. The black and white are solids and the turquoise is like a batik. The color combination was inspired by the colors Danika Patrick wore one Indianapolis 500 race way back when. There are some very good books on Seminole Patchwork out there (I know, I own most of them), but they are likely out of print. Still you ought to be able to Google something if you want to know more.

This is a woodcut by Barry Moser. Go ahead, look him up. He's awesome and his work is fabulous. You can see more images here. This print is the Mad Hatter from his illustrated version of Alice.

I was cleaning out my closet to get to the Fontaine Sisters when I found the print. I had forgotten I owned the books. 


I thought the Mad Hatter's delightfully horrified expression would be perfect for the bathroom wall. I'd have placed him directly ABOVE the toilet if the quilt fit on the wall on the right, because I thought it would be hilarious to have him looking down at a man urinating in the toilet, except that there are no men living in this house and male visitors tend to use the guest bathroom. And besides, there is a nice symmetry to having the quilt in the middle.

I do plan to revamp this bathroom, but with the spa tub taking up so much space, and the skylight directly above it, I have some major rearranging and work, to do it. Since I am a big believer of not getting started until you know where you are going, this bathroom will wait. I will, however, be giving the guest bathroom a total revamp that should be done by summer. Part of that was replacing the toilets in both bathrooms. 

Honestly, never in a thousand years did I expect a post about TOILETS would generate more comments than a post about a quilt, but there you go. Proves once again the world is indeed a funny place.


I'll show you something EVEN MORE SPECTACULAR that I found that I didn't even know I had later.

Wednesday, March 31, 2021

Black is Best!


I just love black-and-white. (Did you know every cat I have ever owned has been black and white?)

I wrote the other day that a white binding would have worked, but I was wrong. A white binding would have let the design flow right out. Those black triangles would have just been floating away. The black binding contains the design and because it is the same black-and-colors as the black triangles, that idea is repeated and carries all around the quilt.

Love, love, love this!


The Waltzing Matilda quilt has been delivered to Megan and she promises a full report shortly - she's had a couple of those workdays-from-hell-on-steroids and she needs to get all that stuff settled first. We all know what those are like. She did tell me that the quilt was "a delightful pick me up" and that it had been "cuddled and admired," which is good enough to hold me until she's ready.

Tuesday, January 29, 2019

Design - A - Bird

Students always ask me how long it takes me to make a bird. If I have the fabrics already chosen, it hardly takes any time at all, but if I am trying to make something special, it takes a lot longer!

I love "black-and-white." It's probably my favorite color combination. Every cat I have ever owned has been black and white. I wanted to make a black and white cat bird using all black and white cat fabrics, but when I gathered them together, they didn't seem to sing well together. I also love checkerboards, and I have several black and white checkerboard fabrics in different sizes. They didn't seem to work well together either.

It's important to know when things aren't working, and to try not to force it.

I liked this swirly black and white fabric, as well as the op art stripe for the legs. The little black cats  on the white fabric were fun, but in order for it to work, I had to use a background that was not white.

But then I second-guessed myself, so I tried the black and white check.  Nope. It's much easier to put things down to see what it looks like before you start sewing.

I then added a little cat fabric for the beak. I like those fabrics and this combination.

I started sewing components together.

Here's the finished black and white bird. I love the sneaky cat expression of the cat on the beak.


You can get my tutorial at my Etsy shop, here, if you want to make your own birds. It's an instant download, so you can get started right away.


Wednesday, December 26, 2018

Replenishing the Blacks on White

From time to time it's necessary to do some stash replenishment. I felt the need for more black on white fabrics for my scrap slab triangle quilts.

I bought sixteen fabrics. All of these were half yard cuts except for one. As you can see I shopped for a variety of pattern, scale, pattern density and design.

I really liked the scale of the print on the left, and I deliberately chose the paintbrushes with their pops of color on the right.

I also liked the little bits of color in this science based print.

I bought a full yard of this jungle print.

These llamas struck me as delightful. In all likelihood they will not be used in the scrap slab triangle quilts, but you never know!


Saturday, September 1, 2018

The Tank, Day One

Never in a thousand years would I have expected a post about painting my oil tank to generate such interest!


I had two concerns. The tank is 9-1/2" away from the house. Not enough space to squeeze into, and there's an old plastic storage shed on the other side, making access from that side difficult as well. The other was a label on one side of the tank. Closer inspection of the label solved that problem. "Do not paint over this label." OK!


The weather report told me that Friday would be a good day to paint. The weather would be a lot cooler and drier. The rest I knew from studying Oil Painting in college, and working at hardware stores during those years. I'd already prepared the surface by brushing off any debris and cleaning the tank.


As soon as I painted the first stroke, I knew two things. One, the paint was nice and I was going to enjoy working with it. The second, I love painting. There's something about pushing paint around with a brush that I find incredibly soothing. Not for nothing did I focus on Oil Painting in college.


Painting the side of the tank against the house was tricky. I used a roller and a long handle. I did brush up against the tank and got white paint on my upper arms a couple of times, but at least I didn't get paint on my house.  For the bottom of the tank, there was nothing I else could do but lie on the ground and use the roller. I had made sure to spray myself with insect repellent before I got started.

To my everlasting delight, the job took one hour. I cleaned tools and put everything away. The paint needs 24 hours to dry completely, so I'll do the second coat tomorrow, and the fancy design stuff the day after that.

This was taken a few hours later when the afternoon sun hit the tank. Yes, it is white!


And about that fancy design stuff - I really haven't decided what to do. Zebra stripes would be fun, just as a bar code design of varying vertical stripes would be too. One thing I do know is that I don't want to get overly complicated. For this, I think less is definitely better.


Friday, August 31, 2018

The Tank

THIS is the oil tank behind my house. The one I have to paint. For your reference, the window on the far right is the window at the end of my sewing studio.

My Dad had laughingly suggested pink, like my doors. I figured I'd get busted for that as the neighborhood organization is decidedly conservative and not particularly creative. Dark brown - the color of the trim - would read as a dark blob, but I wasn't sure I had many other options.


But I thought I could do something soothing, like these colors, the soft blue, green and yellow. I'dve arranged them like this: light blue, green, yellow, green, light blue in vertical stripes. It would have been very pretty and soothing.

Alas, painting a metal tank has some limitations. If I want the paint to stick, the paint guy suggested Rustoleum, which has a very limited selection of colors, at least in the gallon size which I would need to cover my tank. So I surrendered, and chose "Brown Leather." I bought the paint, the brushes, the roller and tray, and paint thinner, because Rustoleum is an oil based paint.

So I had just checked out at the big box hardware store, and while I was waiting for my Dad who was using the restroom, I checked out my blog.

Julie suggested Black and White. Oh holy hell! How come I didn't think of that? Then Ducky suggested a geometric design. DOUBLE holy hell!!!

HOWEVER.... Black and White are colors I CAN get in Rustoleum, so I will return the brown for WHITE!  Until I work out a design I can give the thing a basic coat of white.

Then I did what any good painter does. I prepared the surface. I washed the tank. After that I was chatting with Julie because I thought her black and white idea was totally kick ass. But I didn't really want to exert a lot of energy or effort.


"...just go look at your stash" Julie suggested.

Oh. Well, I have this (above).

I also have THIS, which could be a lot of fun because it is pretty much free hand, and kinda silly.

which reminds me.

See that little window above the tank? It's my bathroom, and HERE is the curtain in that window.

Yes. Black and White. Bras and Panties.


No, don't go there. I will NOT be painting my oil tank with bras and panties.