Showing posts with label triangles. Show all posts

Wednesday, February 5, 2025

So How Did I...?


You're probably wondering how did I cut down the long triangles from the template (on the right) to the smaller size on the right. I mean, I'm sure you know how I did it, but let me tell you how I did it EFFICIENTLY. 

Because we all know I don't mind working hard, I just don't like working STUPID.

For this design I'd need over 250 left leaning right triangles. And they had to lean in the correct direction or I couldn't use them. I knew I sure as hell wasn't going to cut them one at a time.

I wanted to cut my traingles 8-1/2" tall, so putting a piece of painter's tape near that line would help me, but I'd need more than that.

I figured I could get two triangles out of a rectangle of fabric, but how big would the rectangle be? 8-1/2" was one dimension, but I needed the other, so I placed two properly cut triangles on my worktable and measured. It was somewhere between 5 inches and 5-1/4 inches. That was good enough for me. So I cut my WOF strips 5-1/4" wide.


Then I taped a 6" ruler to a 2-1/2" one and subcut my strips into two 5-1/4" x 8-1/2" pieces. This meant I had FOUR of each (because WOF = two layers of fabric.)

Next I flipped one piece over so both rectangles were wrong side up. I aligned the edges so one rectangle was perfectly sitting atop the other.


Next I lined up the top and left edges of the fabric with the top edge on the ruler and the 8-1/2" line, which I marked with the blue painter's tape so there would be no confusion. I cut along the long edge of the triangle, pulled the other pieces of fabric out of the way slightly and trimmed the corners.


Then I rotated the ruler, matched up the edges and cut the next piece.

Worked like a charm.

After that all I had to do was sew them up.

You know, "all."


***Now, I because I wanted my triangles leaning to the left, and because I wanted the template to face UP (I find templates slipperier if you turn them upside down), I had to cut my fabric from the wrong side. If I had wanted them facing the other direction, I would have arranged the fabrics right side up.

Thursday, March 25, 2021

More, more, more!


The process of slicing four piece strips from the leftover triangles is in progress.

Lots and lots...

This is fun.
 

The design wall is filling up, and I still have lots more triangles to slice up.


Wednesday, November 29, 2017

Stack 'em Up

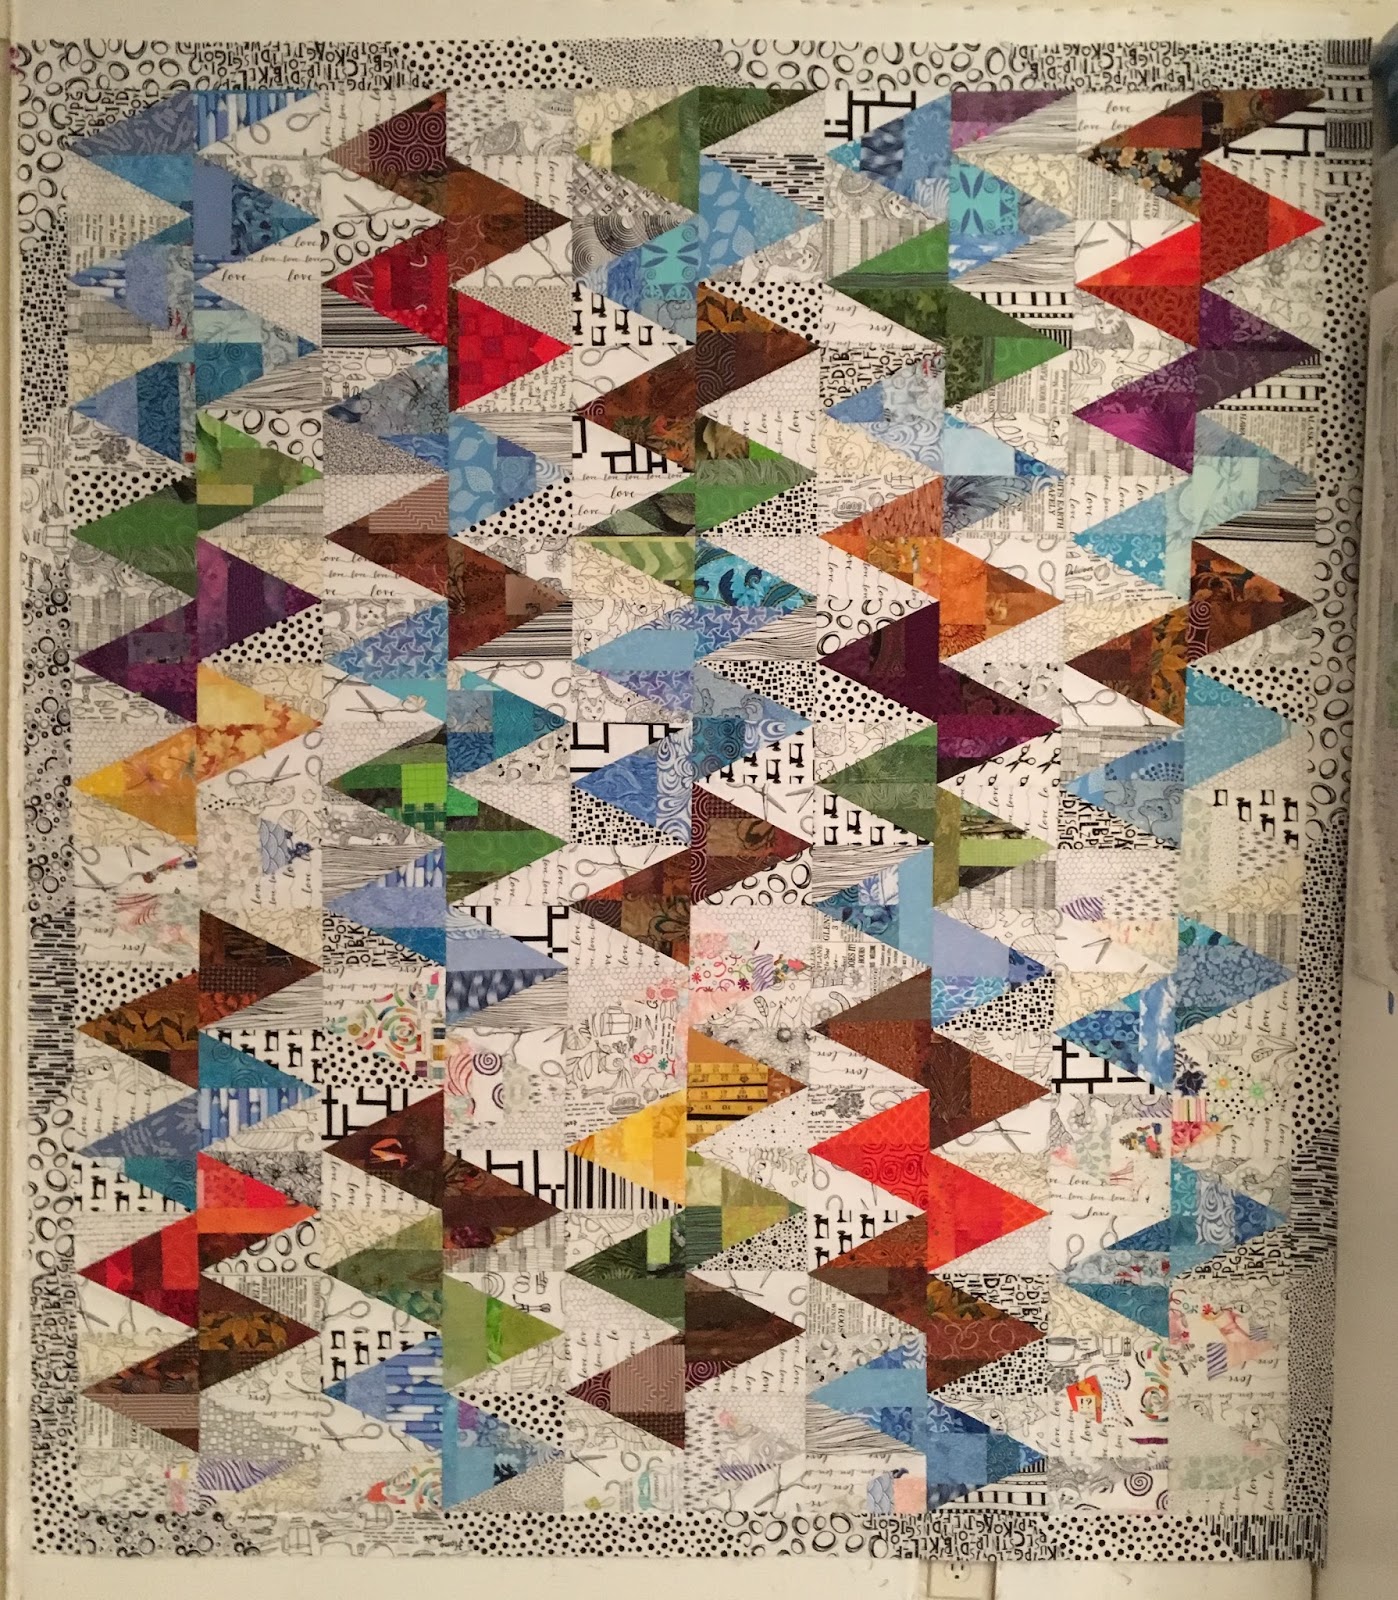
This is the final layout for the Toy Quilt. Well, it's final as for the colored triangles. The black on white side triangles are good for now, but they might change as I sew them up and find combinations I don't like.

Now I am working my way through the quilt, sewing the blocks together, trimming them square, and then sewing the blocks together in vertical rows.

Here you can see I have two vertical rows sewn together. Each block is 6" square, so the vertical rows are 72" tall.

By the way, there are 32 different black and white fabrics.


If you want to make a scrap slab quilt of your own, you can get my tutorial here, on my Etsy shop.

Thursday, February 16, 2017

Scrap Slab Triangle Quilts

Here are the three scrap slab (trying saying THAT three times fast) quilts:

Fruit Loops, Nov-Dec 2016

Treasure Trove, Dec 2016

Snow Day, Jan - Feb 2017

All are made with one block, a colored scrappy slab built triangle and two side triangles in black on white.

And I used these templates.

A reminder that you can click the photos to enlarge, and then click again to supersize so you can see all the gory details.

Wednesday, February 15, 2017

Snow Day Details

I thought you might like a couple of Snow Day close ups.


I like that the quilt has a fox in it.

Here's the obligatory crumpled shot (another nod to my pal Julie)

Here's the finished flimsy.

Tomorrow, I will post photos of all three scrap slab triangle quilts.


Tuesday, February 14, 2017

Snow Day


Wow!

Thank you to all who commented yesterday. What a wonderful selection of names for this quilt. In the end, there was one that completely encapsulated all this quilt was about without getting too obscure or too cute. That was "Snow Day."

I am adding a border of random lengths of black and white fabrics that aren't too dark. The binding will also be a black and white fabric, but a mostly white one, and I've decided to have one slice of a bright color somewhere on the binding, just to keep up this idea of colors appearing and disappearing between the gusts of snow and the wind blowing the tree branches.

Monday, February 13, 2017

Suggestions, Please

I am good at a few things. I can draw, I can paint, I can cook and I can sew. I'm a good teacher, a good Geek and a good mother. I'm good at figuring things out and solving puzzles. After that, it all goes to pot, not that I much care. I've always been contrary.

One of the things I suck at is naming. I can never come up with good names for my quilts, and this quilt is no exception.

So while this quilt, which is all sewn up, was inspired by the winter woods, I'm not sure naming it something winter related is really the way to go. (Then again, I could be wrong.) I need your help. What should this quilt be called? Leave your suggestion in the comments, and let's avoid the corny, unoriginal, predictable or trite, so please don't say "heartbeat", Zig Zag" or "ripples."

Hey, I said I was contrary.

thanks

Sunday, February 12, 2017

Two by Two and Doobie Doobie Do

My Mother always freaks out about what I do. "Lynne, you make quilts, you blog, you WORK, and you COOK." Yeah, well, I like to eat well, what can I say. So I got up yesterday and made some granola (because I can make it better, cheaper and healthier than I can buy it), then I cooked up some farro (love it in grain salads, which I will have for lunch this week), made two loaves of bread (again, better, cheaper, healthier than the stuff at the store), made some onion jam (great on sandwiches, pizza and pasta; again, part of the menu plan for the week), some sesame noodles, and then because I wanted something different, some salted caramel brownies. (Mine probably weren't cooked enough, but I never made this recipe before. Still they are damn good. I'll bring them to work and pass them around.) After I did all the dishes, I made the bed took a shower and then went into the studio to start sewing up the blocks for the Winter Whatever Quilt. Having done all that cooking ensured two things: 1. I didn't have to feel guilty for spending the rest of the day sewing; 2. I'd have something to eat whenever I got hungry. I didn't have to stop to cook. I do this cooking thing every single weekend, (obviously with different items) and I have done it for years. It makes the rest of my life easier. I'm not quite sure why my Mom freaks out about it. Later today I'll put a couple of lamb shanks on the stove to braise all afternoon. I'll have an easy dinner and leftovers for another meal this week.

Basically, I think (and plan). I'm always thinking. Part of this is making my life easier, so that's why I do it. To me, it's no big deal. I also love to cook, so for me this isn't work.

I started taking the blocks off the design wall, trimmed them up, paired them, and sewed them together.

yadda yadda yadda.

I have six vertical rows sewn together.

My friend the Selvage Fairy wrote to me and said this quilt didn't so much remind her of trees as it did ripples of water, even though she likes it anyway.

I do too, and the ripples thing works too.

Friday, February 10, 2017

Winter Woodland

Gosh, snow days are so much fun. I got up, made a cup of hot chocolate (I do not drink coffee) and went into the studio and got right to work. I started placing the black and white side triangles next to the scrappy slab triangles.  Yes, I placed one at a time, and none of them were random.  Every now and again I'd walk across the room to see what it looked like. I even - gasp - unsewed some of the darker black and white side triangles from their blocks and replaced them with lighter versions.

After another hour, I had filled up all the spaces. So I took a break, got dressed, changed the sheets, did the laundry, had breakfast and tinkered with my computer. (I needed to delete some unnecessary files and I ran a temp file cleaner. I was able to reclaim over 27 GB of hard drive space. Yay me.)


 I made lunch, made a couple of phone calls and then got back to work. I think it's a good idea to let some time pass between the time you think you have something good and the time you do your next step. So when you go back into the studio, you notice things you might want to change. I did see a few things that needed modifying, so I did that. (I removed one of the bright orange pairs, swapped a light pair and moved the purple pair, among other things.)

I spent the rest of the afternoon sewing the triangles and the side triangles into blocks. (Those half triangles at the top and the bottom will be trimmed away.) I do see something I want to change before I declare this the final version, but so far, I like it.

There's only one tiny problem, and it exists only in my head. I showed the photo to my son. He appeared troubled. "Imagine being in the woods in winter," I said, "the sun is shining through the branches and you see the snow and the shadows on the ground. You see the brown leaves on the ground where the snow has melted. Occasionally you see a bird flying through the scene."

"Oh! As soon as you explained it, I got it," he said.

Yeah, so that's my problem. I don't want to have to EXPLAIN it. As far as I am concerned the artwork should speak on its own. (Hence the working title, "Winter Woodland.")

Anyway. Time for another mental break AWAY from the quilt.

**BTW, the weather guys originally said we were to get between 4 - 8" of snow yesterday. We got over 13". This was the inspiration view about four o'clock Thursday afternoon.

 And this, after I did a bit of tinkering, and then undid the tinkering, and then tinkered in another area, is, I think, almost, the final version.

Thursday, February 9, 2017

Winter Wonder

I got home from work last night, made a quick dinner and went right into the sewing studio. By 9 PM I had made a lot of white & colored triangle slabs. I put them up on the design wall, as you can see.

Then I had to cut some side triangles from the white and black fabrics I bought recently. After I did that I sewed them to the white colored triangles and threw them up on the design wall.

I'm liking where this is going. I will be adding the side triangles to the blocks and then I'll start moving things around with an eye to a final design. There are some of the light green blocks that were left over from Fruit Loops that I don't like here, and will make replacements for those tomorrow, and some of the orange blocks are too much one color, and I may replace those too. We'll see, but by that that time it will be more of a block by block thing. I'll redistribute colors and patterns, and I'm pretty sure I won't add the black and white side triangles randomly.

We're expecting the big snowstorm that's been walloping the midwest tomorrow. We may get between 6 - 12 inches of snow that will start during the morning commute and go right through the evening commute, with whiteout conditions along the way. I'll be staying home and I plan to be in the studio working. I may feel the need to bake some cookies because, hey, what's better than being inside watching the snow fall than the aroma of good things baking?

Wednesday, February 8, 2017

Woodland

I have been making more blue slabs and cutting more blue triangles.  Really.


 But looking back at my inspiration, I thought, there's a lot of space that's empty, and I am working to fill up all my space with colored triangles.  What if I didn't?


So for grins and giggles I filled up some of the space with white with colored prints triangle slabs. They would have the same black and white side triangles as the rest of the quilt, but having this "empty" space would allow my colors to twinkle, and would suggest the dappled light of a woodland area.

Here are a couple of the white triangle slabs.  Now this could fail dramatically, but I won't know for sure until I try, and I won't even know that until I...

Make. More. Blocks.

(sigh)

And then I'll have to surround them with the black and white side triangles...

And then I'll have to move them around on the design wall...

And then I'll have to add some black and white side triangles to the white slabs and see if the idea works or if I have rocks in my head.

You know what I think, really?

I think it could work.

Because I WANT that empty space to stay empty. And I WANT that unexpected jolt of... Oh, there's nothing there. Oh wait. There IS something there.

Heh.

And because, no I couldn't resist (because I can resist everything but temptation...)


YES!!!

Friday, February 3, 2017

Zigs

This has potential.  I have to make more blocks.

Woke up yesterday and the heat wasn't working. I hit the reset button and it restarted, but when I got home from work last night, it was off again. Called the service guys and had to wait 2 hours for a repairman. No problem. I made dinner.

Turns out there's a little switch that needs to be engaged for the heater to work. When engaged my heater does NOT work, but when it is NOT engaged, it works fine. Go figure. So we gerry-rigged something that will keep my house warm, and a replacement part has been ordered.

Sunday, January 15, 2017

The Old Switcheroo

Check out these two photos. Same blocks. Same layout. Different color placement. What do you notice?  What pops out, and what doesn't? What does your eye see? (Or rather, notice what contrast attracts your eye.)

 1. Blue Diamonds


2. Colored Diamonds


Here I've tried to place them side by side so you can compare the two. Neither is RIGHT or WRONG, they are DIFFERENT, and show you how color (and value placement) can change the whole thing. Which one you might use depends entirely on what you want to emphasize.


Since the design with the colored diamonds (2) remind me of Treasure Trove, I probably won't make that one. But I am not quite sure I want the blue diamonds in (1) to be so wimpy and disappear.

I think I'll try to make some other lighter triangle blocks and use them also, and just keep the darker colors for the triangles that complete the star pattern, because it would be a nice thing to have two ideas working together. Here the dark shapes that make the star tend to pop forward. That's fine with me, but it would be fun to get another set of lighter colors to sink backward (like the light blue) to make that "layer" more interesting than just being one color. It'll be a fine balancing act and until I actually put blocks on the design wall, I'm not sure it will "work" the way I want it too.

It's going to be fun to find out.

Saturday, January 14, 2017

X's and O's

I added black and white side triangles to the blocks and put them back up on the design wall. This layout is interesting, but the blue is too light (too close in value to the black and whites) to make the design of the triangles really stand out. It needs more stronger colors. That's fine. I have a lot of scraps to play with. So things are progressing.