Showing posts with label how I work. Show all posts

Wednesday, February 5, 2025

So How Did I...?


You're probably wondering how did I cut down the long triangles from the template (on the right) to the smaller size on the right. I mean, I'm sure you know how I did it, but let me tell you how I did it EFFICIENTLY. 

Because we all know I don't mind working hard, I just don't like working STUPID.

For this design I'd need over 250 left leaning right triangles. And they had to lean in the correct direction or I couldn't use them. I knew I sure as hell wasn't going to cut them one at a time.

I wanted to cut my traingles 8-1/2" tall, so putting a piece of painter's tape near that line would help me, but I'd need more than that.

I figured I could get two triangles out of a rectangle of fabric, but how big would the rectangle be? 8-1/2" was one dimension, but I needed the other, so I placed two properly cut triangles on my worktable and measured. It was somewhere between 5 inches and 5-1/4 inches. That was good enough for me. So I cut my WOF strips 5-1/4" wide.


Then I taped a 6" ruler to a 2-1/2" one and subcut my strips into two 5-1/4" x 8-1/2" pieces. This meant I had FOUR of each (because WOF = two layers of fabric.)

Next I flipped one piece over so both rectangles were wrong side up. I aligned the edges so one rectangle was perfectly sitting atop the other.


Next I lined up the top and left edges of the fabric with the top edge on the ruler and the 8-1/2" line, which I marked with the blue painter's tape so there would be no confusion. I cut along the long edge of the triangle, pulled the other pieces of fabric out of the way slightly and trimmed the corners.


Then I rotated the ruler, matched up the edges and cut the next piece.

Worked like a charm.

After that all I had to do was sew them up.

You know, "all."


***Now, I because I wanted my triangles leaning to the left, and because I wanted the template to face UP (I find templates slipperier if you turn them upside down), I had to cut my fabric from the wrong side. If I had wanted them facing the other direction, I would have arranged the fabrics right side up.

Friday, July 31, 2020

How I Cut

Foreword

I wrote this post on Tuesday, July 28th, before "The Ruler Rant" was published. Never, in my wildest expectations did I expect that post to generate over 700 hits in less than 24 hours. This post, "How I Cut" was supposed to be published the next day, on July 29th, but the comments The Ruler Rant generated simply had to  be addressed, so I postponed the publication of THIS post by a day, to respond to those comments. What I did NOT do, however, was change anything in the post you are about to read. It is below, exactly as I wrote it on the 28th.

~ ~ ~ ~ ~

Once I was given permission to arrange my work in the way it best suited me, I didn't hesitate to rearrange things I thought were dumb.

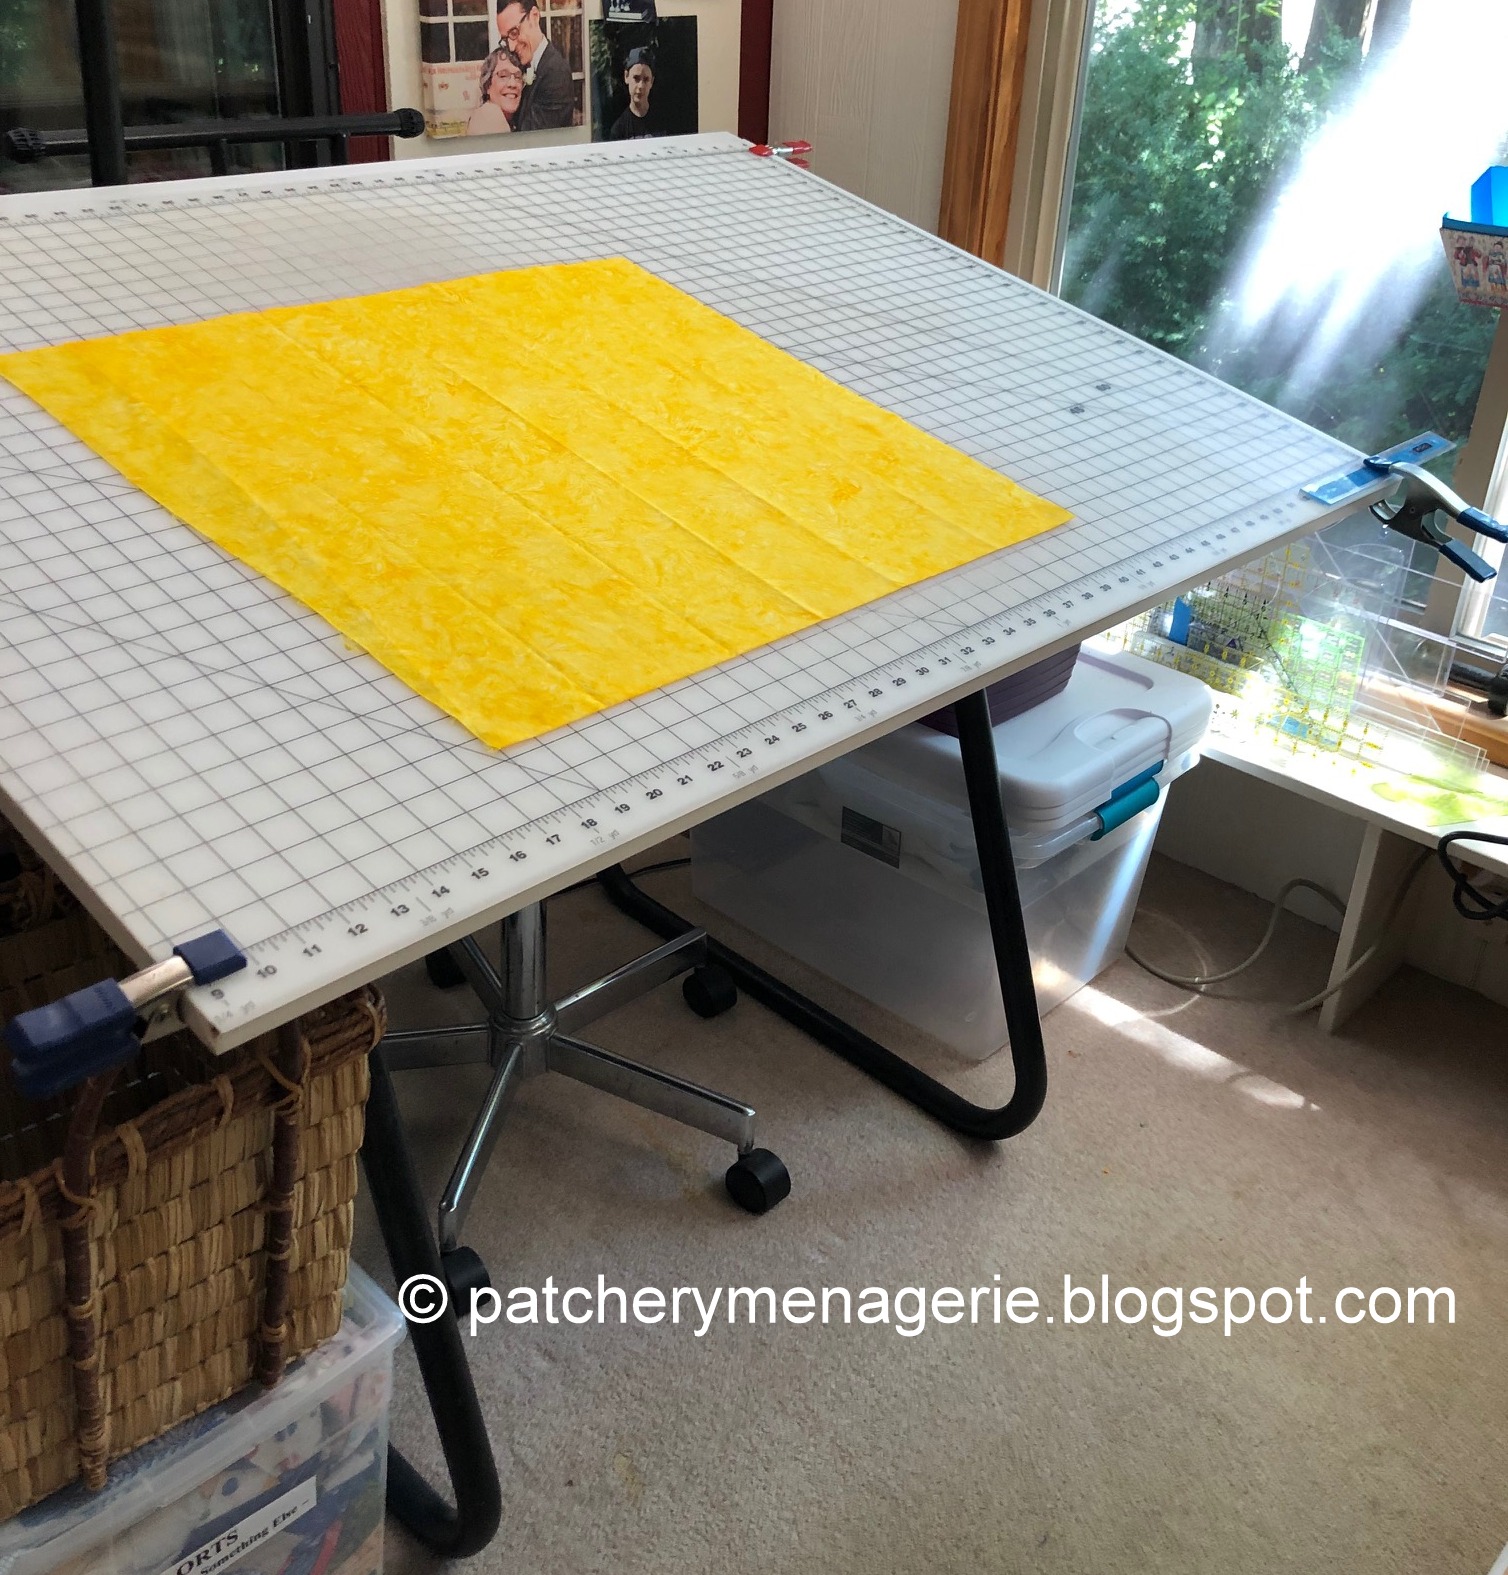
Bending over a flat work table to cut strips is uncomfortable. If the table is too low, like a dining room table, it hurts to keep bending over. If the table is too high, I have to stand on my tiptoes. To use a rotary cutter when you aren't stable can lead to wobbly cuts and wasted fabric. It didn't take me long to figure out that it would be better to use my big drafting table at an angle. I bought a giant cutting mat and cut it to the size of the big table, and held it in place with big clamps I bought at the hardware store. I worked at a hardware store while I was in college so I was familiar with the wonderful goodies found there.

(By the way, I NEVER use the lines on the cutting mat as cutting guides. Frankly, I find the lines on the mat distracting.)

I'm a big believer in working efficiently, in working SMARTER, not HARDER. If you know how I make legs for my birds, you get my point. So if I have a lot of strips to cut I want to be able to get them all cut with the least amount of effort. I experimented and then worked out a way that made perfect sense to me.

Of course, you have to start with the ground rules. The fabric has to be FLAT, which means it should have been WASHED and IRONED. It should be folded so the selvages are together. The folded edge should be crisp, so you can line up a ruler against it and know that when you are cutting a folded piece of fabric you end up with a STRAIGHT piece instead of a V-shaped piece. There shouldn't be pins or clumps of thread or other debris lying under your fabric. Your rotary cutter should be SHARP. You work harder with a dull blade. If your blade has a nick in it, replace it. Really.

Did you notice in that top picture the fabric is ALL BY ITSELF on that big table? I'm right handed, and I am going to start on the right edge and work my way to the left. AT NO TIME will I have to move the piece of fabric. EVERY TIME YOU SHIFT THE FABRIC, you risk getting it out of alignment.

I start by trimming the RIGHT edge of my fabric straight. I am right handed. I will run my blade alongside the RIGHT edge of any ruler or template I use.

DO NOT MOVE THE FABRIC...

Next, I place a wide ruler on the right side of that cut, and I gently slide it over until the edge of the ruler butts up against the edge of the fabric.

(Now I know I am silly, but I prefer to cut through no more than two layers of fabric at a time. So my fabric here is folded and the selvages are at the top, and the fold is at the bottom. Two layers. I like accuracy. You won't hurt my feelings if you cut multiple layers, but don't come to me whining if they aren't all exact.)

Next I take the template I want, (this is the 2.75" x 24" orange strip), place it on top of my fabric, butting it up against the clear ruler on the right. Because the clear ruler is up against the fabric, my orange template can butt up against it, and I know it is lined up properly.

Next I take ANOTHER big wide ruler and gently butt it up against the LEFT edge of my template. I make sure everything is lined up snug and straight.

Next, I lean my left arm down on the big wide ruler, putting weight on it. My pinkie finger catches the left edge of the ruler, pressing down. I am putting weight on this big wide ruler, my hand and pinkie finger prevent the ruler from sliding to the left. This also prevents the fabric underneath from shifting.

With my right hand, I slide the two rulers to the right, pick up my rotary cutter, and starting at the bottom, align my blade up against the clear ruler, and cut from bottom to top away from my body in one long, smooth stroke. If your blade is SHARP, you don't even have to press HARD. (DO NOT rock your blade back and forth as you cut.)

I slide the newly cut strip aside, and get ready for the next cut. (I always realign the ruler with the bottom edge, and straighten if need be.)

THE BIGGEST ADVANTAGE OF THIS METHOD is that if my rotary cutter goes astray, I have only cut into the width of the fabric strip I am cutting (here it's 2.75"). But there are other advantages. Because I am resting my weight on a large ruler, I exert a lot of pressure, and the ruler, and the fabric beneath it is less likely to slip. Because I am not trying to put a lot of pressure on a narrow strip, the chance of an inaccurate cut is virtually nil.

It takes longer to explain than it does to do.

Let's look at THE OTHER WAY...

This what I see everybody do at quilt shops. They line up the left edge of fabric along one of the vertical lines on the cutting mat, and the fold along a horizontal line. Usually they layer about four different fabrics one on top of each other. Then they line up a ruler so the right edge is 18" or whatever distance away they want to cut, and they cut along the right side of the ruler. What happens if they slip?

OOPS! This is a little slip. But it could easily have gone very wrong and cut deeply into the fabric on the right.

Now I can live with this method if you are cutting wide pieces. But I didn't see anybody straighten that edge over there on the LEFT! If you cut your fabric this way, what do you do? Do you straighten the edge on the right, then flip the fabric around, lay it down flat, hope everything is straight, and then measure from the left edge and cut on the right side of your ruler/template?  To me, that's living dangerously. Besides, it's one more step. After you flip the fabric over, you STILL have to make sure the edge is straight. So now you've done the same thing TWICE! (Not efficient.)

OK, so what do you do when you want a narrow cut, like 2"?

This is clearly fraught with possibilities of bad things happening. Sure, I could cut this 2" strip, but I had to move my hand on the cutting ruler three times so I had adequate pressure on the template the length of the fabric. And I had to basically make three cuts. And I had to make sure I didn't cut myself.

I can hear you all already, "Well, see, Lynne, THAT's why we don't use those skinny templates. THAT's why we use the nice big rulers with all the lines.."

So are you guys going to tell me THIS IS BETTER? Because to me, it surely isn't. To me there isn't enough pressure applied the the ruler and the fabric beneath to make a good accurate cut. And those of you who apply a weight to the ruler, you think that is better? I disagree. I think it is too many "moving parts," and ALL OF WHICH can wiggle way too easily while cutting with the rotary cutter, which can result in inaccurate cuts. And of course, you had better be sure you used the right line on the ruler.

I've tried it both ways. Neither one is "right" or "wrong." I'm a firm believer that you should do whatever works for you.

I've given it a lot of thought. What I am after is good, consistently accurate cuts that can be done quickly and efficiently with a minimum of fuss and fabric handling. I'm not interested in using twelve steps when six or eight will do. From the time I set a piece of fabric on my cutting table, I can cut four perfect strips using my technique in less than 60 seconds. And yes, that includes straightening the right edge.


Thursday, July 30, 2020

Holy Ruler, Batman!

WELL!!!

I sure as hell didn't expect the comments I got yesterday. Some of them, maybe. And I think a few of you missed the "Come back tomorrow and I'll show you [how I cut my strips]."

57andfemale couldn't wait to hand me my butt. Not so fast sweetie. Patience is a virtue and because of all the comments you are all going to have to wait another day to find out HOW I cut my strips and WHY.

Let's go in order, shall we?

earthmotherwithin: You have a good point Lynne. But I have sore hands, and the Accuquilt system is great for me, even though it means that I have to channel my creativity through the spectrum of the dies I own or am willing to buy.

Lynne: I surely get it. I have arthritis in my hands too. I'm all about the fat pens and the special tools and knickknacks needed to open things like pickle jars and some highlighters. You've been a reader for a long time, so I know you have heard me say "Do whatever works for you" more than once.


Helen Howes: I have had a set of these for many years, but don't use them much. Creative Grids in the UK used to offer them and I have found them good for "live" teaching.

Lynne: Helen, you made me laugh, but I'm a little confused. What do you mean, good for "live" teaching?  "Live" as opposed to, what, exactly?


Kathy: I had a set of clear ones back in the dark, beginning ages of rotary cutting, too. So easy to use but not clearly marked like your new ones. What a great way to go!

Lynne: I was overjoyed when I saw how big the markings for the size were. The older I get, the happier I am with stuff I don't have to squint to read.

57andfemale: ...Your templates (those are templates, not rulers)...

Lynne: That's an issue of semantics. I think of a template as something I trace around. I don't think template is any better a word for them than rulers, but long and skinny and my brain thinks rulers. Use whatever term floats your boat.


57andfemale: But I teach beginning quilters, and I stress safety when cutting. Keeping your fingers from the edge of a small ruler is difficult and dangerous, and there is less control of the ruler...

Lynne: You don't know how I cut. You don't know why I do what I do. The answers will come tomorrow. You know what they say about assumptions.
 

57and female: I teach how to use a regular rotary cutter ruler... A regular rotary ruler is the best tool.

Lynne: Regular readers know I used the two rotary cutters I bought in 1983 for over thirty some odd years before I replaced them two years ago... with standard rotary cutters.


57andfemale: I would also say that it's easier to line up a line from a traditional rotary cutter ruler against the raw edge of the fabric, than lining up the edge of a template.

Lynne: Again, you're making assumptions. Why don't you wait and actually see what it is that I do?


the Colorful Fabriholic: I find it helpful and easy to mark my ruler with blue painter's tape at the width I to cut. As an added benefit, the tape on the underside of the ruler snugs up against the previously cut edge of the fabric.

Lynne: I'm pretty sure I introduced blue painter's tape to the quilting community back in 2008. You don't have to convince me. I've used it more than once to mark a line on a gridded ruler.


Judy in Michigan: You are amazing - I would like to see 3 rulers taped together - just to see how it looks - the taping - how it stays together. Thanks. Interesting posts and so true about misreading all the lines on the ruler.

Lynne: Thanks Judy! When you tape two rulers together, the edges have to be absolutely straight, sharp and square. I usually lay them next to each other on my worktable, and them tape them to each other crosswise at the top and bottom. I've been known to jam heavy things on either side to make sure there isn't a gap between the two strips before I lay down a wide piece of blue tape on their long edges. And then I measure to make sure the width is the same from top to bottom. I can't tell you how much I hate misreading the lines on those rulers.


JustGail: These are very cool and I like that the whole, halves, and quarters are color coded AND clearly marked.

Lynne: They ARE cool, and I also love that they are color coded and clearly marked.


JustGail: What do you do if you need 1.75" strips, or are some not in the photo?

Lynne: I forgot to order the 1.75" one, dammit. But I have a 1" one and a 3/4" one from 1983, so I'd tape those together. hee hee hee. Or I'd break down and use a gridded ruler and swear.


Exuberant Color/Wanda Hanson: Those were available in the early 1980s when there was only one company making a rotary ruler. Seminole patchwork was popular back then and the strips worked better than a wide ruler for that. They weren't marked with size though like yours so I used a black marker. As more companies got into the rotary ruler business the plain strips lost popularity, mainly for storage reasons. Rarely did anyone have a studio in the 1970s and 80s. A corner of the dining room or bedroom was the usual creative space and storage for tools and fabric was limited. Now with more people dedicating a space for sewing storage isn't as much of a problem and more than one cutting aid is the normal.

Lynne: What Wanda said. But in 1983, I did have a quilting studio.


GrammaBabs: I for one , relate totally to your point of view... care to share where one can find something like this?..

Lynne: Thank you, and I have to imagine there are people out in the quilting world who make templates.


OK, that's it. When I wrote this post there were nine comments, so those are the ones I addressed. I tried real hard to keep my temper in check and not be snarky. Seriously, though, I am not sloppy, reckless or careless with a sharp rotary cutter in my hand. You will see that I care about accuracy, consistency and safety. But I am also interested in working efficiently with no wasted energy. I am good at what I do. My quilts are neat, my threads are trimmed, my seams are pressed, and the backs of my quilts are lovely. My quilts are square and lie as flat as a pancake. That does not happen if you are cavalier about your work.

There's a lot of talk about "precision piecing" but "precision cutting" is just as important.


See you on the flip side, ladies!


Wednesday, July 29, 2020

The Ruler Rant

One of the things I have learned as a teacher is to watch how people do things. I can often learn new things this way. (My dad calls this the "looky looky method.")

I ALSO see things I don't understand at all. Many years ago a supervisor at my first job asked me, "How do you work?" It turned out to be a prescient question, as I have been aware of my work process and the flow of that work, ever since. It has also made me watch how other people work.


I made my first quilt in 1977, attended Quilt Market in 1983 and saw the rotary cutter for the first time. I knew as soon as I saw it that I would never make a quilt the traditional way ever again. I bought a rotary cutter and some templates and never looked back.

Apparently I was left in the dust. I stopped making quilts in 1984 and didn't get back into it until 2008, and when I did these were the types of rulers everyone was (and still is) using.

"Everyone" apparently, but me. I find these rulers, by any number of manufacturers, with all those lines and hash marks, confusing as hell.

I can't tell you how many times I've cut something wrong because the numbers ran backwards or that what I THOUGHT was the two inch line wasn't. That kind of thing really pisses me off. When I am in the middle of CREATING, the LAST thing I want to do is break my concentration and look for something ELSE.

If I am going to cut a million TWO inch strips, or THREE inch strips or WHATEVER, I don't want to have to stop in the middle of a process and shift gears to search for something STUPID. I want to WORK! I want to go, BANG, BANG, BANG, and not waste time, energy or brain cells (or, gasp, fabric!)

My coworkers have hear me repeat this line many times. "I don't mind working HARD, but I hate working STUPID."

Now THIS is what I am talking about. These are what I like to call "roll-over, brain dead stupid simple." I want to cut a zillion two inch strips, do YOU think I am going to grab one of those rulers with so many lines I can get confused and make a mistake or grab the two inch ruler? And check out those three rulers/templates above. Do you see it yet? Do you understand what makes these particularly magical?

 Maybe you need a bit more information...

I have long told anybody who will listen that rulers like THIS are a thousand times easier to use, but how could I convince anybody when I had the only set in existence?  So after I got the big triangle templates, I thought about it for a bit and then called back and asked for a set like this, in different colors.

So maybe somebody is wondering... "Lynne, what do you do it you need a 3-3/4" wide strip?" Well, I would tape the 1" to the 2.75" strip together with blue painter's tape.

"What if you needed a 7" strip?" (tape the 3" to the 4"), "or an EIGHT inch strip?" (tape the 4"+ 1.5" +2.5" together.) You can figure out the rest. A group of rulers/templates like this can be combined to make virtually any size you need.

(An interesting side note. THE REASON my big triangle template, and these, are colored, is because with COVID-19 everybody everywhere is putting up plastic guards so clear plexiglass is a rare (and expensive) commodity right now. Had I not said, "any color is fine" I wouldn't have had the idea to order this set of templates organized by color.)


I admit though, I don't do the quilt show circuit. There could be rulers like this out there, but I've never seen them.

I'll tell you another thing. When you are cutting 112 strips, it sure is nice not to have to worry that you're getting them all the same size. With my rulers, I don't even have to think about that, because, I don't have to THINK.

SO HOW DO I CUT MY STRIPS?  I thought you'd never ask. Come back tomorrow and I'll show you.

Saturday, October 10, 2015

The Stash

 Everybody comments on my stash, and I am embarrassed to say I don't think much about it. This is pretty much IT.  The little bins on the top shelf hold the tiny bits bigger than 2" square, but smaller than, say 6" x 8".

(All photos will supersize when clicked, then clicked again if you want to study each stack more closely.)


The bookcase is a simple melamine bookshelf three feet wide by six feet tall. Yes, it's messy, but I've been busy.

This is what it looked like when I moved into this house a year ago. Nice and neat. I haven't really added a lot to it since then, so most of what was in the stash in this photo was used to make the Fall House Top, Blue Deco, Blue Boy, Triangle Dance, Petals and the Diamond Jubilee quilts.

These are the White with Colors, Orange and Yellow stacks.

 Here are the Acid Green and Green stacks.
  

Next shelf down is the pink, lavender and blue.
  Light blue, dark blue and teal (blue-green)
 
Red and Purple.

 Black on Black (BOB) and Black with Colors.

Black and White (I LOVE B+W, but you knew that, right?) and Grey, a new stack this year.

 The the creams and browns and tans.

And these are my WOWs and very light things.

These photos were taken Thursday evening October 8, after I finished the Diamond Jubilee quilt. I like to have fabrics that are blenders, some that have smallish allover designs, and some that have medium designs, some with larger designs, and some giants, but generally, I like fabrics that I can do lots of things with. I don't get all too worked up about it.

Why am I showing you this? Because Jackie said "You must have a fantastic stash..." and she wondered "when you purchase fabric is it for a specific project or just because and if not for a project how much do you purchase randomly?"

I bought these fabrics when I visited Kathy in Belfast Maine this past July.
Wow. Talk about a good question.

First, look back at the stash. I buy a lot of pure, vibrant color. I do not buy muddy values, and I can't stand the  "civil war prints." Too tiny, too dull, and frankly too hard to work with. Most of what's in my stash reads as ONE color, with the obvious exception of the large prints, which I like to use as backings for my quilts. I tend not to have any of the "modern" fabrics either, because a lot of them don't know which color they are.

The two on the right were used in the Diamonds quilt
Fabrics that can't decide what color they are are too hard to work with so I don't usually buy them.  What does that mean, too hard to work with? It means the fabric can't decide WHICH it is, so neither can the viewer, which makes it a bad choice.

These are fabrics that were given to me, but they are examples of stuff that's really hard (for me) to work with. I don't buy fabric like these.

What I have come to recognize as my "style" is my ability to put different prints together and make them "flow" from one to the other and look good. I can do that because the fabrics I generally select lend themselves to this kind of work. They're basic, and don't fight with each other.

 
Then again, being trained as an Artist, I know how to make a color look good. Remember, colors are affected by the colors they are next to. So you can make a color look brighter or duller by changing its neighbors. That makes it look like you have more fabrics than you really do.


By and large, when I buy fabric, I buy half yard pieces. I might buy a fat quarter if I need a particular color and can't find yardage, but I don't generally hang out in the FQ section. If I'm making a house quilt, and I need a brown for tree trunks (for example), or I want a stone foundation, I'll check the FQ section, but that's about it.

I never buy more than one yard of ANYTHING unless I have a specific use for it. And I rarely buy  backing for a quilt until the quilt top is finished. (Ask me how I know this.)


NOW... I have my share of novelties and things that I just think are irresistible, but I know full well buying them that they are not the most "flexible" things in my stash.  Look closely at the yellow stack. There's a fabric in there of black and white zebras on yellow.  Not exactly user friendly, but I thought they were fun. At the time I had a yellow and grey and black and white quilt in my head, but I used a lot of the grays in the Petals quilt. Oh well. They'll end up somewhere. Remember, I'll fussy cut ANYTHING to get the look I want.

I adore "The Ghastlies" and someday I'll use them in something, but I don't know what. Stuff like this, I only buy a yard or one pattern repeat.
 For me, the novelties are the extra goodies I put in my word quilts as visual "jokes." They will be a letter "i" that is really a cat, for example, or something like the ladies in the Rules quilts.


I'm not going to use a lot of the fabric, but when I do, I usually get a big impact out of it, so it's worthwhile. Stuff like this, I buy a yard, not more. Generally I see a print like this, and if I can see possibilities, and I like the colors, and it isn't "cute" or "cartoony" or "corny" or "tacky" I'll buy some. Yes, I am very, very picky. (And yeah, I know I'm opinionated too.)

Generally, I don't buy fabric unless I need it. I mean, OK, you've seen my stash, so that's not a big surprise. I just made two quilts (Petals and Diamond Jubilee) where I ONLY used fabrics from the stash. Look at the top photo. There's a LOT of fabric in there. There are more quilts to be had from my stash.


One exception is WOWs, or White On Whites. When I make a quilt with a "white" background, I use WOWs. So when I see one I like, I will buy a yard, but usually I buy four or five one yard cuts of different WOWs. In this case, more is better. I like a variety of pattern and texture. Regular readers know I use them randomly and interchangeably. I think they add interest and I like the way they reflect the light differently.


ONE THING I NEVER EVER EVER EVER DO... Well, OK, two things.
1. I never buy precuts. No jelly rolls, layer cakes, charm packs or any of that crap. Never. Ever.
2. I never buy everything in a designer "line." Oh, gag me with a spoon, how dull. Much, Much, MUCH more fun and interesting to combine a fabric or two from one line with blenders, batiks, or anything else from among the thousands of fabrics at any given quilt shop.

Okay, three things. I don't buy solids either. I use blenders instead.

ANOTHER BIG LESSON...
I never buy fabric I fall in love with, unless I have a specific plan to bring it home and cut it up for a quilt I am making.

I bought these fabrics five years ago, and only cut into the one on the lower left when I made the Diamonds quilt last week!

Why?
Because it will sit in my stash for years before I cut into it.  That's a waste of money and storage space.  I keep threatening to teach a class and tell my students to bring their favorite fabrics and then make them cut it up. Does this thought make you cringe? Gotcha!


The only time I might buy something I really don't need is when I see a fabric and it's a beautiful pure color. Believe it or not a "true blue" is almost impossible to find, so when I see some, I'll buy a yard or more. As you know, colors come in and out of "style" so you can't always find what you want for sale in the shops. So I try to make sure I always have the basics.


I view my stash as my "Raw Materials." If it's in there, it's meant to be cut up. And one other thing. My stash is right out in the open. I never put fabric in a drawer, or wrap it up. For me, if I can't see it, it doesn't exist. I am not made of money, and storage space at my house is not infinite. Buying fabric I don't need, and then putting it away so I forget I have it, is a waste of money and space. I live by myself, so I don't have to worry about hiding my fabric purchases from a husband.  Believe me, I know full well that I spend more money each year on fabric than I do on clothes, but then, clothes are kinda boring.

LOL!


I can do what I do and make the quilts I make because my stash has a wide variety of colors with varying scales of patterns. I have them on hand. If something isn't working, I can walk over to the stash (which is right next to my design wall) and rifle through it, looking for something else.


If you don't have a wide selection of fabrics in your stash, you might settle for something less than what you need. If you've read this far, you know I don't do that. I never settle. I keep pushing. Having a good stash makes my life a lot easier in a lot of ways.

The stash on the evening of Friday October 9th. I just had to organize it while I was working on this post.

I've been building the stash for five years, and let me tell you one other thing. It will NEVER get bigger than what's in this bookcase. Too much can be overwhelming. Sometimes endless possibility can be endlessly frustrating. You've heard me say it before, sometimes having fewer choices forces you to be creative about what you do have. Tim Gunn says "Make it work." I'm not above cutting a shape out of the middle of a piece of fabric if I want that part of a print to do something special.


I look at my fabric not so much as what it IS, but of what it can BECOME.