Thursday, October 31, 2024

The Clock


This is the clock in my kitchen. For years it graced my studio. I made it (rather I embellished it) myself. Over 20 years ago I was home sick and had the TV on out of sheer boredom. I was lying on the couch watching some women's show and there was a craft segment on making a clock like this. As soon as I got better I went shopping. I think I spent more on the doodads than I did on the clock itself.

Last week I looked at it and thought I'd had it so long and I was grateful it was still working. 

I suppose I should have recognized that was an omen. A few days later it stopped working, and nothing I could do could get it to work again. So I put on my thinking cap and got creative. I ordered a replacement clock mechanism with the battery. I didn't have any idea if it would work, or if I got the right size, but what the heck.

So I carefully took it apart, then replaced the mechanism. Both hands of the new clock were too long, so I snipped those shorter. It all stuck out farther than the original, so I couldn't replace the glass, but the clock was working so I put it up.

My repair attempts dislodged some of the little doodads and I had to locate the hot glue gun and fix them. Then I put the clock back where it belonged.

Hmmm.

The orginal hands of the clock did not stick out very far from the clock face and did not cast a noticeable shadow. And this clock does not have the second hand, which I use when I am timing something when I cook. So I do not consider this a rousing success. Further research leaves me in doubt about whether any other clock mechanism would fit in the narrow space if the glass were in place, so I have decided to move on and accept the inevitable.

The clock has lived a good life, and is now due for retirement. (Plus it was dusty and dirty as hell and icky to touch.)

A replacement clock is on order.


Tuesday, October 29, 2024

The Replacement


Not one but TWO trucks arrived at my house on Monday morning. They arrived about 10 AM and spent the next forty minutes disconnecting and removing the old furnace. (It's the beige box in the photo above.)

It was a noisy and messy process. I had already moved my quilts and artwork out of the way. They installed the new furnace, tested it and turned it on. Then they cleaned the mess and left.

WOW! It is SO nice not to have to worry about that now.

While the guys were banging away, I was in the studio assembling the last of the panels I needed for the third Nightingale Quilt. This is N3, and I will start sewing it up later today.

What I have learned from making these is you have to have faith, and lean into your fabrics. Even if the patterns are large (especially if the patterns are large), do not fret if they take up the whole piece and you don't see much of their black background. As Earthmotherwithin wrote: "With the fabric doing all the work, of course it only needs to be simple in construction."

I have said it before, while this quilt LOOKS complicated, it will be one of the easiest things you ever sew together. If you want the tutorial, you can get it here, at my Etsy shop.


Sunday, October 27, 2024

How I'm Doing

 I have been fortunate enough to have access to a couple of space heaters, which have certainly helped over the last few days. The weather has helped too. It has been sunny and in the 60's over the last few days.

Still though, I decided to make use of the things I already had in my house. Like my oven. After the technician left on Friday, I reviewed my menu for the week and made some changes.

I decided to make the most use of my oven whenever I could. I would prepare each meal in the oven instead of on the stovetop. One morning I made myself a soufflé. Another I made muffins. One lunch I made a flatbread pizza. One dinner was a sheet pan dinner of sausage, Brussels sprouts and gnocchi. On the coldest day, Sunday, I put a pork stew in the oven to cook. These things helped bump up the temperature inside my house and meant I didn't need the space heaters.

It's very strange how this no-heat thing has affected my daily life. I can't wait for it to get back to "normal."

The new furnace will be installed sometime on Monday. I don't know precisely when.

Of course I have been sewing. The studio has its own separate heating system, so I've been very cozy there. This is a panel for the third Nightingale quilt. I cut a lot of black strips, so now I am using them up.

This is fifteen panels that when rearranged, will form the third Nightingale quilt.

Remember, this is not a quilt about patchwork first. This is about seeing a mass of color and pattern. 

Friday, October 25, 2024

EEEK!! (corrected)

 I had not had the yearly maintenance done on my heating unit since the pandemic. Generally I remember to schedule this because there is a note in the monthly bill. But I must have missed it. Anyway I scheduled an appointment last month and a technician came Thursday morning and found a leak. Since it was leaking CO (carbon monoxide), he disconnected the unit.

EEEK! No heat!  EEK.. Carbon Monoxide!  

But he said he thought the leak was so small my Carbon Monoxide monitor would probably not have picked it up.

And the heating unit is covered with a warranty so replacing it will be no charge to me. The problem is it won't get done until Monday. That's four days and four nights with no heat. Sigh.

My studio has electric heat, so I'm good there, and I've been lent some space heaters, so I should be OK, but wrapping my head around all of it was nerve-wracking, to say the least. 

The temperatures for the next three days will be 52-61F during the day, it's supposed to be sunny all weekend and it won't drop below freezing until Sunday night. It won't be so cold that I have to worry about pipes freezing. All good things. My Mom said I could sleep at her house, but that will be a last resort. I'd rather sleep in my own bed anyway. Clearly I have enough quilts to keep me warm.

So dinner will be anything I can cook in the oven (a way to generate heat) and I may do a bit of baking (again, oven). The electric heat in the studio warms the room almost immediately and doesn't need much to keep the room warm. I've got a recliner and a TV in there, so I will not have any trouble staying comfy. And did I mention it was the studio?

It could, of course, be worse. 


Tuesday, October 22, 2024

Nightingale Number 2


Every single person who has seen the Nightingale quilt had the same reaction. 

"WOW!" 

I was quite surprised. I knew this was a beautiful quilt, but I love the unusual. I am also rather fearless. I mean, who ELSE would make a black quilt? And who would be crazy to encourage others to make them? I mean, who wants to make a BLACK quilt?

The thing is though, this quilt is remarkably simple in its construction. A beginner can make it. 

The only requirement is that all fabrics should have a black background. 

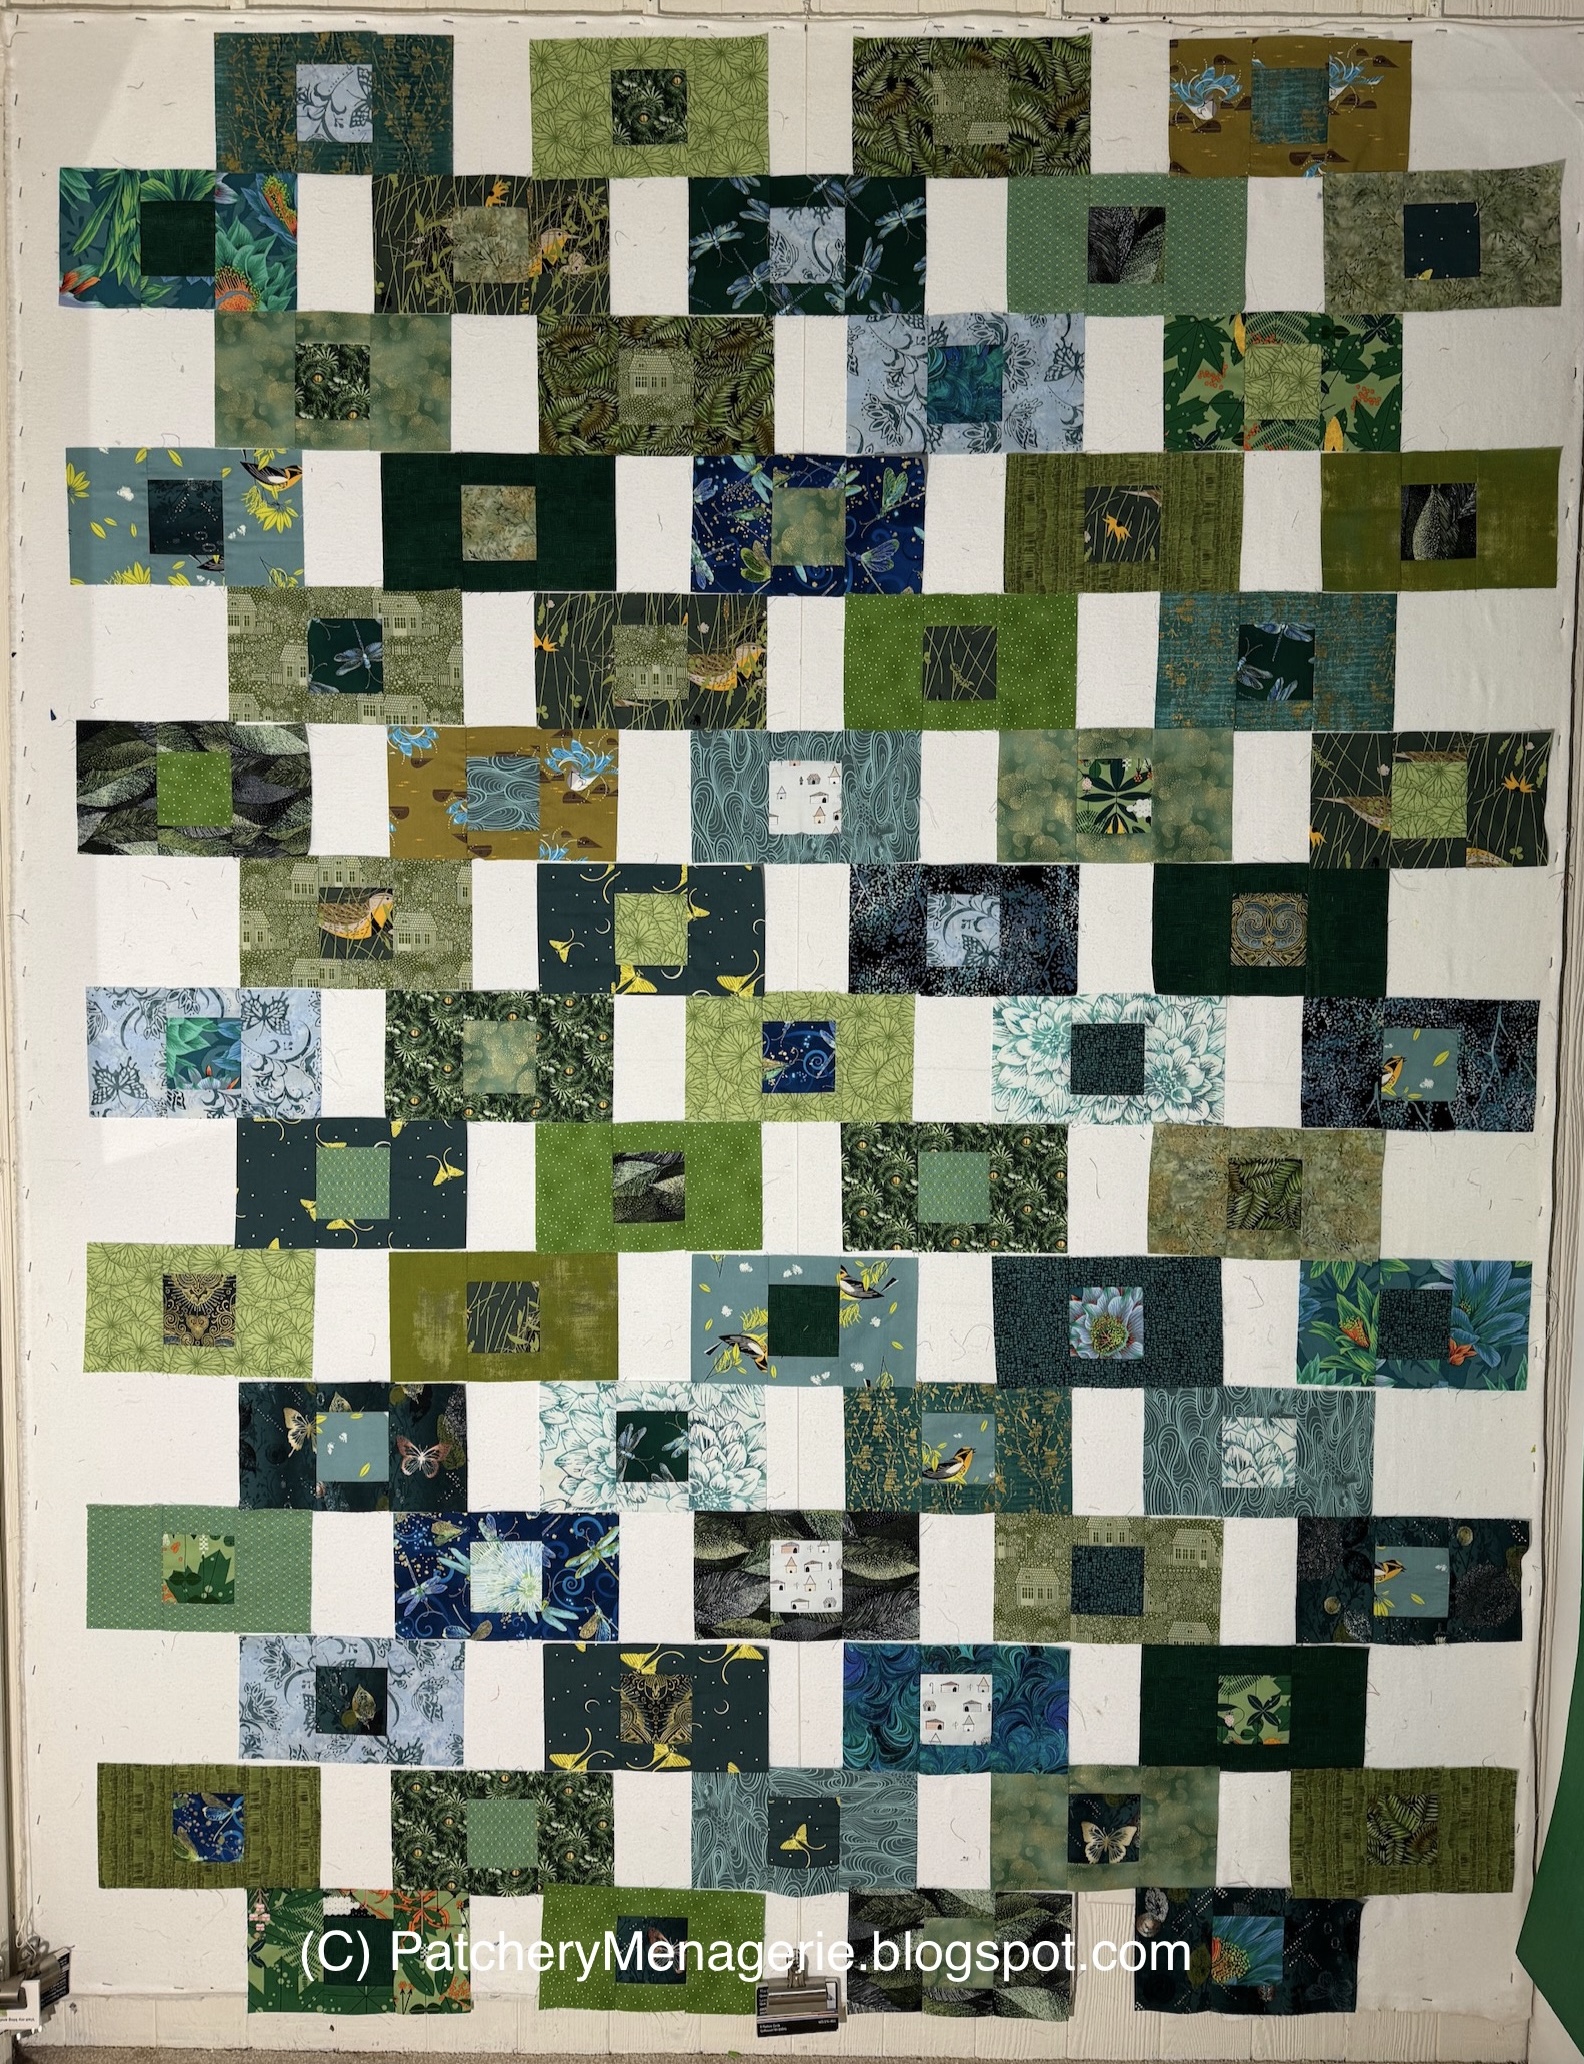
Anyway, after I made the first one, I made the second one. The first six panels are shown above.

In the photograph above, both quilts are shown. Are they the same? Of course not. While they share some of the same fabrics, they are not identical.

This is the second one. I had a title for it, but I forgot what it was. I'll figure it out.

Every quilter who makes a Nightingale quilt will make a quilt that is unique. Each quilter will select different black fabrics that will make up the quilt. Each quilter's own sensibilities will be reflected in the quilt itself. A successful Nightingale uses all kinds of fabrics: great big giant prints, medium prints, novelties. batiks, florals and orientals. It's not really a scrap quilt in that the fabrics are repeated over and over throughout.

It works because the fabrics share a common element: the black background. While this quilt is patchwork, the patchwork is secondary to the flow of color that moves around, which is what the eye sees first.

Susan from California is making one of these and when I talked to her she said to remind everybody that for this quilt you simply have to have faith. "Because halfway through you might think it's awful, but the farther along I get the more I love it. So tell everybody to just go for it."

Well yes. But then the usual rules do apply. Don't put too much busy right next to each other, distribute your colors and prints and avoid making BLOBS of too much dark or holes of too much light.

But Susan also said that "you could be blind and put this together and it will still work." How's that for an endorsement?

So yeah. I mean, what the hell. It's only fabric.


Oh yeah! I remember. This is the Black Swan.


Friday, October 18, 2024

Randy Says...

 I was having a small problem with my sewing machine. When I would press the button to cut the thread more often than not the thread would be cut so close to the needle that when I went to sew again the needle would become unthreaded.

My sewing machine is an Elna X680.

Clearly this was a tension issue, so I brought my machine to the sewing machine spa, in my case, Bittersweet Fabric Shop in Boscawen NH.

Randy knew just what to do (duh), and then he went into the innards of my machine to see if anything else was amiss. I asked if I could watch. Glad I did, because I learned a few things.

We all know dust can be an enemy. I use a little tool like this to get the dust out of places (particularly where the bobbin lives), and I had been told never to use compressed air to blow the dust out. Randy corrected me.

He said I could VACUUM dust out of the area above, and then it was fine if I wanted to use a can of compressed air to blow the leftover bits out, because after that there wouldn't be many and they would be tiny.

HOWEVER,


I was ABSOLUTELY NOT to be doing this - using the little tool or a pipe cleaner to jam it into the recesses of the machine to get out dust or debris that might be lurking there. (I was guilty of that.) 

WHY?

Apparently there can be little springs and other very delicate gizmos lurking under there that we cannot see and a pipe cleaner or tool like the one I used to use can dislodge said spring and cause the machine to run, shall we say, less than optimally. Randy found the little spring my overeager cleaning had dislodged and put it back where it belonged. (Consider me chastised.)


One hint he DID have was to use a pin to separate things in the bobbin race (where the bobbin lives) to get the dust that might get between those thin metal strips (I think it's kind of a spring). You can just blow the dust out with a puff of breath. (You know, your own lung power.)

We both agreed that sewing machine manuals do a poor job of explaining what we SHOULD do and what we shouldn't do.

It should also be noted that the thread I was using was partly responsible. A 60w thread, (such as the Precensia 60w thread I use) requires a different tension than a 50w thread. For my machine the AUTO setting was fine for 50w, but I had to reduce it to a 3 for my 60w thread. (On my machine AUTO = 4.)

Here's a big THANK YOU to Randy and Holly from Bittersweet Fabrics for letting me watch him work and allowing me to ask my questions and help us all out. Naturally, my machine now works like a charm and the thread cutter works precisely the way I want. 

~ ~ ~ ~ ~

In other much more fun news, I ordered some postage stamps online the last time I had to ship a package via USPS. They arrived yesterday and I am delighted to share them with you. I think it is quite possibly THE COOLEST STAMP EVER.


I do not know if these beauties are available at your local post office, but you can get them at USPS.com.

Monday, October 14, 2024

Backing for Morning Garden Quilt


There are several Charley Harper prints in the Morning Garden Quilt, so I decided this one with frogs and butterflies would be the centerpiece of the pieced backing I will make for the quilt.

I used the leftover blocks on the backing too!

This is the finished backing for the Morning Garden quilt.

I always place the flimsy on top of the backing so I can ensure the backing is at least six inches bigger than the quilt top all the way around.

This one is ready to go!

Saturday, October 12, 2024

Backing for Nightingale Quilt


This is the Philip Jacobs print I have chosen for the back of the Nightingale Quilt.

And this is the binding I have prepared for the quilt when it comes back from being quilted.

This is another shot of the Nightingale quilt, this time in full sun. I love bright colors, and these brights on black just pop and sing! It creates such a beautiful design. You see the colors first, then you realize this is patchwork. 

It is almost embarrassingly easy to make, and it works with any fabrics with a black background. I have a couple of testers making them now and I am eager to see how they turn out. Each one will be unique, deepening on your own style, which I think makes the best quilts. 

What has been so exciting for me is that everyone I have shown this quilt to just freaks out. "OMIGOD that's GORGEOUS" has been the consistent response, which is very encouraging.

You can get the tutorial here, at my Etsy shop. It's an instant download, so you can get started right away.


Thursday, October 10, 2024

Nightingale Tutorial is Live!

Here's a beauty shot of the Nightingale flimsy. I just received the backing fabric so I will be working on that soon and will deliver the quilt to the long-arm quilter.

The tutorial for this quilt is finished and you can find it here in my Etsy shop. It's an instant download, so you can get started right away!
 

Wednesday, October 9, 2024

The Lesson


I threw myself a birthday partly this past summer, and my long-arm quilter came. I gave her a flimsy to be quilted and all the guests and I were looking at it. Someone asked her a question. She flipped the flimsy over, revealing the back. (I felt like somebody threw open my underwear drawer.)

"Look at this. See how the seams match perfectly? See how the seams are pressed so neatly? See how there are no loose threads? This quilt is square and lies flat. THIS is a dream to work with. I quilt over 300 quilts a year. THIS is rare. You wouldn't believe the crap I get. I LOVE quilting Lynne's quilts."

I was taken aback, to say the least. I know I do good work, and we have all heard about how long arm quilters are fussy about the flimsies they quilt, but I thought it was a story worth sharing. You can look at the back of the Nightingale quilt, a detail of which is in the photo above. You can see the seams are neat, and there are no loose threads Sure, the fabric ravels, and some of those threads show, but that's the nature of the beast.

If there are any of you have don't believe the stories you've heard, here it is writ large: Press your seams, trim your threads. Make sure your work is square and lies flat without any ripples. It makes a big difference.

Monday, October 7, 2024

The Nightingale Quilt


This is the new Black quilt. It is called Nightingale, and I will be releasing a tutorial on how to make it soon. 

This is 60" x 72" and has about 50 unique fabrics - and the one thing they have in common is they all have a black background. The quilt goes together surprisingly fast.

Here's a closeup of one section, so you can enjoy the variety of fabrics.

Friday, October 4, 2024

Morning Garden is a Flimsy!


 The main body of the Morning Garden flimsy is complete. I will add a border to it next. (You can see it over on the left.)

Earlier this week when I was sewing the blocks into rows, when I would complete a row I would sew it to the row below it (so I was joining two rows into pairs), and I inadvertently inverted one of the rows so I sewed the two rows together the wrong way. I hate when that happens, but I took it apart and sewed the two rows together again.

And sewed it wrong AGAIN!

That was my cue to exit the studio and do something else. When I calmed down a bit, I went back into the studio and unsewed the seam again.

Then I double and triple checked and sewed the two rows together, properly.

And then kept going.


Tuesday, October 1, 2024

Morning Garden


I made all the blocks for the new Slide Show quilt, whose working title is Spring Garden. Here I have just thrown them up on the wall. I will rearrange the so the fabrics are well distributed. I can't quite see what it will look like without the "background" fabric.

Here I have placed the "background" fabric where it belongs, and I can immediately see the blocks with the light centers have to change. That is not a surprise. I can't really design a quilt unless I can see all the fabrics and blocks together. Obviously I've got to place the rest of the background fabric, and I have some rearranging to do, but overall I am very happy with the way this is turning out.