Showing posts with label set in squares. Show all posts

Sunday, March 26, 2023

The Set-In Square

 When assembling blocks that are not in regular rows, sometimes you have to use a set-in square. It means Y seams. Sort of. I hate sewing into a corner, but when I insert a set-in square, I'm not sewing INTO a corner, I'm sewing OUT of one. I will show you how I do it.

The set in square in this example will fit underneath the middle bird in the top row.

First I had to sew the birds surrounding it together. I had to sew the two pink birds in the upper right together, and I had to make sure they had enough fabric above their heads so when the whole thing was complete, there was enough fabric there. I had to do the same thing to the birds on the lower left. I had to join them together, and make sure they had enough additional fabric on the bottom and left sides. 

Most importantly (read: MOST IMPORTANTLY) the resulting panels had to be SQUARE, which means all the sides were trimmed perfectly STRAIGHT and each corner was 90 degrees.

You can start anywhere, but I decided to sew the set in square (the heavily printed WOW above) to the left edge of the bird panel at the upper right. Note that I did not sew that seam all the way across. I stopped short about an inch. I pressed the seam.


The next thing was to sew it to the bird panel to the left of it - the one with the big bird and the little teeny bird. I'll sew the two panels together, from one edge to the other.
Like this. Next I will sew it to the bird panel (when I have more than one block sewn together I call that a "panel") below it.

See?

The next step is to sew the big bird on the right to it.

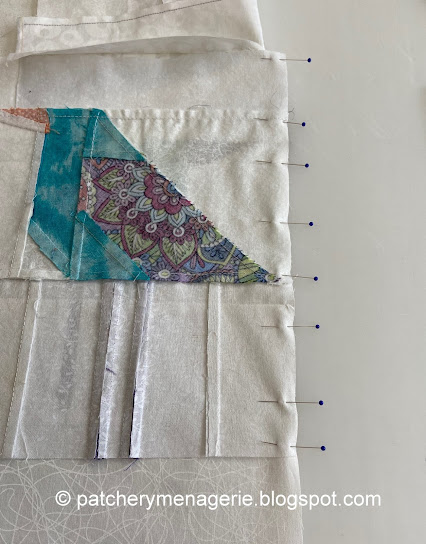
Here I have folded to top panel down, and over to the left so I can properly line up the edges. Because I didn't sew the Set In Square fabric all the way to the edge, I have room for my seam allowance and room to sew.


The last step is to fold the top panel down, line up the edges and sew the last seam across.


TA-DA!

This is what I have sewn together so far.

And this is what's left to do.


You too can make birds. I explain how in my tutorial, sold here on my Etsy shop. Fair warning: making birds is addictive.


Tuesday, March 8, 2022

The Magic of a Set In Square


This is the top of the first student bird quilt, with the birds arranged more or less the way I want them to look. I don't like them stacked on on top of the other, or with too many darks or lights together. And I like it when they seem to talk to each other and interact. 

It's a tricky thing. I have to add fabric to the bird blocks. Sometimes at the top, sometimes the bottom, sometimes the sides. I never cut a bird apart, but I might make the legs a bit shorter, or trim the block across the top. SOMETIMES I need a set in square.

If you enlarge and look carefully at the top picture, there is an empty space below the little hummingbird. In the second photo, I have added fabrics to several of the blocks and sewn them together. You can pretty much see how they are going to fit together.

I have added a small rectangle of fabric underneath the hummingbird, but I didn't sew the seam all the way across. I left it a little bit open, because I'll need to sew the bird on the far right to it. I'll trim it down to size when I am ready to sew it to the panel that will go below it.

The next step is to sew the horizontal seam connecting the two panels above. (You can see I adjusted the piece of fabric under the hummingbird.)

Now I'll sew the lone bird on the right to the large panel. Part of this seam is the edge of the set in square.

The last thing is to sew that last seam together.                

Here you can see the small set in rectangle just above the bird's head.

So here is that top third joined together. It isn't all finished. (The little orange bird on the right hasn't been sewn to the rest yet. I haven't quite decided how I'm going to do that.)


You too, can make birds. You can get my tutorial here, at my Etsy shop. Now, bear in mind that my tutorial is for a basic bird. The birds in the photos above were make by students/customers, and they have added their own unique customizations, but you can do that too.

Tuesday, July 19, 2016

Flight of Fancy Flimsy - How Did I Do It?

Every time anybody sees the Flight of Fancy quilt, and they know the birds are all in different sizes, they ask how I put it together.

"Did you use set-in squares?" one of my students asked me last weekend.

"Yeah, but not as many as you'd think," I replied. "I think there were only four or five."

At which point I tried to find them, but I had a hard time.

So here, dear readers, is how I did it.
First, I took a picture of the layout, and made it so I could see the edges of the bird blocks. I didn't need to see the individual birds, but I had to figure out how to put them all together, using as many straight seams as possible. Once I figured that out, I'd have to fill in a lot of white space. You can see that easily in the photo above.

I printed a photo (I only have a black and white printer) and drew out the outline of each bird block.
 
 Then I tried to figure out how best to sew them together in the biggest possible chunks. I knew I could trim some legs down, and the white strip on the top of each bird's head could also be shrunk, but I did not disassemble or trim any of my bird blocks.
Next, using a variety of patterns, I filled in the spaces with squiggles, indicating how much extra WOW fabric I had to sew to each bird block to get it ready to sew to it's neighbors. The solid squares would be the set-in squares.

Here you can see the places I added to each of these three bird blocks. I also used my drawing to assemble some of the big basic "panels" of the quilt. I don't measure with a ruler, I measure by eye. It's a skill I learned when I was learning how to draw. I know it makes people crazy to hear that, but it's true. I move my pieces around next to each other, compare them to my drawing, and I can tell right away if it's OK or not. And in true free-piecing fashion, I always make my pieces BIGGER. That way I have enough room to trim down to size without freaking out.

You can see an example of my set in squares here. One thing I did quite deliberately was to use very strongly patterned WOW's for the set in squares. Dunno why I decided to use them that way. Maybe I was just in the mood to say HAHAHAHA if anybody pointed them out. I'm prickly like that.

Just because I laid out my design that way, doesn't mean I SEWED it that way. Here is proof:

One one side is the layout I designed, on the other is the layout once it was sewn together. Can you tell the difference? There are one or two tell-tale signs, but the changes were not arbitrary or accidental. As I was working I saw some elements that were not as successful as I felt they could have been, so I made changes. I also made some changes to make sewing it together easier. Hey, 50 shades notwithstanding, I'm not into punishment.

This is the way the quilt is sewn together. I used only five set-in squares. The quilt was made in three large "chunks." The first third, with its bottom row one straight seam across. Then the next row is also lone long horizontal strip.

When I got to the bottom third I knew there had to be an easier way than the complex arrangement I originally had, so I broke it down into big pieces and made the big center block (with the upside down birds) first, then added it to the three big pieces next to it. After that it was simple to put the last chunk together and sew it to the rest of the quilt.

You can read more in depth explanation of the process here, when I was actually sewing the flimsy together. I can either SEW, or I can try to remember to stop to take pictures. Usually once I get going I completely forget to take pictures.

Is it hard? Not really. Is it fussy? Damn straight. Is it worth it? Hell yeah.

If you want to make your own unique birds, you can buy the tutorial, Lynne's Liberated Birds, here, in my Etsy shop.