Showing posts with label Flight of Fancy. Show all posts

Tuesday, July 19, 2016

Flight of Fancy Flimsy - How Did I Do It?

Every time anybody sees the Flight of Fancy quilt, and they know the birds are all in different sizes, they ask how I put it together.

"Did you use set-in squares?" one of my students asked me last weekend.

"Yeah, but not as many as you'd think," I replied. "I think there were only four or five."

At which point I tried to find them, but I had a hard time.

So here, dear readers, is how I did it.
First, I took a picture of the layout, and made it so I could see the edges of the bird blocks. I didn't need to see the individual birds, but I had to figure out how to put them all together, using as many straight seams as possible. Once I figured that out, I'd have to fill in a lot of white space. You can see that easily in the photo above.

I printed a photo (I only have a black and white printer) and drew out the outline of each bird block.
 
 Then I tried to figure out how best to sew them together in the biggest possible chunks. I knew I could trim some legs down, and the white strip on the top of each bird's head could also be shrunk, but I did not disassemble or trim any of my bird blocks.
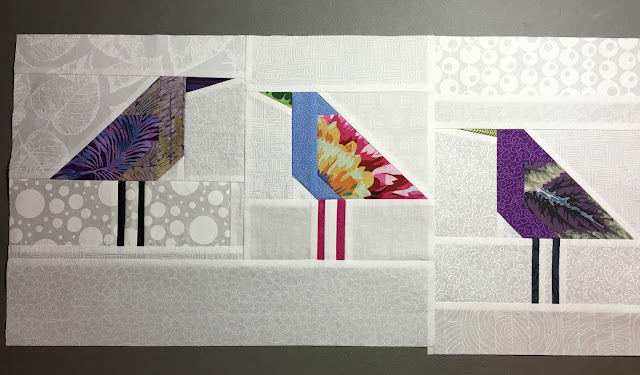
Next, using a variety of patterns, I filled in the spaces with squiggles, indicating how much extra WOW fabric I had to sew to each bird block to get it ready to sew to it's neighbors. The solid squares would be the set-in squares.

Here you can see the places I added to each of these three bird blocks. I also used my drawing to assemble some of the big basic "panels" of the quilt. I don't measure with a ruler, I measure by eye. It's a skill I learned when I was learning how to draw. I know it makes people crazy to hear that, but it's true. I move my pieces around next to each other, compare them to my drawing, and I can tell right away if it's OK or not. And in true free-piecing fashion, I always make my pieces BIGGER. That way I have enough room to trim down to size without freaking out.

You can see an example of my set in squares here. One thing I did quite deliberately was to use very strongly patterned WOW's for the set in squares. Dunno why I decided to use them that way. Maybe I was just in the mood to say HAHAHAHA if anybody pointed them out. I'm prickly like that.

Just because I laid out my design that way, doesn't mean I SEWED it that way. Here is proof:

One one side is the layout I designed, on the other is the layout once it was sewn together. Can you tell the difference? There are one or two tell-tale signs, but the changes were not arbitrary or accidental. As I was working I saw some elements that were not as successful as I felt they could have been, so I made changes. I also made some changes to make sewing it together easier. Hey, 50 shades notwithstanding, I'm not into punishment.

This is the way the quilt is sewn together. I used only five set-in squares. The quilt was made in three large "chunks." The first third, with its bottom row one straight seam across. Then the next row is also lone long horizontal strip.

When I got to the bottom third I knew there had to be an easier way than the complex arrangement I originally had, so I broke it down into big pieces and made the big center block (with the upside down birds) first, then added it to the three big pieces next to it. After that it was simple to put the last chunk together and sew it to the rest of the quilt.

You can read more in depth explanation of the process here, when I was actually sewing the flimsy together. I can either SEW, or I can try to remember to stop to take pictures. Usually once I get going I completely forget to take pictures.

Is it hard? Not really. Is it fussy? Damn straight. Is it worth it? Hell yeah.

If you want to make your own unique birds, you can buy the tutorial, Lynne's Liberated Birds, here, in my Etsy shop.

Sunday, July 10, 2016

Blindstitching Again


I seem to be having a rough year. I can't seem to get out of my own way. I think hearing I am going to be a grandmother may have knocked me for a loop. My grandbaby will live 3,000 miles away on the opposite side of the country and that's going to be hard for me. I've kind of been in denial about it, trying to bury my feelings in books and busywork. I've got my tickets to visit after the baby is born, and that will be great, so I am trying to keep looking on the positive side of things.

I've been sending a stream of gifts to my son and DIL. A tote bag with pockets to use as a diaper bag and a baby sling along with a few other goodies for Mom and Dad. I have pile of stuff that I've been collecting set aside - some books, some baby onesies, a receiving blanket and a heating pad.

Now I'm working on finishing the baby quilt, Blue Topaz, above.

I'm also preparing for another Birds class at QT this coming Saturday. (It's full.) They tell me that every day at least three customers ask about the Flight of Fancy quilt.  Which is pretty cool.


Monday, July 4, 2016

Four Birds on the Fourth

One of the reasons why I prefer free-piecing over traditional patchwork piecing is that I get bored easily. The idea of making any number of identical blocks is enough to make me run screaming from the room. OK, maybe not.

Variety equals interest, creates energy, and makes my heart sing.

 This is a "standard" bird.

This is another bird using the same fabrics, but there is one subtle difference (aside from the beak). In this bird, the breast is ever so slightly wider.

In this version, the breast is very narrow. It's a completely different bird.

This is one of my favorite variations. The bird has a very wide breast, a tiny, pointy beak, and very long legs.

Four birds using the same fabrics in the same places, and yet these are four DIFFERENT birds. I think they are much more interesting than four identical birds.


For those of you who keep asking, NO, there will NOT be a pattern for the birds quilt, Flight of Fancy. Never, ever.

HOWEVER... I am working on an extended step-by-step tutorial on making the Birds and it will include all variations (beaks, breasts, bellies, legs) and lots of photographs. It should be ready about the middle of this month, and will be for sale in my Etsy shop (see the sidebar). I'll let you know when it's ready.

Friday, May 13, 2016

An Evening with Gerald Roy

This is Gerald Roy, noted quilt appraiser, while appraising my quilt, Flight of Fancy, last night.  It's so much fun to talk to him. He knows everything about everything quilt related. 

For instance, I heard the whole background story about Molly Upton's quilts being exhibited by QuiltCon Pasadena.  Both Gerry and I think her quilts are the Ne Plus Ultra.

Sunday, May 8, 2016

More Birds

I'm preparing for the class at Quilted Threads on Saturday. It's completely full - two rooms full - so I want to be VERY well prepared. Here is a bird I made as a class sample. Can you figure out what's so special about it?

Actually, I made two birds. As you can see I used the same wing fabric for each, but I wanted them to have slightly different personalities.

Have you figured out what's different about them yet?  Here's a clue.


Heh.

Yes, these are big birds.  Very. Big. Birds. The average bird is about 8 inches square. These are about 28" or 29" square.

I wanted to have BIG BIRDS to hang in the classrooms at Quilted Threads so the students could easily see the details when I pointed out how to make them. It will be much easier for the class to understand what I am talking about when I point to something on a BIG bird than if I was pointing to something tiny. I usually give each student a bird block I made to look at during the class, and have nearby so they know what they should be doing. It's hard when you look at the front, and I have found if they can turn it over and see how it's put together, it's easier to understand.


Happy Mother's Day!

Thursday, May 5, 2016

Round and Round I Sew

I've sewn the binding down on one a bit more than half the quilt. I'm up to the Numbers bird. I sew right to left, so I have to so the rest of that side and then all the way across the top to finish the binding. Then I have to sew to the hanging sleeve to the back of the quilt. I should deliver this quilt to the Quilted Threads quilt shop in Henniker NH on Saturday in advance of the class next week. That class is full, but I will teach another so if you are interested give them a call.

While there isn't much going on here, please go over to Brenda Suderman's blog, and see the barn she built for the Secret Society of Barn Builders.  Brenda's barn is in Manitoba Canada, and is completely different from the barns I built. Brenda has a giveaway of Julie Sefton's book, Build-a-Barn for our Canadian friends. 

Every week a SSOBB member will reveal the barn she made for Julie's book, and they are all very different. I enjoyed being a part of the SSOBB and seeing the barns come to life. Each of these blog posts will delve into further detail of the quilter's thought process of barn building, so please visit each one as they are posted. You can see the entire schedule here.

Judy in Michigan, who won last week's giveaway, asked if I could sign her book in addition to Julie, so Julie sent the book to me and I did. Now it's on its way to Michigan. Enjoy, Judy!

Wednesday, May 4, 2016

Eggs!

I've sewn the binding to the back of the birds quilt.

Now I blindstitch my way all around the quilt. I guess I'll be "watching" a lot of TV over the next few nights.