Friday, December 28, 2018

Flip and Flop

After the not-success of diamonds in the bottom area of this quilt, I wondered if I should just fill it with the lightest of the black on white fabrics and see what happened.  What happened was I got mush and mush is never good.

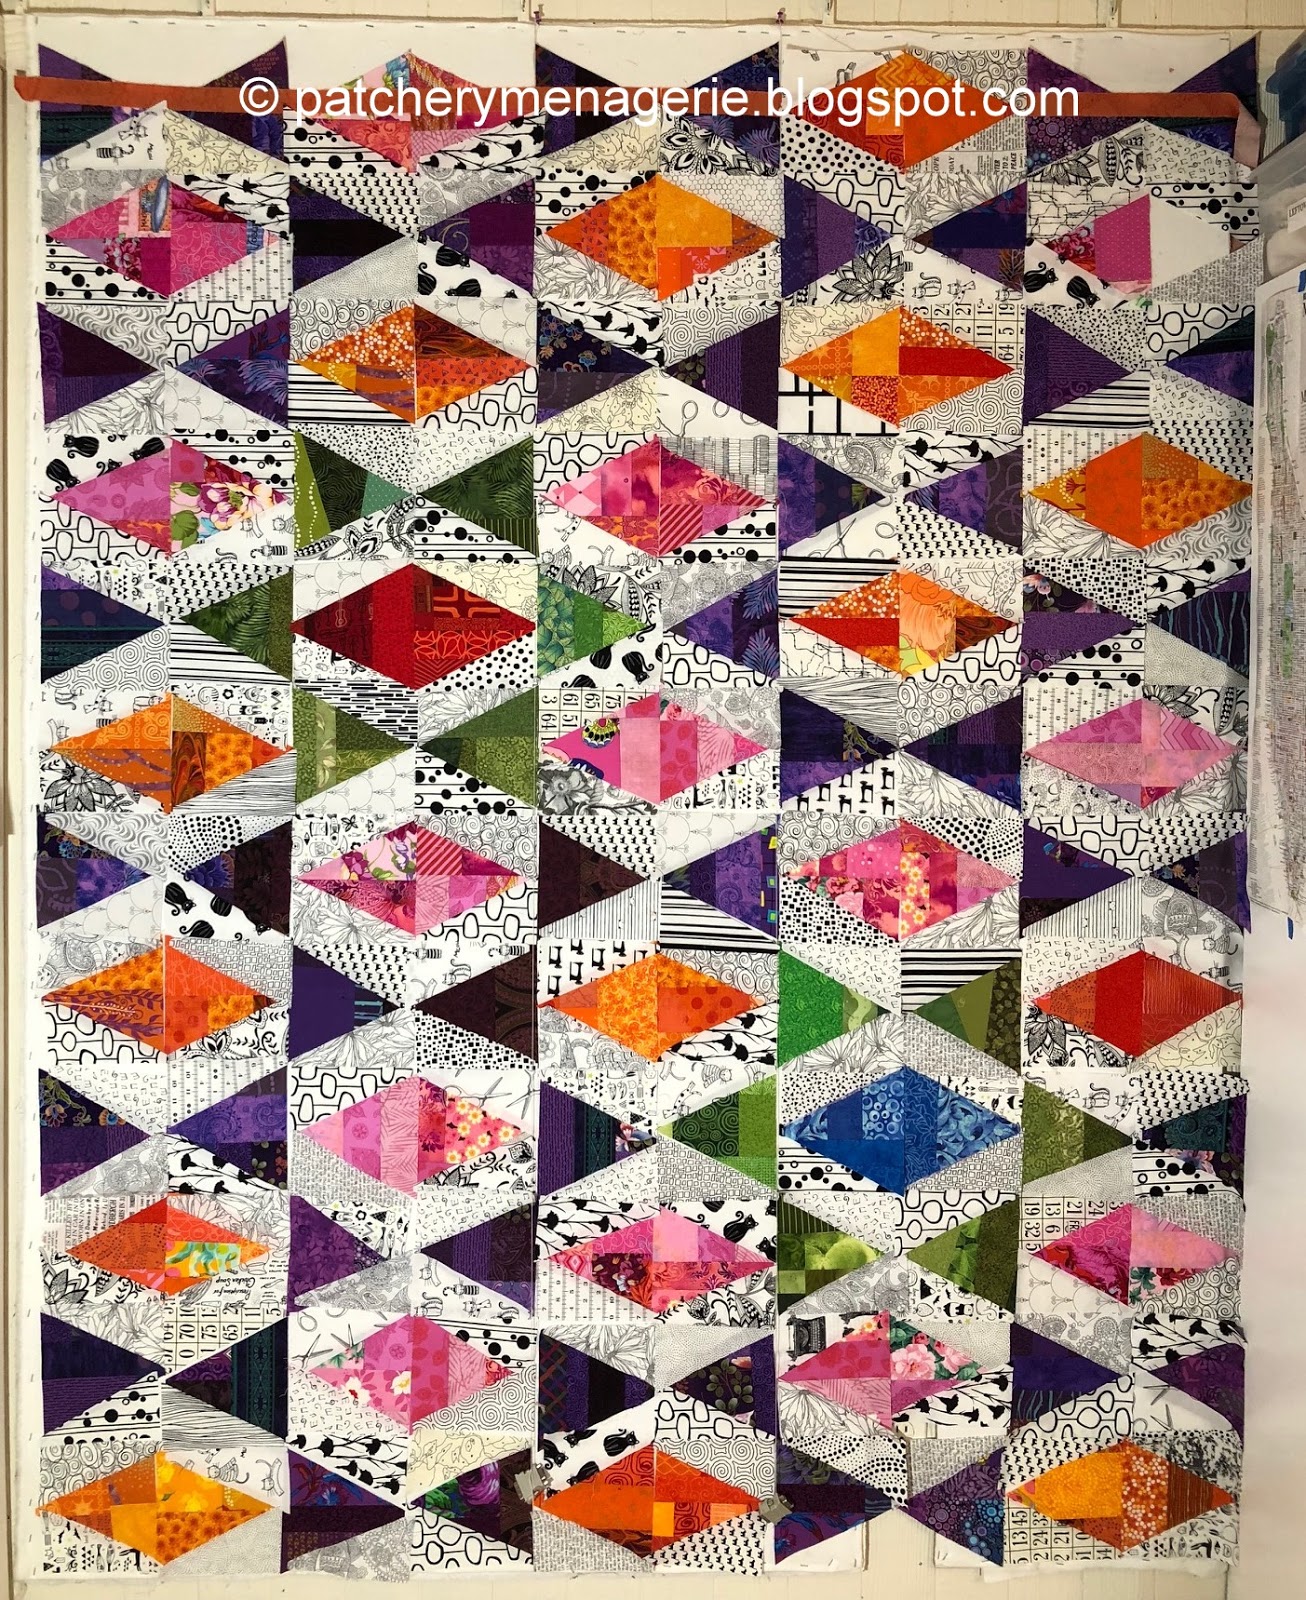
But there was one more option. The other day I had tried making diamonds of the darker black on white fabrics, and that seemed to be too much like a whack upside the head. Maybe I needed a gentler approach?

Here I made the diamonds the lightest of the black on white fabrics, and surrounded them (mostly) with the darker black on white fabrics.  I like this  a lot better, The lightest diamonds disappear like I wanted them to, but the integrity of the overall design is maintained.  I'll look at this over the next few days, and then I'll start sewing these blocks together.

By the way, this isn't the whole quilt. The bottom part was so close to the floor I had to get down on my hands and knees to work on it, which wasn't helping. So I folded up the long vertical rows and pinned them higher up on the design wall so I could work comfortably.

This is the whole thing. The five big vertical rows are sewn together. Four more seams and the top will be complete. It will measure 60" x 66".

And now to reply to some of your comments:

Somebody asked if I was going to make the top like the bottom. NO! Because to do that I would have had to rip out six blocks and then recreate the black on white diamonds like I did on the bottom. The hardest part of THAT was I was running out of my really light fabrics, and let's face it... One long diamond block had eight different black on white fabrics, and those fabrics could not be adjacent to each other in neighboring blocks. It was a logistical nightmare in the extreme to make the ones I did make. I was in no mood to rip things out and go through that again!

I considered adding some White On Whites to the bottom of the first photo of yesterday's post, but that would have added an element that was not present in the rest of the quilt. It wouldn't have fit, and it would have been the lightest light area in the whole quilt, and it would have been concentrated at one part of the quilt, and that kind of contrast would have drawn the eye there. That's a design flaw, so nope.

I also nixed the idea of a zig-zag edged quilt. It would have been too cutesy and too tricky. I don't mean tricky = difficult, I mean like a trick, like bad thing. I wanted to suggest the idea of floating panels, but I had no intention of representing them literally. (Remember, I can draw anything I want and make it look exactly like it is, so if I want a picture, I'll draw one.)

Adding "piano keys" of light blue to the bottom would have added another element that was not present in the rest of the quilt. It would have been a "what is THAT for?" or "Where did THAT come from?" and therefore not an option.

I had to continue with the black on white fabrics, because that was an element that was common throughout the quilt. It's another reason why I also did not use any of the "new" fabrics I bought recently.

I've always felt that at some point, a quilt starts making demands. "The quilt wants this, the quilt wants that..." What's really happening is a design develops and you have to respond to it, but find ways to continue to what's going on in the quilt and yet expand upon the idea that is there. I tell people that the farther you get along with stuff like this the more limited your options become. In other words, every choice you make informs yet limits the choices you have yet to make. So in order to continue the design I had yesterday (in order to make it cohesive), there were some things I simply could not do.


If you are interested in making a scrap slab quilt like this one, you can get my tutorial in my Etsy shop, here. It's an instant download, so you can get started right away!

Thursday, December 27, 2018

Guessing Game

I like this, with the bottom stopping like this, with complete hex stars. I like the way it looks like fluttering banners. If I keep this layout, I have to figure out how to fill out the rest of the space at the bottom.

 If I filled the design with scrap triangles, the quilt would look like this. It's fine, but it's kinda predictable.

I thought, well, if I am going to go with dropping the blocks off, I need to fill the space. What if I made triangles from White with Colors fabrics and tried them as the diamonds? Uh, nope! Damn those are ugly!


Here I've filled the space with black on white fabrics. If you look closely you can see I've tried to use the darker black on white prints to create the diamonds. I'm not sure this is working for me.

I'm going to have to think about this a bit more.


Wednesday, December 26, 2018

Replenishing the Blacks on White

From time to time it's necessary to do some stash replenishment. I felt the need for more black on white fabrics for my scrap slab triangle quilts.

I bought sixteen fabrics. All of these were half yard cuts except for one. As you can see I shopped for a variety of pattern, scale, pattern density and design.

I really liked the scale of the print on the left, and I deliberately chose the paintbrushes with their pops of color on the right.

I also liked the little bits of color in this science based print.

I bought a full yard of this jungle print.

These llamas struck me as delightful. In all likelihood they will not be used in the scrap slab triangle quilts, but you never know!


Sunday, December 23, 2018

Merry Christmas!


Merry Christmas to all my readers, all around the world!


This is my Happy Holidays quilt, made with my free pieced birds. It's all original and designed by me, Lynne Tyler. It is totally free-pieced, made without patterns, templates or paper piecing.


If you want to make these birds, you can get my tutorial here at my Etsy shop.

Saturday, December 22, 2018

Critical Mess

I never really cleaned the studio after making the Early Autumn quilt, and now I'm sewing up the Whirlygig quilt. It's manageable, but every time I looked at the floor it made me crazy.

 There were thread and fabric bits all over the place, so I cleared out the big stuff and let the robotic vacuum cleaner loose.

This was what it picked up. Wow. Needless to say the studio looks much better now!

Thursday, December 20, 2018

One Small Problem

There's one small problem with this arrangement. Well, more than one actually, and the biggest one sure as hell isn't small.

I don't like it.

Why?

Well, it's perfectly symmetrical, for one thing, which can be boring. And it's a bull's-eye for another. Which means the center of the quilt is in the exact center of the quilt and everything that surrounds it is the same and predictable. And you all know me, predictable isn't exactly what I like best.  So it's boring. There's nothing here for the viewer to discover on their own. The green hex star and the others are basically stars-of-David and while there is nothing wrong with that, I just don't want that to be the one thing that everybody sees.

Blah and bleh.

I like making my viewers work for it. I like making them discover things on their own.  And I really like the large lazy hex stars this way. They are more open, and they don't hit you over the head with their being stars. And the horizontal diamonds are much more relaxed and soothing. I like the overall pattern of this, with all the area full of stuff.

There was a part of that top design I liked, so I wondered if I could have it both ways. I filled in the "sides," took away those pointy purple triangles and flipped it on the side again.

(I rotated the picture, so it looks funny.)

But this I can work with.

I can't work with it much until I sew more things together, because rearranging all the pieces is crazy work, and I am not willing to do that. The four vertical rows on the far right are all sewn together. When I get more sewn together I'll figure out what to do on the bottom edge.

Maybe I can have it both ways!

Monday, December 17, 2018

On the Side

I like everything about the design of this quilt except for one thing.

If I made it this way, it would be 72" wide by 90" tall. Which is bigger than I want to make. Bigger than is comfortable to use.  However...

If I trimmed the design down a bit it becomes 72" wide by 66" wide. Which doesn't really work unless you flip it on its side.

So I did.

Saturday, December 15, 2018

Turks! Stars!

After a lot of thought, I decided to try some turquoise diamonds. Or Aqua, I suppose. The new blocks are a very light blue green. I like the value of these - they aren't darker like the dark green or blue or red ones. I felt they fit in with the whole color story that was already going on. But no matter how much I pushed these turquoise diamonds around, they just didn't look right to me.


This layout, discovered at the last Scrap Slab Triangle class, was my inspiration. When I got up this morning and looked at my design wall, I realized I had strayed from my original idea. Maybe it was time to just give in.

A side story: At the end of the most recent bird class a few weeks ago at Quilted Threads, one student was designing her bird and was choosing fabric for the beak. She had a piece of blue fabric that neither her friend sitting next to her, nor I liked very much. We kept trying to offer her other options, but she kept coming back to the blue. After the fourth or fifth option, I put my proverbial foot down. "Nope. You've gone back to that same blue every single time. If it speaks that much to you, then you HAVE to put it in."  She did, and her friend and I agreed it was a good choice.

Sometimes things just CALL to you. I tell students "What the quilt wants, the quilt gets."

So it is with this. I decided to stop fighting my urge to make this quilt inspired by that original design and just go with it.

I removed all the turquoise (ok, I am going to settle on "aqua") diamonds and then just put it smack dab in the middle of a green diamond. I liked it. Then I started to arrange the diamonds around it.

I liked it, but I knew it needed more aqua...

 This was better, but then I looked at that circle of orange diamonds.  Hmm.  All the other colors are cool colors, which I really liked, but this put the emphasis on the orange. Before I committed to it, I had to try reversing the pink diamonds with the orange ones.

To me, this was clearly better. But then I looked at the edges, at the partial purple hex stars around the edges. I knew changes needed to be made there, but I had to work out the size first, so I got out my little sketchbook.

I think I might let the partial hex stars just fall away at the edges. I have to make some more purple scrap slab triangles, but that's not hard.


If you want to make a scrap slab triangle quilt, you can get my tutorial here, at my Etsy shop. It's an instant download, so you can get started right away.


Friday, December 14, 2018

Whirlygig

Right now the working title of this quilt is Whirlygig because it's got my head spinning.  It took me about 2-1/2 hours last night to add the black and white side triangles. Before I got started I would have told you I didn't have enough in my stash. Clearly I was wrong. I did have to cut some more, but this gives me enough to work with. (The design, I mean. These blocks will get rearranged once I decide the colored triangles are where I want them.) 


I really didn't want the dark purple diamonds in the middle of the green hex stars. I thought it just attracted too much attention, so I thought, what is along that side of the color wheel but isn't so bright? The answer is Lavender, but as you can see in the photo above, it is just too wimpy.

So I tried Blue. Eh.

So I tried Red. I'm not much a fan of that either.

So I thought, well, maybe I just need MORE Blue. W-e-l-l, dunno.

So I tried putting Green diamonds in the purple hex stars. Not so sure about that either.

So then I put some Purple in the Green hex stars and realized that oh holy crap, now the thing is just too predictable, and then I realized, oh sh*t, that Green hex star on the lower right is exactly next to the Purple one (meaning they are on the same row) and WE CAN'T HAVE THAT! but I will have to fix that later.

So I took the Green diamonds out of the Purple Hex Stars and stood back and laughed.

That was exactly where they were when I got started.

Now, I hope you are all laughing, because this really is kinda funny. Just about ANY color combination I played with above would make a VERY pretty and attractive quilt. There is nothing wrong with ANY of them except that something in MY head isn't happy, and I don't know what it is yet.

I'll figure it out, and I'll fix it, and with a little luck (and more work and grumbling, naturally) I hope to knock this sucker out of the park.

As Oscar Wilde once said, "Oh, the anxiety. I hope it lasts forever."


(If you want to make a scrap slab quilt, you can get a tutorial on my Etsy shop, here.)


~ ~ ~ ~ ~ ~ ~

Happy Birthday Mary!

Thursday, December 13, 2018

Or Hex Me Not!

When I am designing a quilt, I can either work or I can take pictures. When I take pictures you get to see a lot of step by step, but it slows me down. When I work, I make decisions, make changes and don't take pictures. It goes faster.

So you are going to have to take my word for it when I tell you I tried placing big colored hexagon stars all over the quilt, but I just didn't like them. I also didn't like the value changes of the dark purple hex stars and the light ones. I mean, they were pretty and everything, and you cold really SEE the hex star shapes, but they took over the design, and I didn't have much flexibility about where they went in the quilt. To be complete, they had to live near the center, and close to each other. I could have spread them apart but then I would have been making a king sized quilt and I DID NOT want to make a quilt that ginormous. I also didn't want them to take over. Like four Divas.


In the end I decided all the hex stars would be DARK and COOL colors and the diamonds floating around and inside them would be LIGHT and WARM colors. I also rearranged them slightly so the design was more centered than it was yesterday.

The other interesting thing that happens is that once I started filling in all the pink and orange diamonds, the hexagon stars disappeared into the background. Part of that was my decision to make them all dark, or similar in value. They are still there, but the viewer will notice them gradually, which is what I prefer anyway. I put the pink and orange diamonds in the centers arbitrarily, but before I start sewing this together, I will take a good hard look at their placement and tinker with them so there aren't too many in one spot and they are distributed more-or-less evenly throughout the quilt.

This is one design that looks dramatically different when looking at it through the camera as opposed to looking at it in real life. As soon as I looked at it in the camera I knew I would chop the design across the top and bottom as shown in the photo above, with the orange fabric strip going through the blocks horizontally.

In every quilt I like to have something that whacks you upside the head, that makes you sit up and take notice, that's something you see and think, "how did I miss this the first time I looked at it?" I'll leave it to you to work out what I did, and it might not stay just like that. We'll see. And I ran out of orange and pink slab triangles, which is why a couple of places are empty. I'm not going to leave them like that!


For more information about making these scrap slab triangle quilts, you can get my tutorial here, on my Etsy shop. It's an instant download, so you can get started right away.


Wednesday, December 12, 2018

Hex Me!

I love pattern. I love graphic designs (which means I like the interplay of flat, geometric shapes) so it is perfectly logical that I love Amish quilts the best, but these triangle in a box blocks have so much potential and I am having a lot of fun with them.

This is I don't know how many scrap slab triangles arranged on the design wall.

See how six of them make a six pointed star shape with a hexagon in the middle? Very nice. But notice my design wall only has room for two full shapes, then it has a half a shape. That means my quilt will have to be 18" wider, or 72". No problem, I can do that. I'm going to have to shift everything over so the design will be centered while I figure out what I want to do with it, but that will happen later.  While this is quite lovely, I have other colors I want to play with.

This is kinda sorta fun, but those half designs on the sides REALLY have to be completed shapes. Again, not a big deal, and not worth stopping the creative ideas that are zinging around. Time to fill up those empty hexagon spaces...

This is cool, but it's a bit too regular and predictable for my taste.


I like it with lots of color.

There is definitely a lot of potential here, and I am just throwing the shapes up on the wall to make the pattern. I haven't fine tuned anything, like finding the right placement and orientation of each triangle slab. I'll find it. I'm in the early stages yet.


Tuesday, December 11, 2018

The Stack

Making slabs is a lot more fun than folding fabric and sorting it. Sunday night while I "watched" TV (after the crushing final play of the Patriots game), I cut triangles from the green slabs.

No, I don't know how many there are.

This many! LOL!

I have a lot of green scrap slab triangles, and I have a lot of purples and I have a lot of pinks. Ought to be a really pretty quilt. I guess that's up next.

I picked up a lot of the fabric scraps that were all over the floor and folded and put away some fabric. It's not as clean as I want it to be and I still do have to fold and put fabric away (as well as replenish my green fabric stash) but it's a start.

CHERIE... You are hilarious!

Monday, December 10, 2018

Cleaning Up the Green

I used virtually every piece of green fabric I had in my Early Autumn quilt and made an epic mess in my studio.

 I had a lot of pieces left over, and a lot of triangles that never made it ino trees.


Rather than fold all the little scraps and put them away, I decided to make slabs and cut them into triangles.

This is a much more fun way to clean the studio.

My Dad came over and put the molding back up in the kitchen, so the fridge move is now officially complete.