Friday, May 30, 2025

This and That


I have white irises in my garden. I was heading out to get my haircut yesterday and I looked at them and thought... oh, I should bring them to my hairdresser, Jen, so I went back inside and got scissors and cut a stem for her.

When I got there, another customer looked at the stalk of irises in my hand and asked if they were real.

"Yes, I just cut them." She replied she'd never seen irises quite so big. 

When I handed them to Jen a few minutes later she was absolutely delighted, and stuck them in the vase with a Rhododendron flower and some Bleeding Hearts. What's funny is they looked like they were designed to be there.

Irises don't last long, but I thought Jen would enjoy looking at them for at least one day!

I'm teaching a Birds class at Night Owl Quilting Studio on Saturday, so I've been getting ready for that.

I've finished planting the herbs in my garden, and got a hanger and macrame hanger for a spider plant that I'll be putting out on the front porch over the weekend.

Otherwise I've been listening to the tennis at Roland Garros and streaming Vera and Top Chef.

Next up is finishing the Kangamangus quilt.

Wednesday, May 28, 2025

99% done...


When I designed the top half of the quilt I think will be called Spring Chatter (thank you Elle), I knew I didn't want the birds stacked up neatly one on top of the other. I wanted some taller and some shorter. And I knew I wanted them spread out a bit.

With WOW (White on White) fabrics this would have been a lot easier. I could not introduce any green fabric that was not already in the quilt, and I had to spread them around and still not make any area too light or too dark.

Working on the floor was both easier and harder. Easier because I could reach it, harder because I could not see the whole thing.

When I started sewing it together I knew how to do the bottom part, but had no clue how I would approach the top. The only way forward is through, so I just started at one side and worked my way over. 

Originally there could have been five or six set in squares, but in the end there were only three. 

This was a rather large one, so I made sure to fussy cut it so it did not have any strong pattern in it.

Here is the top part almost sewn together. It needed to be sewn to the row underneath it, and then to the bottom part.


I still have to trim it a bit and make sure there is enough fabric all around so no bird loses his or her tail feathers in the binding, but this is it. My first thought after I put it up and went across the room to look at is was that I should have spread more different fabrics around on the bottom. But I think I will leave it as is (because I'm not going back) and because I kind of like it. It's as if the birds are in a tree and you can see more sky around them toward the top. That's my story and I am sticking with it.

Although the QUILT looks OK, the photos look darker and the quilt really isn't that dark, so I took it outside.

Yup. Works for me.


Sunday, May 25, 2025

Building Blocks


The quilt is coming along, but the pieces are NOT sewn together. This is just how I think they are going to fit together and the fabrics I think will fit in the empty spaces.

Because I am short, and ladders and I are not always on the best of terms, I moved the top half of the quilt to the floor, so I can access the pieces more easily. This was rather tricky. You can see the large rulers which helped me work out the area I'm working with.

At this point the birds aren't lined up in regular rows, so everything is "fiddly."

An aside:
While I work in the studio I often stream something that provides some background noise. As I was working on this, I was streaming something called "Make It at Market," from BritBox. It's about professional craftspeople helping amateur crafters make the jump from amateur to Business Owner. We see various craftspeople describe their work. A basketmaker just described something as "fiddly." She was from Wales. So clearly the term "fiddly" has a more widespread use than my student last week imagined.

I'm glad I use pins and always check what I'm doing. Had I not used pins I would have sewn this wrong.


This is the upper right corner of the quilt. There is a set-in-square above the middle bird in the bottom row. There will be another one above the head of the bird on the lower left.

Here is where I am so far. It doesn't look like much, but there is so much thinking involved that it's really slow going.

I also got my vegetable garden going. It will be small, only one zucchini plant, one cucumber plant, a row of bush beans and a row of snap peas. I have a tomato plant, and one cherry tomato plant, and two pepper plants, one sweet and one spicy. All this in addition to the usual herbs that I plant every year in containers. I planted marigolds in the garden also. They are good companion plants for tomatoes and peppers.

Thursday, May 22, 2025

Major Surgery

In yesterday's post, Julie pointed out that the two birds I have circled were on backgrounds that were too light, and they looked like a hole in the quilt.

She was absolutely correct. I'd have to remake both birds. 

Not a problem at all for the bird at the very top, as I hadn't sewn him to anything yet. You can see the revised bird above.

For the pink bird in the second row, however, it was a different story. I had to completely remove that bird block, create another one, and sew it back into place. I thought it would be easier to remove it and the adjacent bird first. This is one of those times where there is more than one way to do something.


Here is the replacement bird. I found those pink striped legs in my recycle pile and just had to use them. Otherwise I tried to duplicate the original bird.

Once I made the new bird, I had to cut it to the exact size of the original, and then sew it to the other bird I removed, and then sew them back into the row, and then sew the row to the other two rows.


Surgery complete. I am pleased to say the patient made a full recovery. I had thought the yellow bird to the left of the new pink bird was overwhelmed by the fabric surrounding him, and had previously made the decision to change that. I made that fix when I replaced the new bird.

I'm really wrestling with what to use to fill in the spaces between the birds. Sometimes a similar toned fabric just looks blah or dreary. I had to order more of some of the greens I had because I was literally running out of what I considered suitable options.


If you want to make birds, you can come to NH and take a class at the Night Owl Quilt Studio in Goffstown NH, or you can get my tutorial here, at my Etsy shop. It's an instant download, so you can get started right away.


Tuesday, May 20, 2025

Fussing and Finagling

 I know I can sometimes make it LOOK easy, but it really isn't.

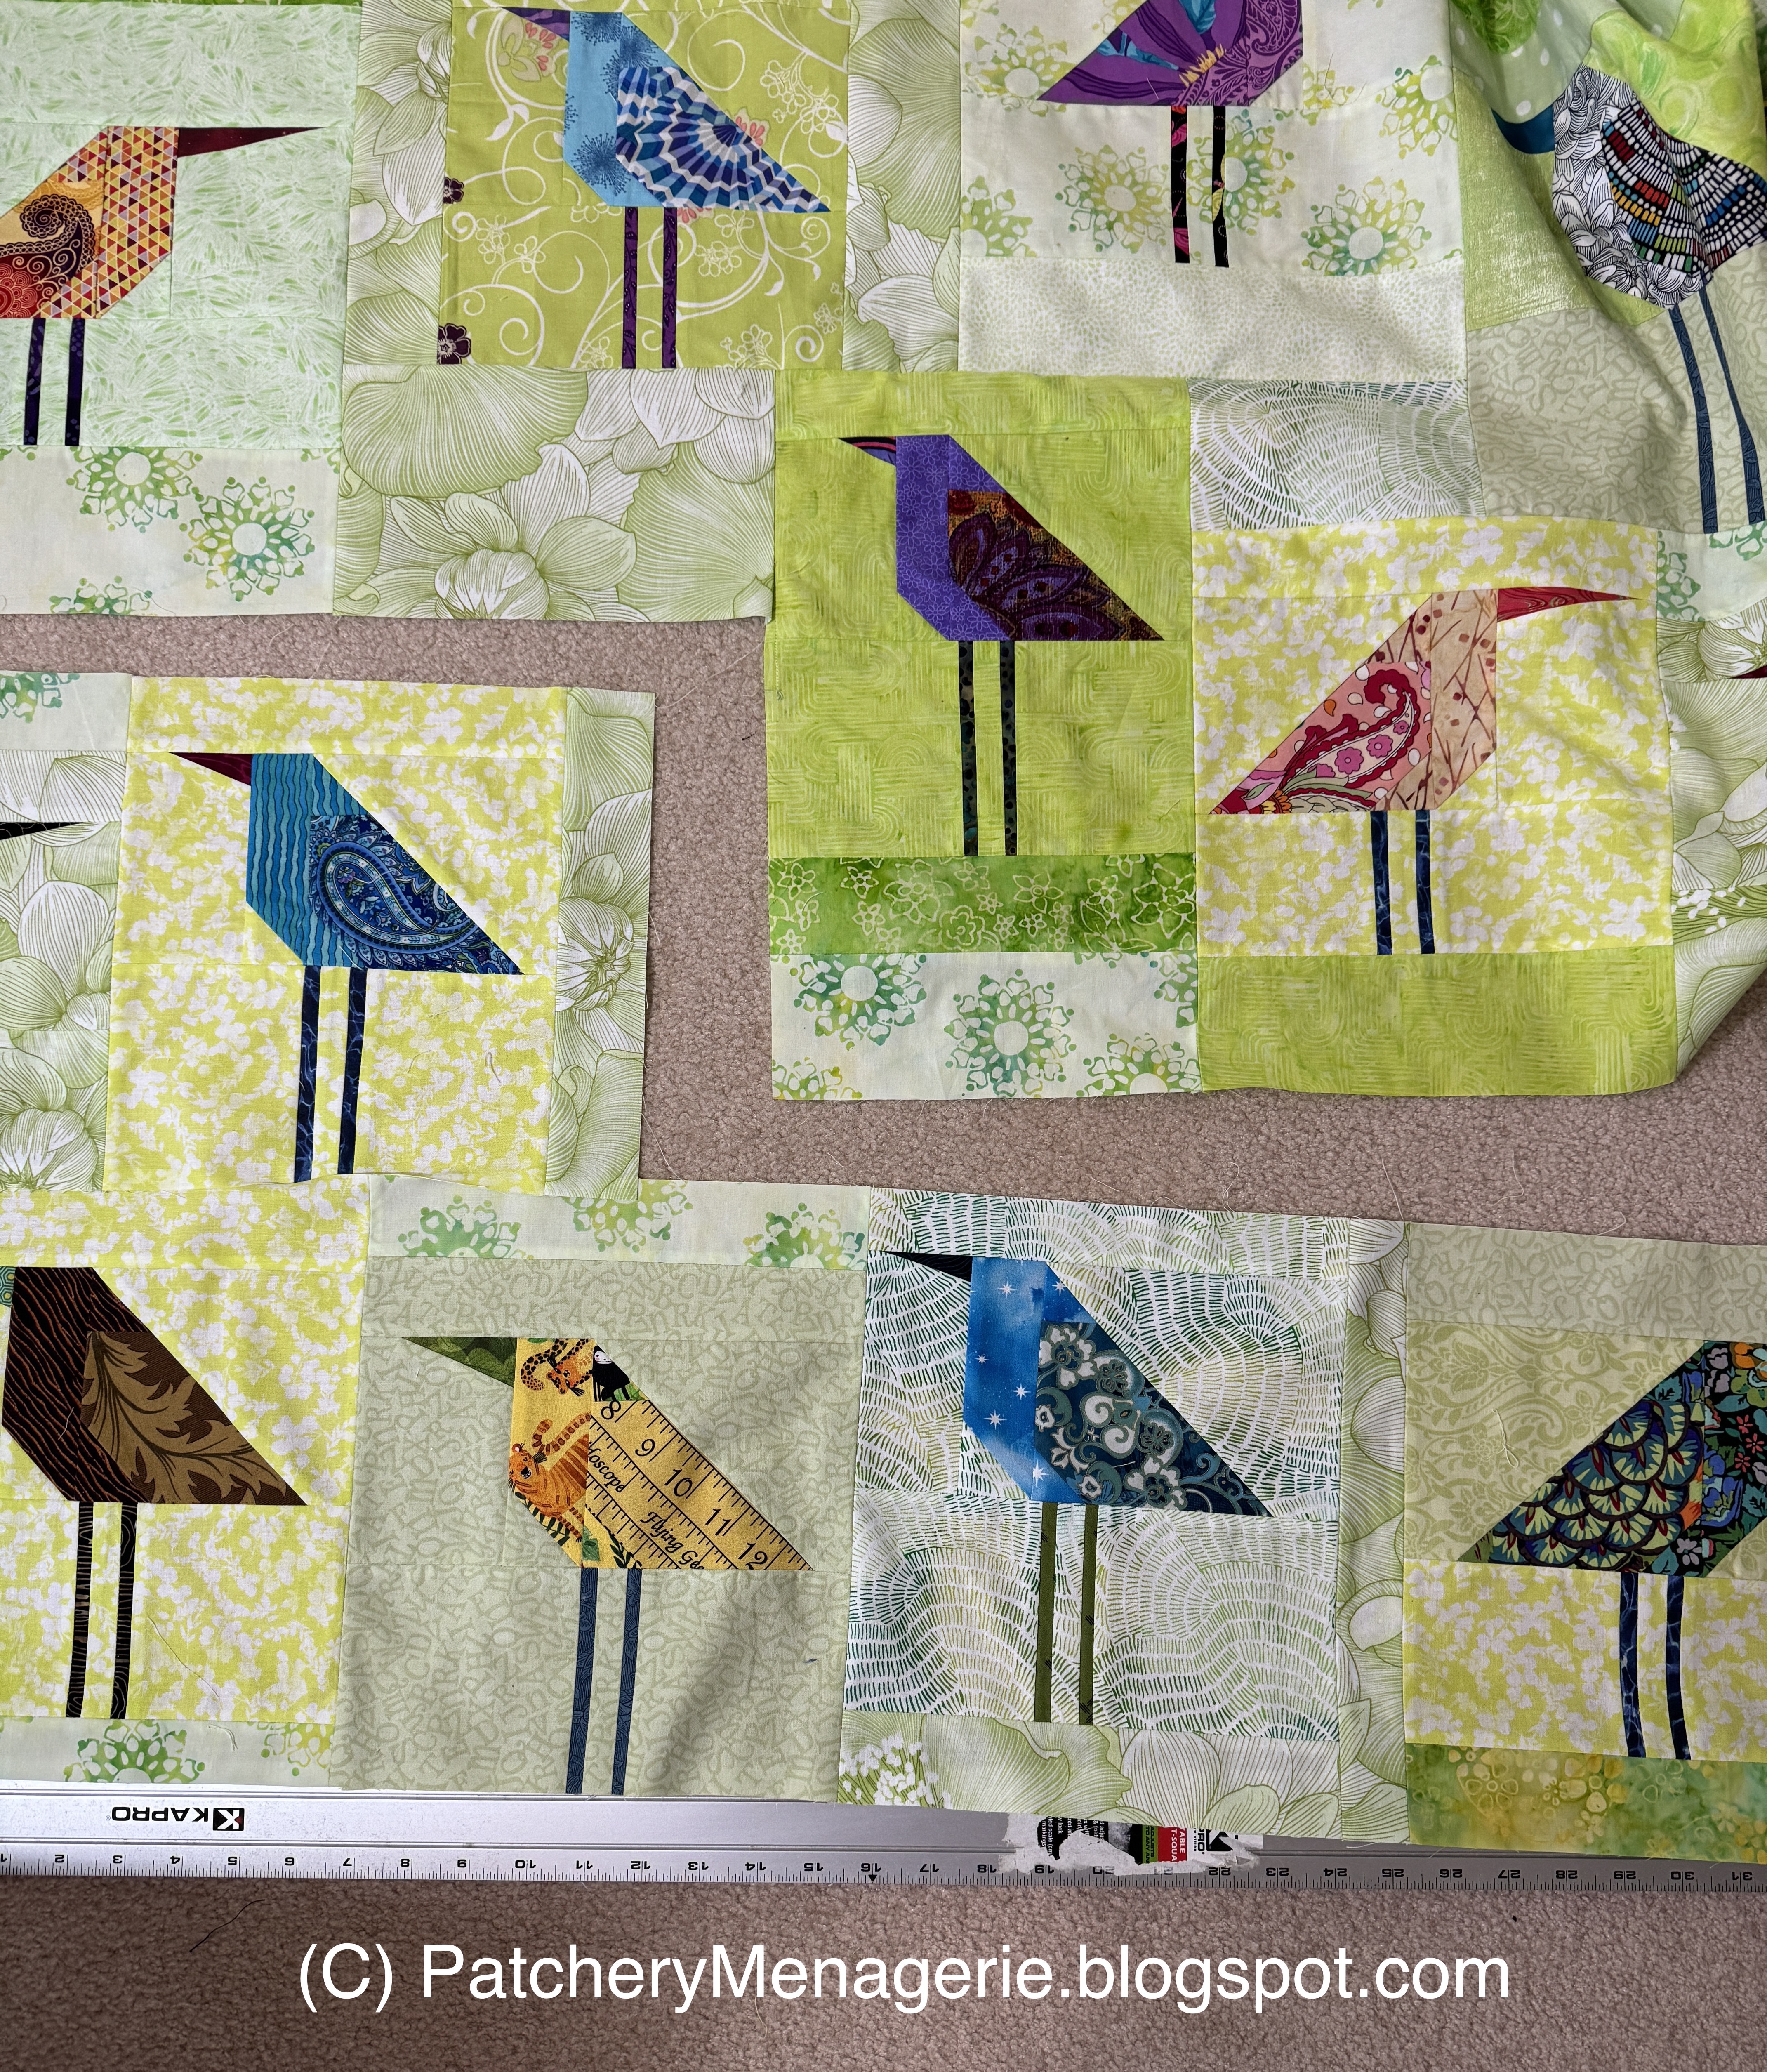
This is the left side of the fourth "row" up from the bottom of the Green Birds Quilt. (Thanks for all the great suggestions for titles by the way. I haven't chosen one yet.)

So yeah, ok, I have to add some fabric to the tops and sides of the blocks and then join them together so they are straight and square. Not so easy.

Anyway, I added the olive-y fabric to the bottom of the brown bird on the left and stuck it up on the wall and immediately had second thoughts.

I ignored them and went to work on the birds on the right side of the row. The great debate there was whether I should sew all five birds together in ONE row or raise the right side, in which case I would need a narrow set in square to get it all to fit the way I wanted. I can do that, no problem, but the size of the set-in square would be less than one inch tall, and that to me was excessively "fiddly."

I try to avoid "cute" and excessively fussy and "fiddly." (One of the students in my class last week told me that using that term, "fiddly," marked me as a native Granite Stater. That was new to me.)


I ended up replacing the offending strip of fabric before I got to the other problem.

So I decided, brilliant me that I am (speaking facetiously), I would trim 1/4" off the top of that three block panel, and then sew the two panels together, and then trim the excess 1/2" or so from the BOTTOM of that same panel.

Well you know damn well it wasn't quite THAT simple. Much fussiness and fiddling ensued. The air turned blue. Yes, I swore. Often and loudly. But I kept my cool and got it done.

AND WHEN I DID GET IT DONE, I put all my tools away and cleaned my worktables. I knew that staying OUT of the studio for the rest of the day would help me keep my sanity.

I haven't sewn that fourth row to the rest of the quilt yet. I have learned to avoid pushing my luck.

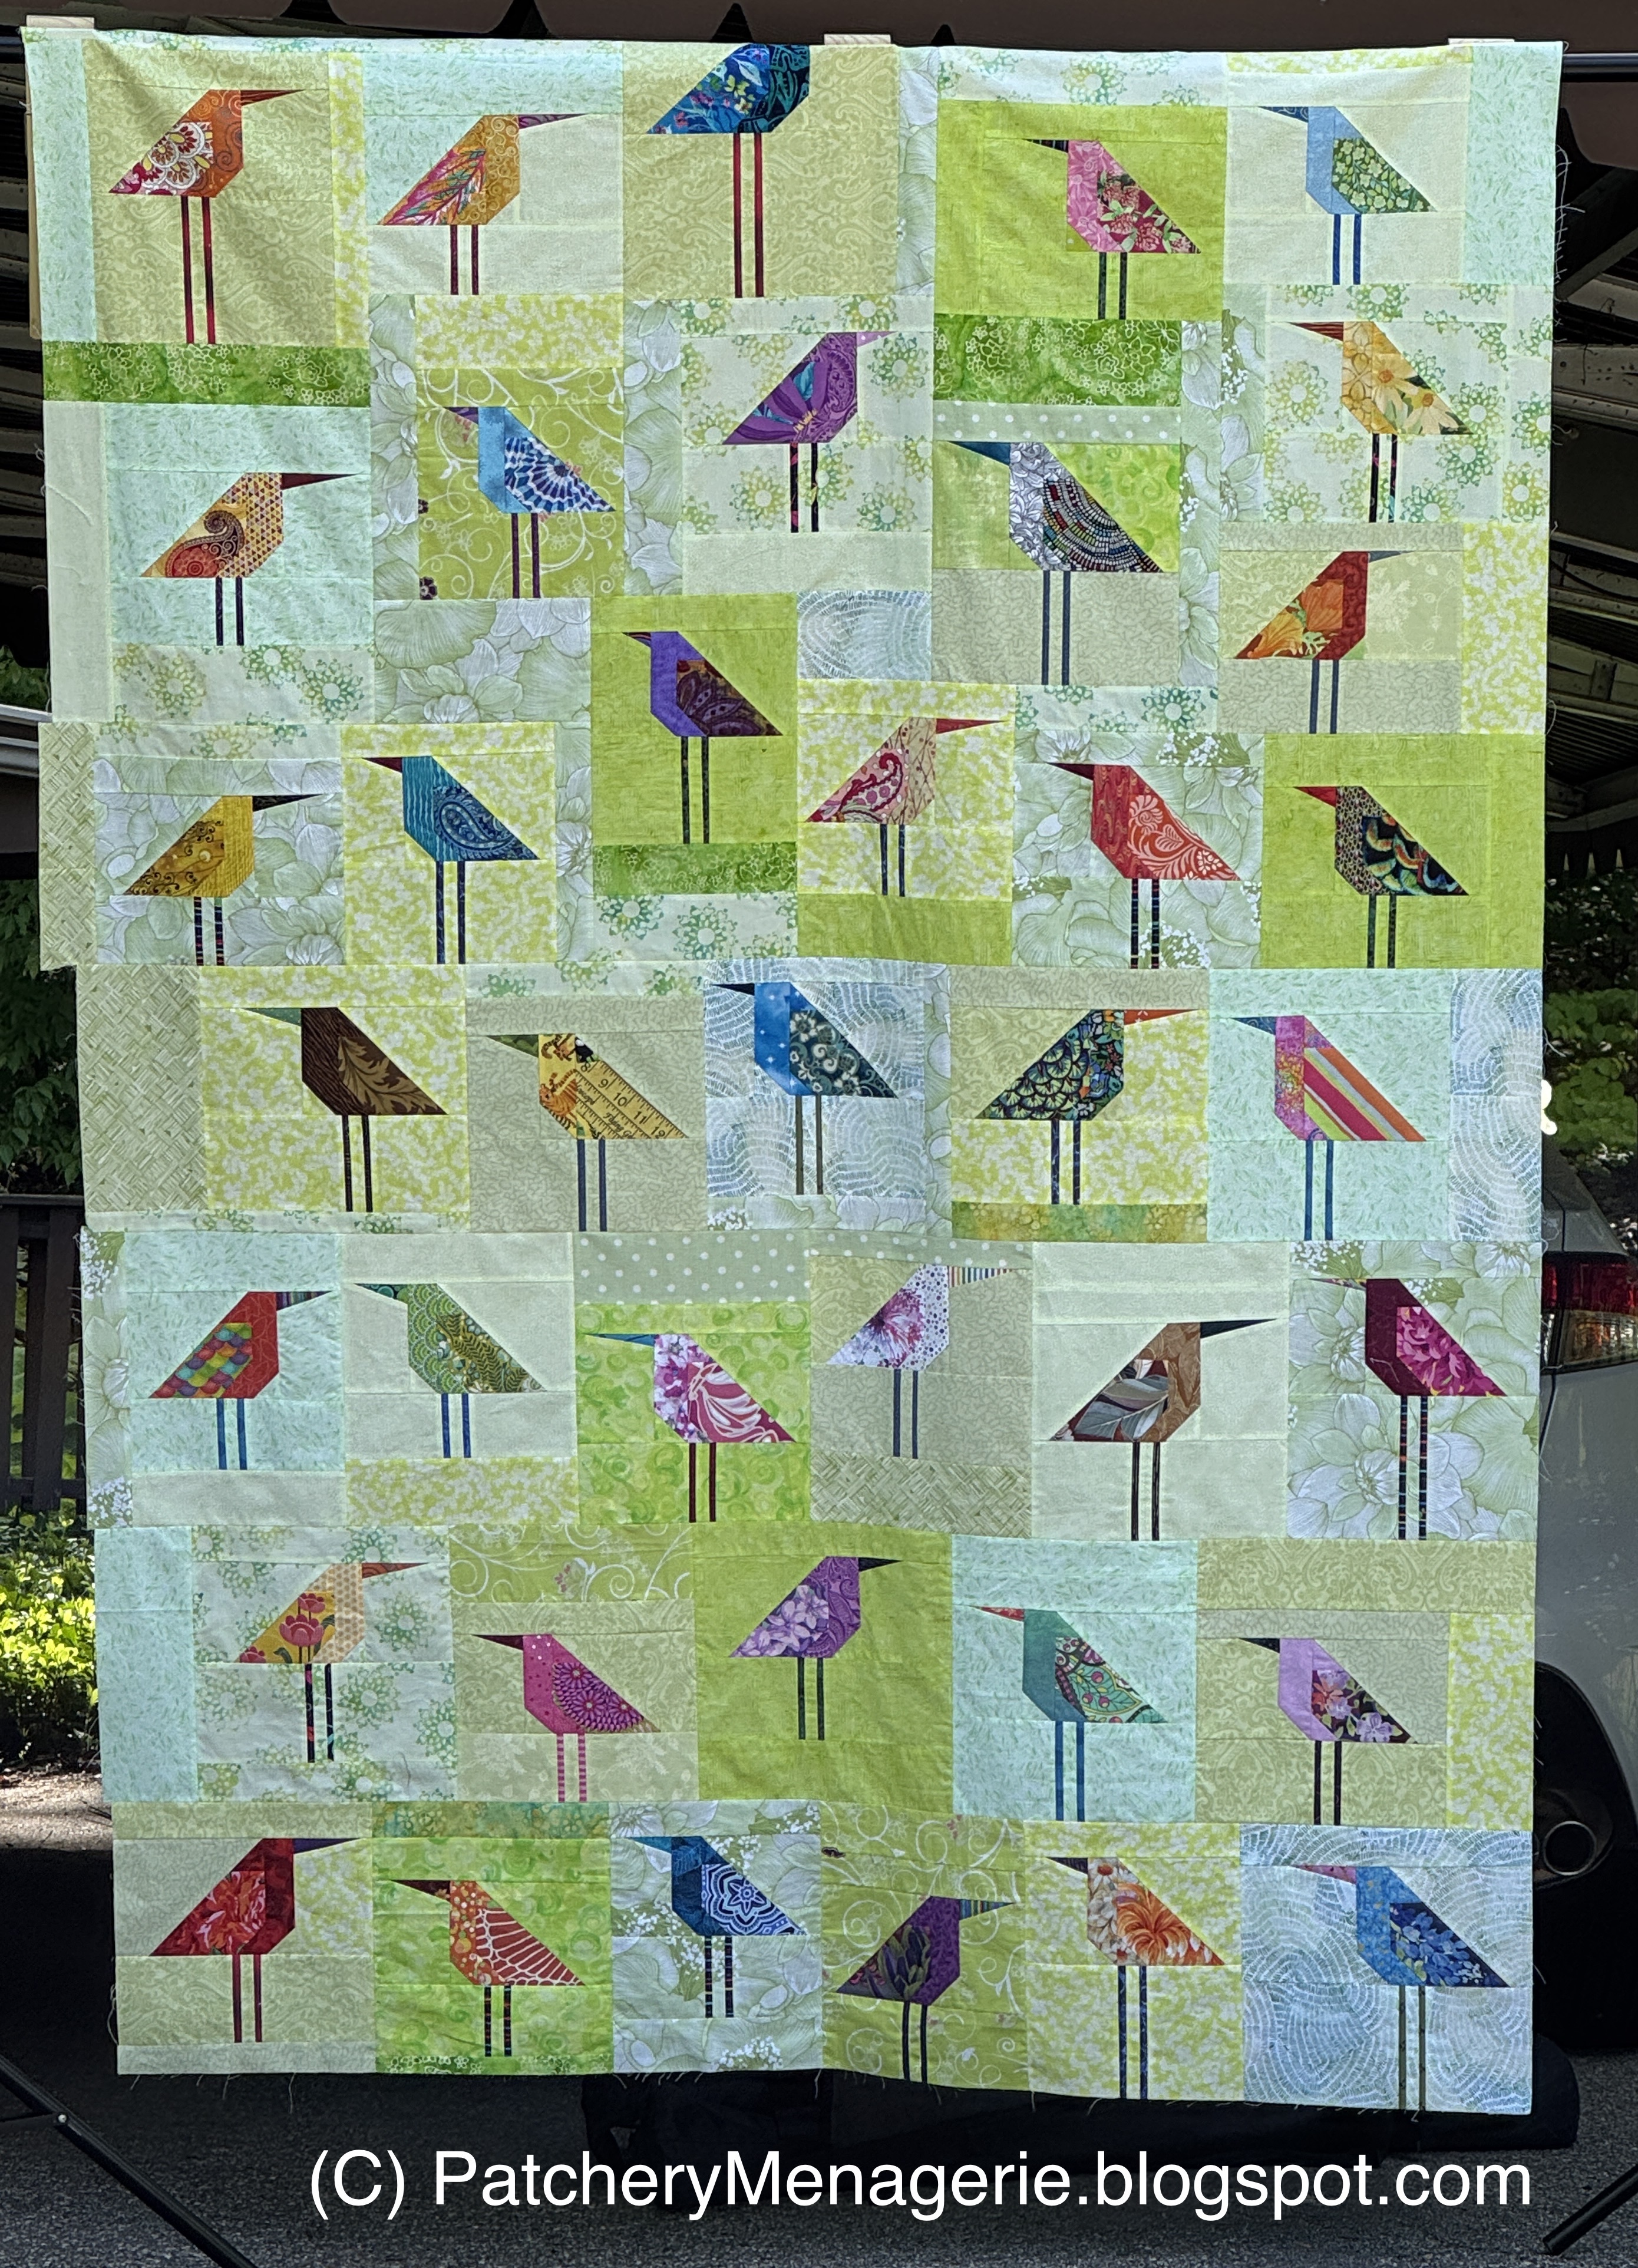
The next group will be at the upper right, and before I finish the top I expect to insert at least three set in squares. But one thing at a time, and one block at a time. This would have been much simpler if I had used WOW (white on whites) for the backgrounds of the birds, but been there done that, and I like to push boundaries, so here I am. I am more or less pleased with this.

And oh yeah, see that yellow bird, far left, second row from the bottom? He has WAY too much of that same fabric all around him and that will have to change.


Sunday, May 18, 2025

One, Two Three

 I've started to assemble the blocks in the Green Birds quilt. This quilt needs a name. (Hint, hint.)

Here is the very bottom row.

Here the bottom two rows are sewn together.

Here the bottom three rows are sewn together.

Thus far, all I have done is extend the size of the bird block and sew them together. Thus far the rows line up, but after this the birds jump around a bit and they won't fit together in neat rows.

I'm not showing HOW I plan to fit them together, because the last time I did that quilters used my layout and essentially copied it and used it on their own quilts. So, sorry, but not sorry.


Friday, May 16, 2025

Class!


It was a good day at the Night Owl Quilting Studio yesterday as I taught my Liberated Birds class. Above is Lynne (not me) with her first bird. Pretty sure the smile on her face tells it all.

And this is Lisa, who had a blast.

This is Karey, before she figured out how long her bird's legs should be.

I didn't get to take a lot of pictures, because I was very busy, but a great time was had by all. The next class is May 31st.


Monday, May 12, 2025

Six More Green Birds

 I made six more birds on Sunday.

 
This is a revised bird...
This was the original. I felt the wing was weak and didn't look very solid.


This is another revised bird, facing in a different direction.

The orange beak was wrong.

I needed a green bird with a light background so I made this one.

Another revised bird. By this time I'm figuring out that I need birds with particular backgrounds - light - medium - dark or busy or plain.


There was nothing wrong with this guy, but I felt he was too dark.

This is a rebuilt bird. Meaning I kept the wing and. breast and body and replaced everything else.


All the revised birds had the same background fabric throughout. This one had more different fabrics than most and I felt it looked a little disjointed.

I needed a yellow bird with a medium green background so I made this one. I love the wing fabric and thought the juvenile jungle print was a perfect pairing. I even tried to fit a fussy cut monkey in the head triangle. I don't remember when or why I bought these yellows, but I am glad I did.

I've been arranging and rearranging the birds on the design wall and this is very close to "IT." I plan to revise the birds at the very top upper left and right, and I need to fill in the empty space.

This is tricky. Not only do I have to balance the left and right facing birds, but their color and the color of their backgrounds. I am pretty sure I know what I am going to do in the empty spaces, but I won't really know until I start putting these together.

And just so you know, a rule I have about assembling bird blocks into quilts is that I won't cut a bird apart, but I might trim legs, or the block above the head, or space on either side. I don't have any trouble using a set-in square wherever I need to.


If you want to make birds, you can get my tutorial here, at my Etsy shop.


Sunday, May 11, 2025

More "Green" Birds

 I was busy yesterday...

This is a new bird.

This is a revised bird. This one has a new breast and body fabric because I didn't have any of the original left. The beak is also new.

This is a new bird.

This is new also. Believe it or not both of these two came from the same wing fabric.

Oh, a stash is a wonderful thing.

Another new bird. This one came from the backing of one of the Nightingale quilts.

I modified this bird. I replaced the different greens with the same green batik throughout. 

Another new bird made from fabric I bought on sale.

I'm not even sure why I bought this fabric, when or where it came from.

Another new bird.

This is a revised bird, but he's facing in a different direction.

This is a revised bird.


This is all of them up on the design wall, including the last five that need modifying. This isn't the best picture, but what I like best is that it gives the general impression of "green."

I texted Julie some of the photos while I was working and she wrote back, "You found your groove."

Yup.


Again, Happy Mother's Day