This is my best pal, Julie, shown wrapped in the quilt I made, "No Rules for Julie". It's her birthday today. Julie and I chat regularly and exchange emails almost daily. She helps me with my quilting conundrums. Go on over to her blog and help me wish her a Happy Birthday!
Happy Birthday Julie!
Page 1
- Home
- Thoughts on Art, Creativity & Inspiration
- Friends
- Good Stories
- Tutorials
- Free Pieced Houses
- Lynne Tyler Word Quilts ~2009 - 2010
- Lynne Tyler Word Quilts ~ 2011
- Lynne Tyler Quilts ~ 2012
- Lynne Tyler Quilts ~ 2013
- Lynne Tyler Quilts ~ 2014
- Lynne Tyler 2015-2016 Quilts
- Lynne Tyler Quilts - 2017
- Lynne Tyler Quilts 2018
- 2019 Quilts
- 2020 Quilts
- 2021 Finished Quilts
- 2022 Quilts
- 2023 Quilts
- My Studio
- 2024 Quilts
- 2025 Quilts
- Doll Swap Quilts
- Details, Details & More Organization Stuff
- Couch, Bed & Table Quilts
- Scrap Slab Triangle Quilts
- Gizzy Quilts
- Slashed Squares Quilts
- Zebras
- Diamond Quilts
- Table Quilts
- Lynne's Bird Quilts
- Flight Of Fancy Hints
- Not Yet Finished...
- Quilts & Their Owners
Friday, September 21, 2012
Tuesday, September 18, 2012
A Hole In One
Some of you know how much I love to watch tennis. During long matches, one always hears that the winner will be the one who "wants it more." This is balderdash. Both players want it. The winner will be the one who prepared himself well beforehand. He or she will be the one who did whatever was needed to ensure a good result.
I like to make quilts that "knock it out of the park," that "blow people away," or are thought to be "awesome." You don't get a quilt like that if you settle for less. I want this quilt to be a knockout. If that means I have to remove something and do it over (and over and over), then that's what I have to do.
Labels:
Black Box,
do-over,
flap,
out of the box,
rip it out
Monday, September 17, 2012
Box, Updated
I did some work on the box. Trimming that left side made a big difference, but I'm still working on the long diagonal on the left. That will affect the lower left flap - which I'm still working on.
It's coming along.
It's coming along.
Thursday, September 13, 2012
Rip Rip
I ripped out the bad seams in the Black Box quilt last night. It's funny to think of taking something apart as "progress."
Tuesday, September 11, 2012
A Little Break...
I took a trip to Quilted Threads over the weekend with a friend when I did NOT need any fabric. Nevertheless, this collection of fabrics followed me home.
By the end of the next day, they had transformed themselves into this quilt:
Gosh, it's fun to make a whole quilt in just one day! This is for my favorite little rug rat, affectionately nicknamed the Caboose!
*(btw, this design is from Tula Pink's new book. If you make it, be advised there is an error. You'll need twice the number of cream colored pieces the directions specify to make the quilt as designed.)
Labels:
caboose,
quilt in a day,
Quilted Threads,
tula pink
Sunday, September 9, 2012
Theory and Practice
In Theory, theory and practice are the same.
In Practice, they are different.
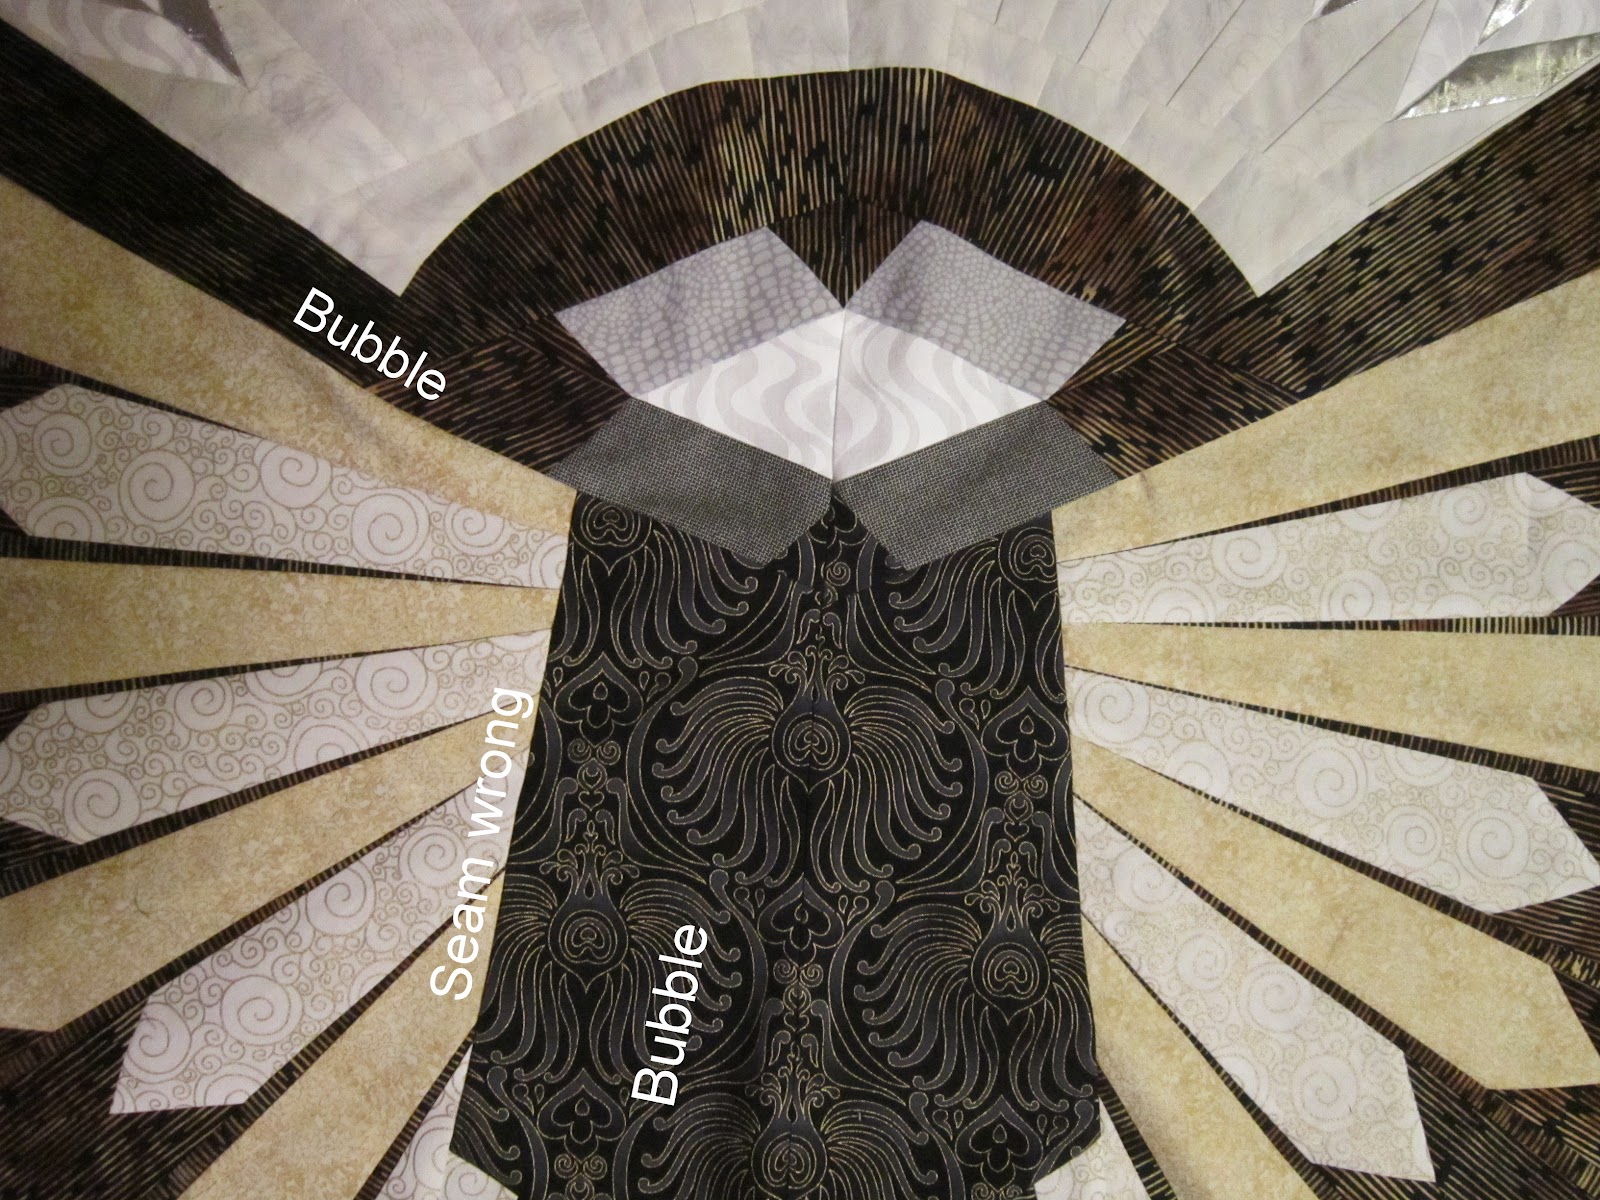
This photo of the box in the Black Box quilt is proof. I knew how I wanted all these components to fit together, and in theory, they were supposed to fit together perfectly. However reality got in the way.
For some reason, the left side of the box is 1/4" too big. That's the THIRD time I cut that piece. Partly because it is too big, I've got bubbles in two places where the quilt won't lie flat. I'm going to have to rip that seam along the box, trim it down and resew it. I've also got to rip out the long diagonal seam from the box flap alongside the gold ray on the left. I'll have to do some finagling there to get it to lie flat.
If I'm lucky fixing those two seams will get rid of the two bubbles. If I'm not, then I've got more tinkering to do. I've been working on this quilt full steam ahead for the last two weeks, and it's kind of worn me out. I'm going to take a little break from it to regroup.
Saturday, September 8, 2012
Silver & Gold Asterisk
I won't be making more of these gold and silver asterisks. The gold fabric, even with a new needle, had lots of pulled "threads".
After I'm finished the Black Box quilt, I'll do a tutorial on how to make these asterisk flowers.
Friday, September 7, 2012
A Little Maintenance and TLC
Like Queenie, I really hate running out of bobbin thread when I'm in the middle of a seam. Since there isn't anything worse at that particular moment then winding a new bobbin, I wind as many empty bobbins as I can when I get down to the last one.
Since I do all my piecing with a medium gray thread, about a dozen will keep me going for a while.
But after sewing with a dozen bobbins, the dust in the bobbin area of the sewing machine usually needs to be cleaned out, so I take the time to do a thorough job.
Julie suggested I take a photo of the type of pins I use so I don't forget. Since I don't tinker with the settings on my sewing machine, it's easy for me to forget what settings I like best. I took a picture, so now I can get back to "Normal" very easily.
I turn off my sewing machine and unplug it before I do any of this maintenance. Couple of reasons, first, there's no risk to machine or my fingers if the power is disconnected. Secondly, if you're going to be taking things apart, be smart, make sure nothing bad can happen. Unplug the machine. (In the manufacturing world, we call this "Lock Out, Tag Out.")
Next I remove the cover, the bobbin casing, and blow the dust out of it with a can of compressed air. Now there are a couple of things you really really need to know before you use this stuff. First, read the instructions on the back of the can. Second, use only short bursts of air. Don't just press the button and go for broke. The air that comes out of the can is COLD, and I mean, FREEZING COLD. You can damage your skin, and electronics don't like extreme temperatures.
Get yourself a little flashlight. Mine's a Mini MagLite. Keep it nearby. It takes two AA batteries and costs about twelve bucks. There are cheaper flashlights, but the MagLite always comes with a spare bulb built in and it allows you to focus the light brighter where you want it. The flashlight makes it easy to see what's inside the dark areas of your machine.
Just like a tape measure from the hardware store, a utility knife, blue painter's tape and a 48" long metal ruler, these are handy to have at hand. Sure you could probably buy all this stuff at a spiffy quilt shop, but you'd pay lots more $$$ for them, and I think that's pretty lame.
Dunno where you get those little pipe cleaner type brushes, but those are handy for cleaning dust out of nooks and crannies. Dust collects, grows, and stores heat and occupies space. You gotta get rid of it.
The bent needle nosed pliers (also called a hemostat) are useful for reaching in and pulling a chunk of dust or tangle of thread out of tight places you can't reach, and they're also handy when ripping out seams.
If you're going this far, you might as well oil your machine, but only if the manufacturer's instruction manual tells you to.
After I've done all this stuff, I clean the machine itself, and the work area. When that's all done, I plug the sewing machine back in (this also gives any parts inside a chance to come back to room temperature), and then I'm ready to get back to work, feeling very virtuous.
Thursday, September 6, 2012
Sun Rays
Oh boy!
This is the layout of the rays that will surround the black box. I had to sew them up this way first before I could add them to the quilt.
Of course, there are a couple of finicky things I have to work out before I add them to the box...
This is the layout of the rays that will surround the black box. I had to sew them up this way first before I could add them to the quilt.
Of course, there are a couple of finicky things I have to work out before I add them to the box...
Wednesday, September 5, 2012
Make It, Break It
To make "Made Fabric" you have to have scraps.
You can probably do it by cutting up yardage, but I think it's fun to use scraps.
So aside from scraps, where did I get the bits to make the Made Fabric?
First, I collected all the pieces I wasn't going to be using in the quilt.
Then I cut what I need away.
Now I have a pile to play with.
Like this!
Tuesday, September 4, 2012
Old Box, New Box
Judy in Michigan wondered if the white inside of the box was a moire fabric.
Nope.
It's the same White on White as it was in the original box.
See?
Nope.
It's the same White on White as it was in the original box.
See?
Monday, September 3, 2012
Whatzit?
Can you guess what these funny, fussy triangles are for?
If I turn them on their sides, you can probably see right away..
It's the new black box.
If I turn them on their sides, you can probably see right away..
It's the new black box.
Sunday, September 2, 2012
Inspiration
You can find inspiration anywhere, and sometimes a solution to a problem can be right in front of your face. Do you recognize this?
It's the logo for the American TV show "CBS Sunday Morning." It's on screen for the whole show, down there in the lower right hand corner. I'd been watching the show for over an hour this morning before I really "saw" it for what it could be -- a solution to how to arrange the "dresden plate" style "rays" that will surround the box on my Black Box Quilt.
I am so going to steal this idea.
Saturday, September 1, 2012
"Made" Fabric
We all create rules when we make our quilts. For me with the Black Box, I wanted to keep the background brown vertical.
But with the arc of the OUT OF THE BOX, keeping the rest of the background perfectly vertical posed some serious challenges.
Trying to keep the stripes vertical around the points of the gold points was a real struggle.
It also generated a lot of oddly shaped bits that collected in a big pile on my worktable. I always try to look at things that are giving me trouble and ask a question. "How can I use these?" "What color should I use to make this element really POP?" I find if I ask questions, I am more likely to figure out a solution.
So the other night I looked at all those bits sitting around and I wondered if they'd look interesting all sewn together every which way.
After all, the whole point of "thinking out of the box" is to use something in a different way. Why, in a quilt all about breaking out, was I so focused on keeping the pattern perfectly vertical? Once I was able to form that question, the answer was obvious. There was no good reason to do so, but breaking the concept of vertical seemed perfect around the exploding arc of the OUT OF THE BOX letters.
It didn't take long to assemble the little bits into something very interesting.
I really like the way this looks, and I'm going to have some fun with this.
Subscribe to:
Posts (Atom)