Thursday, April 30, 2009

Blast From The Past


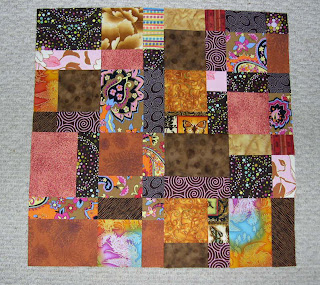
I made this twenty-five years ago, before any "Bargello Quilt" books came out. This is completely original. It is a part of something bigger, and I will show more pictures later, but don't hold your breath. The little dark purple blocks are 1/2" x 1".


I've been busy over the last few days with another "top secret" project, about which I will divulge nothing, except that it is becoming more and more demanding of my creative energies.

And it's not a quilt.

Monday, April 27, 2009

ROL Blocks Progress

I've got about 1/2 of the ROL blocks completed (the stack on the right). Another dozen are sewn together and need to be trimmed. There are about 20 blocks in the stack on the left that need the extra side sashing pieces.
These have been matched already and are waiting to be sewn together.

I really don't like my present method of organizing leftover bits of fabric. Right now they're more or less organized by size of scrap, but that isn't very consistent, and as I have been going through them for this quilt, I've been really frustrated.

So I've decided to organize them by color. That's how I've got everything else organized, so it should be much easier. To that end I've ordered some clear plastic storage boxes from The Container Store. I already use them for my "chunk" storage, and I like them very much. They have clear lids and are easy to open. They stack nicely and come in a wide variety of sizes.

I can't wait.

Sunday, April 26, 2009

ROL block assembly

Now that I have the basic ROL (Reading Out Loud) blocks made, it's time to add the sashing. A finished unit is the block with sashing on two sides plus a corner block, like this:Every time I make a batch of blocks, I then added the sashing to one side. Now I am making the little side block with the colored corner.So, I'm lazy. When I got the sashing fabric, I cut it into 2-1/2" strips. As I made the colored blocks, I would set aside fabric bits that were about 3" square. As I cleaned my sewing table yesterday, I trimmed these little pieces 2-1/2" wide by whatever. Next, I sewed these little squares to one end of the long sashing pieces like this.Then I played matchmaker, choosing which sashing square would go with which block. Then I sewed them all up and trimmed them. I have made about 20 so far. Here are the first 9.I won't automatically add sashing to the triangular pieces I made the other day, because I haven't determined the final layout yet. And this whole on point with sashing business is complicated enough already. I am not a math whiz, and yes, I do know all about the instructions for all this math business on various sites like Bonnie's. I worked it all out and I -think- I have enough blocks for the quilt to be the size I want.* But if not, I'll make more.

Regular readers will know I don't quilt my quilts, and they don't even have batting. Just a top, a cotton backing and they are tied about every 4" - 6" with crochet cotton. The backing is folded up over the front edge and machine stitched down. This makes for a sturdy, lightweight quilt (washes like a dream, btw) that, in my family, lives on top of the top sheet (like this:)and underneath the blanket, so 99.99% of the time, nobody ever sees it. Which is certainly pretty hilarious.I suppose the name really should be Laughing Out Loud. Because if you think the front of the quilt is going to be loud, wait until you see the fabric I have chosen for the back. (Hint, hint.)


*How big will this be? Since this quilt will be used on my bed, I will want to tuck it in under the mattress at the bottom, the quilt will be the top of a double bed + 8" drop on each side and + 20" at the bottom. So I am going for about 70" x 92" and this is before the 4-1/2" border I am planning all around.

Saturday, April 25, 2009

Half Square Blocks

The "Reading Out Loud" quilt I am working on is set on point, and thus needs half square triangles all around the edges. Here are the ones I have made so far. (You can click the picture to make it bigger.) These blocks are 6-1/2" on the short sides.

The quilt is inspired by Gwen Marston & Freddy Moran's quilt Reading in Bed from their book, Collaborative Quilting.

You may be wondering why I have decided to rename this quilt Reading Out Loud. Good question. Let me explain.

At the last meeting of the local quilt guild, a woman got up at "Show and Tell" with a quilt she described as being "kind of loud." I craned my neck to get a better view as she unfolded it. This I wanted to see.

It was a smallish quilt, with nine blocks and a wide border. The blocks were very simple, with a lot of background. The quilt was made with three fabrics, bright red, bright yellow with beige background.

I thought, "well, if that's loud, my [Reading in Bed] quilt is positively SCREAMING!!"That's when I decided to rename my quilt.

Friday, April 24, 2009

Reading Out Loud

Like many of you, I have been absolutely enchanted by the many, many beautiful quilts I have seen over the last week at the Blogging Quilt Festival. Many are from quilt blogs I never knew existed, and many have the most wonderful stories. It will take me quite some time to work my way through the entire list, but I have really been enjoying it. Thank you so much, Amy, for setting this up!

I've had a few days off so I have been making more blocks for my Reading in Bed quilt, which I have retitled "Reading Out Loud." I have done my calculations, and I needed 7 more blocks for the top. I still need about 24 half blocks for the edges, as this quilt will be set on point.

So I decided to lay them all out, just so I could take a look at them all.
The new blocks (more on the right, in the photo above) tend to look a bit more sedate and less wonky. All of the blocks looked very unique and "block-like." Few of them interacted with the sashing fabric the way this one doesWhich is to say, this one plays games with the sashing by almost disappearing.I like that, so I decided that for the last few blocks, I would really play with that concept, and use fabrics for the outer pieces that were only black and white.I am definitely feeling a wonky vibe going on, and I like it! Now to make the half blocks and start assembling this top!

Friday, April 17, 2009

Blogging Quilt Festival - 2009

Thanks to Amy for organizing an online Quilt Festival!

It was easy for me to figure out which is my favorite quilt. It's my Alphabet Sampler Quilt. I had been making Tonya's free pieced letters so much, I decided I needed to make an alphabet for myself as a reference, so wouldn't have to keep looking at the instructions whenever I wanted to make a letter.

I knew I wanted both upper and lower case letters. Somewhere along the line I decided to add numbers. I wasn't sure how I wanted to arrange them, so I stared looking at early American cross-stitch samplers. Then I decided to add my house, and sign the quilt along with the date.

I needed some elements to fill empty spaces, so I added hearts, flowers, butterflies, the spools of thread and finally, my own hand.

I'm really thrilled with the way it turned out.

Check out the other quiltmakers who are participating in this Blogging Quilt Festival here.

Bella's Gizzy Quilt

Bella is a cute little Shih Tzu who owns Chris. This is a Gizzy quilt I am making for her.And here is the backing fabric, which was the inspiration for the color choices.Chris will be at a little quilt shindig in Paducah next week. This quilt will be waiting for her when she gets back home.

Thursday, April 16, 2009

Something Completely Different

This is my workspace at work. Yes, I have two computers; I'm the Alpha Geek. The painting is one of my mother's, and I like it because it makes me feel like I have a view outside.

Tuesday, April 14, 2009

I hate a messy workspace

Making wonky quilts really does make a mess in the studio. Looking for bits and strings, and small pieces in every box and bin and pile just gets really messy.Boxes overflowing with stuff, stacked willy-nilly, teetering towers of long strips of fabric,

all make me competely stressed out, and scatter my energy.
There comes a time when the piles have to be organized, and wrinkled stuff has to be ironed and then stacked neatly in bins and hung on racks.
Somewhere in all these pictures is the 4 am quilt for the baby; the messy brown and olives from the selvage bags and the yellow and orange and pink strips that will become custom Gizzy quilts and I can't make sense of it until I clean it all up.


*edited this morning. Damn, I must have been tired last night!

Sunday, April 12, 2009

Specialty "Gizzy" Quilts

I made these two "Gizzy" quilts for Christine. The one on the end of the bed was made last August and is 24" x 60".
This narrow one is 12" x 84", and was made in March. I didn't have all the fabrics from the original, so I did the best I could.Christine had told me she was redecorating her bedroom, and sent pictures. I thought the colors she requested for the quilt were warmer than the colors she was using in the room. Suddenly it dawned on me that the quilt had the same coloring as the cat, Faz. The skinny one is designed to keep Faz from scratching the top of the bureau.

Christine and her husband and Faz live in Wimbledon.

Yes, that Wimbledon.

Saturday, April 11, 2009

Exquisite, Indeed

The top is finished. Whee! I really like this.The backing will be both of these blues, but the binding will be white.
Here's the other blue.As you can see, Millie approves.

Friday, April 10, 2009

Nine Rows


Nine rows. The finished quilt will have 14.

As I was taking the picture, I realized a couple of blocks are water stained, so I will be fixing those over the weekend.

Thursday, April 9, 2009

5 Rows

Here are five rows of my Exquisite blocks.
Here's a closer view.
I like this a lot.

Wednesday, April 8, 2009

Exquisite

Here they are, 180 little blocks. I finished trimming them last night. Each bag holds 12. The little baby quilt I am making with these will be 14 rows of 12 blocks, so I have a dozen extra. These little squares will be 3" finished.

I shall start sewing them up tonight. Will I sew them up randomly?

Probably not.

By the way, Gwen Marston refers to this block as The Exquisite in her book, Liberated Quiltmaking.

Tuesday, April 7, 2009

I ordered two Moda Scrap Bags. They arrived on Friday. One was full of selvages, the other had hardly any. They are tightly wrapped, so you can't tell by looking at them. Lots of good fabrics, the colors were soft greens and reds. These will make great potholders and stuff. I won't make bags out of them because I prefer the brighter colors.Yes, I washed them first. I wash all my fabric first.

Monday, April 6, 2009

4:00 AM Quilt Project

I finished sewing all the blocks from the 4 AM Quilt project. I've got 7 of 14 rows trimmed.

I would have had more of them trimmed were it not for an emergency trip to the office to give one of my servers a nudge. It had gotten stuck during the weekly automatic reboot and the remote management company called to alert me.

Sunday, April 5, 2009

The 4:00 AM Project


This is 24 of the blocks I made yesterday as part of the 4 AM project. They will finish out at 3" square, and they will become a baby quilt, about 36" x 40". I have about half the blocks finished. Hopefully I can finish the rest today.

Why, you ask, was I awake at 4 AM in the first place? Hot flashes. Those of you who have experienced them know that's all I need to say.

Saturday, April 4, 2009

Did You Ever...

Wake up at 4 AM and realize the plans you had for one quilt project were much better suited for another one? And then you can't get to sleep because all of a sudden that something that was bothering you is now DEMANDING ATTENTION!So you get up and head to the sewing room and started?
Well, that's my day so far today.

Friday, April 3, 2009

How Big a Bag?

Once you know what you want your bag for, you have to decide how big you should make it. Some things are big, so you should make a big bag, and some things are small. Here are some bags I have bought over the years. The ruler next to them is 24", so you can get an idea for size.

I wish I had had this bag when I was in Art School. It is made of canvas, and is big enough to hold an 18" x 24" pad of drawing paper. It isn't very deep, about 2". This is just a basic tote bag. You could make this.


I used this black bag for a long time, until something spilled on it, and I washed it. After that, I didn't like it so much. It is a basic tote bag, with one variation. It has a zipper closure across the top of the whole bag. Looking at it now (Lynne slaps forehead) I realize that it's just an oversized zippered pouch, and I can do that. You can too. THE BEST tutorial I have ever found for zippered pouches is here, at twelve22.

This red bag came from Jerry's Artarama. It's long and narrow with an open top and mesh pockets on each side. The pocket on the front has a velcro tab to keep it closed.

I got this green bag free with an order from Cheap Joe's Art Supplies. It's 10" wide by 14" tall and 3-1/2" deep. (actually it's a perfect size for everyday stuff.) It's made from cotton twill and the handles are colorful webbing. (This is another basic tote bag.)

I bought this little bag at a street fair in town. It's about nine inches square and has a zipper closure. It's really nothing more than a zippered pouch (a la Twelve22) with a strap.

I found this little denim bag at a big chain craft store for less than $5.00. It's about 9" tall by 7" wide. It was the inspiration for my toolbag.

Here are two bags I have made that aren't basic tote bags. Both are drawstring bags. The first has a round bottom. It holds a rolled up quilted chessboard and chess pieces. The other is simply a drawstring bag to hold plastic toys.

Thursday, April 2, 2009

Bag Lady

I love tote bags. In fact I love all types of containers, tins, boxes and jars. I have a collection on my bureau.Last year I made myself a knapsack (bought a pattern.)check out the lining. You can click the photos to enlarge.I told you I make my living as a geek. Sometimes I have to take computers apart and replace components. So I made myself a little toolbag to carry my tools. I made it so it could go across my body and leave my hands free. Here's the inside.It took me two tries to get the slots for all the tools just the way I wanted them. I made this bag in 2002, and that's Gizzy, who has gone on to the Rainbow Bridge. I use this bag every day at work.Here's the outside. I couldn't make it ugly, now could I?I made this brown bag in a previous life, it seems. As I have said many times before, brown is NOT one of my favorite colors. But I use this bag a lot. It is large, the patchwork is about 16", so the bag is about 18" square. It is not very deep, only 2", but it is great for carrying my quilts around for show-and-tell. There's a different patchwork block on the other side.
I am telling you all this because before you make yourself a bag you should ask yourself...

What do I want to carry around in it?

Because it makes a big difference in the materials you use for the bag. The toolbag body is made from denim. The knapsack is made from cotton with haircloth interfacing throughout. The brown bag uses something that was called "trigger cloth" (I think).

I promised you a tutorial, but in the meantime here are a couple to get you started.

Colorfool Creates
has a great tutorial with a wonderful sense of humor.

Mama's Pocketbook goes a bit more formal.