In 2021 I made a quilt inspired by water on the road that reflected the sky in it. I called the quilt Deep Space. It was based on the Slide Show quilt from Colorful Quilts for Fabric Lovers. I am making another one in soft greens and teals.
Here are some of the fabrics I have chosen.Page 1
- Home
- Thoughts on Art, Creativity & Inspiration
- Friends
- Good Stories
- Tutorials
- Free Pieced Houses
- Lynne Tyler Word Quilts ~2009 - 2010
- Lynne Tyler Word Quilts ~ 2011
- Lynne Tyler Quilts ~ 2012
- Lynne Tyler Quilts ~ 2013
- Lynne Tyler Quilts ~ 2014
- Lynne Tyler 2015-2016 Quilts
- Lynne Tyler Quilts - 2017
- Lynne Tyler Quilts 2018
- 2019 Quilts
- 2020 Quilts
- 2021 Finished Quilts
- 2022 Quilts
- 2023 Quilts
- My Studio
- 2024 Quilts
- 2025 Quilts
- Doll Swap Quilts
- Details, Details & More Organization Stuff
- Couch, Bed & Table Quilts
- Scrap Slab Triangle Quilts
- Gizzy Quilts
- Slashed Squares Quilts
- Zebras
- Diamond Quilts
- Table Quilts
- Flight Of Fancy Hints
- Not Yet Finished...
- Quilts & Their Owners
Monday, September 30, 2024
Tuesday, October 26, 2021
It All Comes Out in the Wash
I have told you regularly and often that I wash EVERY piece of fabric before I let it into the studio. I wash it in warm water. Then I run it through the dryer, bring it into the studio and iron it.
The last thing I do before I give a quilt away or use it is run it though the washing machine, in warm water, with a couple of Color Catchers. (I also include a box of Color Catchers with every quilt I gift.) For this quilt, since it was so dark, I used Woolite detergent for dark fabrics. I use it for my black jeans and slacks. It is reputed to keep your darks dark, so I used it for the very dark Deep Space quilt.
This is what the two color catchers looked like when I pulled them out of the washer after I washed the Deep Space quilt. If this isn't proof that you should wash your fabrics before you use them, I don't know what is.Monday, October 25, 2021
The Beauty Shots
Cats live in our world, but most of us know that's an illusion. (Cat owners know we live under their control/training in theirs.) After I wrote yesterday's post I got ready for bed, and where did Millie go? Yeah.
This post is about Beauty Shots. Megan, my friend from Sydney Australia, would say the photo above is the perfect beauty shot. But Megan is biased. She loves Millie. (The feeling is mutual. Millie loves Megan too). I think a beauty shot should be a beautiful picture of the quilt in question in a setting that shows of the quilt to its best advantage. Outside in natural light is best. The point is to see the quilt in all its glory. Like most things, it is harder than it looks.
First, you need a good location. You want something big enough to hold up the quilt. This gate to the community garden meets that requirement.The photo above show that you need a bit more than that.
Secondly, you need good light. Good light will show off the colors of the quilt (yet not be too bright so light colors get lost) and the quilting, but not so extreme that all you can see is the quilting and not the patchwork. This photo shows you need something else though.
The third thing you need (aside from clamps, a step stool, a camera and/or an assistant) is a calm day. Wind is the enemy of beauty shots. A quilt of any size, displayed outside is nothing more than a potential sail. Clamps or weights can hold a quilt in place, but Mother Nature is unpredictable and stronger than anything or anybody.
Just as in quilt design, I'm a big believer of taking advantage of every opportunity. In this case, the wind has flipped the quilt over so you can see the backing.The last thing you need is patience. Once I figured out the garden door OPENED, I re-positioned the quilt and then kept taking pictures. That's the most important thing. KEEP TAKING PICTURES. Sometimes you don't know until later that you took a perfect photo. Wayne Gretzky said "You miss 100% of the shots you don't take."
Sometimes you know as soon as you take it.
(I kept the last photo full size, so you can click, and then click again to see all the details of the fabrics and the quilting.)
Sunday, October 24, 2021
Deep Space is Finished
Yeah, I know this isn't a quilt. I live in New England, where we have beautiful fall foliage. What that means is that after the leaves change color they fall to the ground they have to be raked up. These six bags represent about a third of the leaves that have to be collected.
The Deep Space quilt is finished. Because the binding was essentially black, it was tricky to do at night because the light wasn't as bright. (Hey, I'm north of 60. I need brighter light to see when I sew on dark fabrics.) I was able to do a lot of the sewing on the binding one afternoon last week. It was sunny and made a huge difference. I'll take beauty shots of the quilt later today. I kinda have to because it's supposed to rain the rest of the week.
While I have been working on the quilt I threw it over the back of the couch. MOST OF THE TIME Millie has been napping on it. But when I wanted to take a picture of her, she was elsewhere. When I finally sat on the couch she hopped up next to me and MEOWED LOUDLY!
When I did not respond IMMEDIATELY she MEOWED again!
I lay down and she hopped on top of me, got comfy and started purring.
Good thing I could reach the remote, because she stayed there for two hours!
Saturday, October 23, 2021
Binding Deep Space
I've been sewing the binding of the Deep Space quilt. The last few days I've been working my way around the quilt, and I only have one long side left.
Saturday, September 11, 2021
In Other News...
In other news...
I visited Janet-Lee the other day and picked up two quilts, the Holiday Boxes,
which is quilted in a ribbons pattern called "Celebrate!"
I've made the binding (it's a WOW) and started sewing it onto the back of the quilt.and the newly renamed "Deep Space"
which is quilted in a pattern called "Champagne Bubbles."
I left the Lady Snaps quilt with Janet Lee, and came home to make the backing for the Pink Panther quilt.
I'll bring that to be quilted next.Friday, September 10, 2021
Hana, Mary and Kathy's Birds!
This is from Hana, who sent me three birds. This black bird (check out the Mickey Mouse breast fabric!! LOL) is an average sized bird on very short legs.
Hana, who lives about 30 minutes away from me, also made two small birds. How small?
This cute little bird is less than four inches tall.
Mari, from Maryland, sent me this "Professor Bird."
Kathy, from Vermont (the next state over from me) made this lovely bird with the bright green legs. She said she didn't have the heart to cut them shorter. Frankly, neither do I!
If you want to join the fun email me at PatcheryMenagerie AT Gmail DOT com and I will send you my mailing address. All birds are welcome, tall ones, short ones, skinny ones, fat ones, baby birds and big birds. Fancy birds and simple birds are all welcome. If you want simply to make your own birds (no patterns, no templates and NO PAPER PIECING... get my tutorial here at my Etsy shop. It's an instant download, so you can get started right away.
~ ~ ~ ~ ~ ~ ~
Tuesday, March 23, 2021
Ice Blue
I added a small deep space border to the Ice Blue quilt.
Here is the finished flimsy on top of the fabric I have selected for the backing. This quilt is going to be gorgeous. Or maybe "handsome" isn't a better term.
This isn't the quilt I had expected to make, but that is what making art is all about. It's about following an idea where it takes you, and if it's a dead end, then you have to switch gears and figure something else out. You can't judge your end result against the first IDEA you had. Because an idea is only an idea. It doesn't exist until you make it real. If I had not brought you all along on the road of this quilt from first inspiration to the final quilt, you would never know that I had stalled.
However, I do think the color story of the quilt matches the original color story I had in my head, and that works for me.
On to the next thing.
Sunday, March 21, 2021
Ice Blue Slides to the Finish Line!
My extra fabric arrived on Friday and I was able to get it through the washer and dryer before my "work day" ended so I could get right to it after dinner. (Actually I brought Megan's quilt to FedEx first.)
Gosh, it is so nice to work in a super clean studio. Nothing to shove over... I should do it more often (LOL).
By ten PM on Friday I had this. The top was all sewn together. The last step was to sew the blocks in the bottom two rows together. I wanted to get the top finished before I went to bed.
Mission Accomplished. Now I want to add a small border of the deep space fabric all around.
This is the fabric I have chosen for the backing of the Ice Blue quilt.Thursday, March 18, 2021
Where Do You Start?
I love questions. Somebody asked me once, "Where do you start?" Where do you start WHAT? I asked back. "Where do start when you sew your quilts together? When you sew the blocks and the rows together. Do you start at the top left?"
I laughed. "Well, you gotta remember, if the quilt is on the design wall, I can't REACH the top. I'm five feet tall. So I start with what I can reach. That's somewhere in the middle. I usually work my way down, and save getting up and down the ladder until later."
That's what I am doing with Blue Ice (or Ice Blue as I have been calling it lately.) I start somewhere in the middle with something that interests me, and go from there. There is no scientific, right or wrong way to do it. SOMETIMES I'll even grab two blocks, sew them together, put them back on the design wall, then grab two more. It is an extremely inefficient way to work, but sometimes I'm not in the mood to figure out how to sew a whole bunch of blocks together and make sure they are oriented correctly. Sometimes I just want to take my time, and work my way through it slowly.
By the way, the rows with the big blocks missing at the ends are those that are waiting for more deep space fabric to arrive.
This is going together so quick I am very soon going to have to start thinking about what I will do next.
oh dear.
Tuesday, March 16, 2021
Blue Ice Laughing Out Loud
in 2009 I made this quilt, Laughing Out Loud. It is a takeoff of the "Reading in Bed" quilt in Freddy Moran & Gwen Marston's book, Collaborative Quilting.
It was the first quilt I ever made with sashing and cornerstones, and it taught me something. If one fabric is used for the sashing, and if it is used well, the blocks appear to be floating above them.
When I started laying out the blocks for the Blue Ice quilt, I saw the two darkest fabrics wouldn't work the way I wanted, so I decided to use them as the spacers between the blocks, but when I stepped back, the dark solid looking fabric looked dead. Notice them around the block with the dragonfly in the center, above. Notice how the other spacer blocks with the deep space "stars" in them, appear lively by contrast, and they seem to connect to each other.I decided to use only that fabric for the spacers, but I didn't have enough. So I have placed an order for more of that fabric. As long as I was at it, I ordered the backing fabric, and something I might use for the binding.
Sunday, March 14, 2021
Blue Ice Close Up
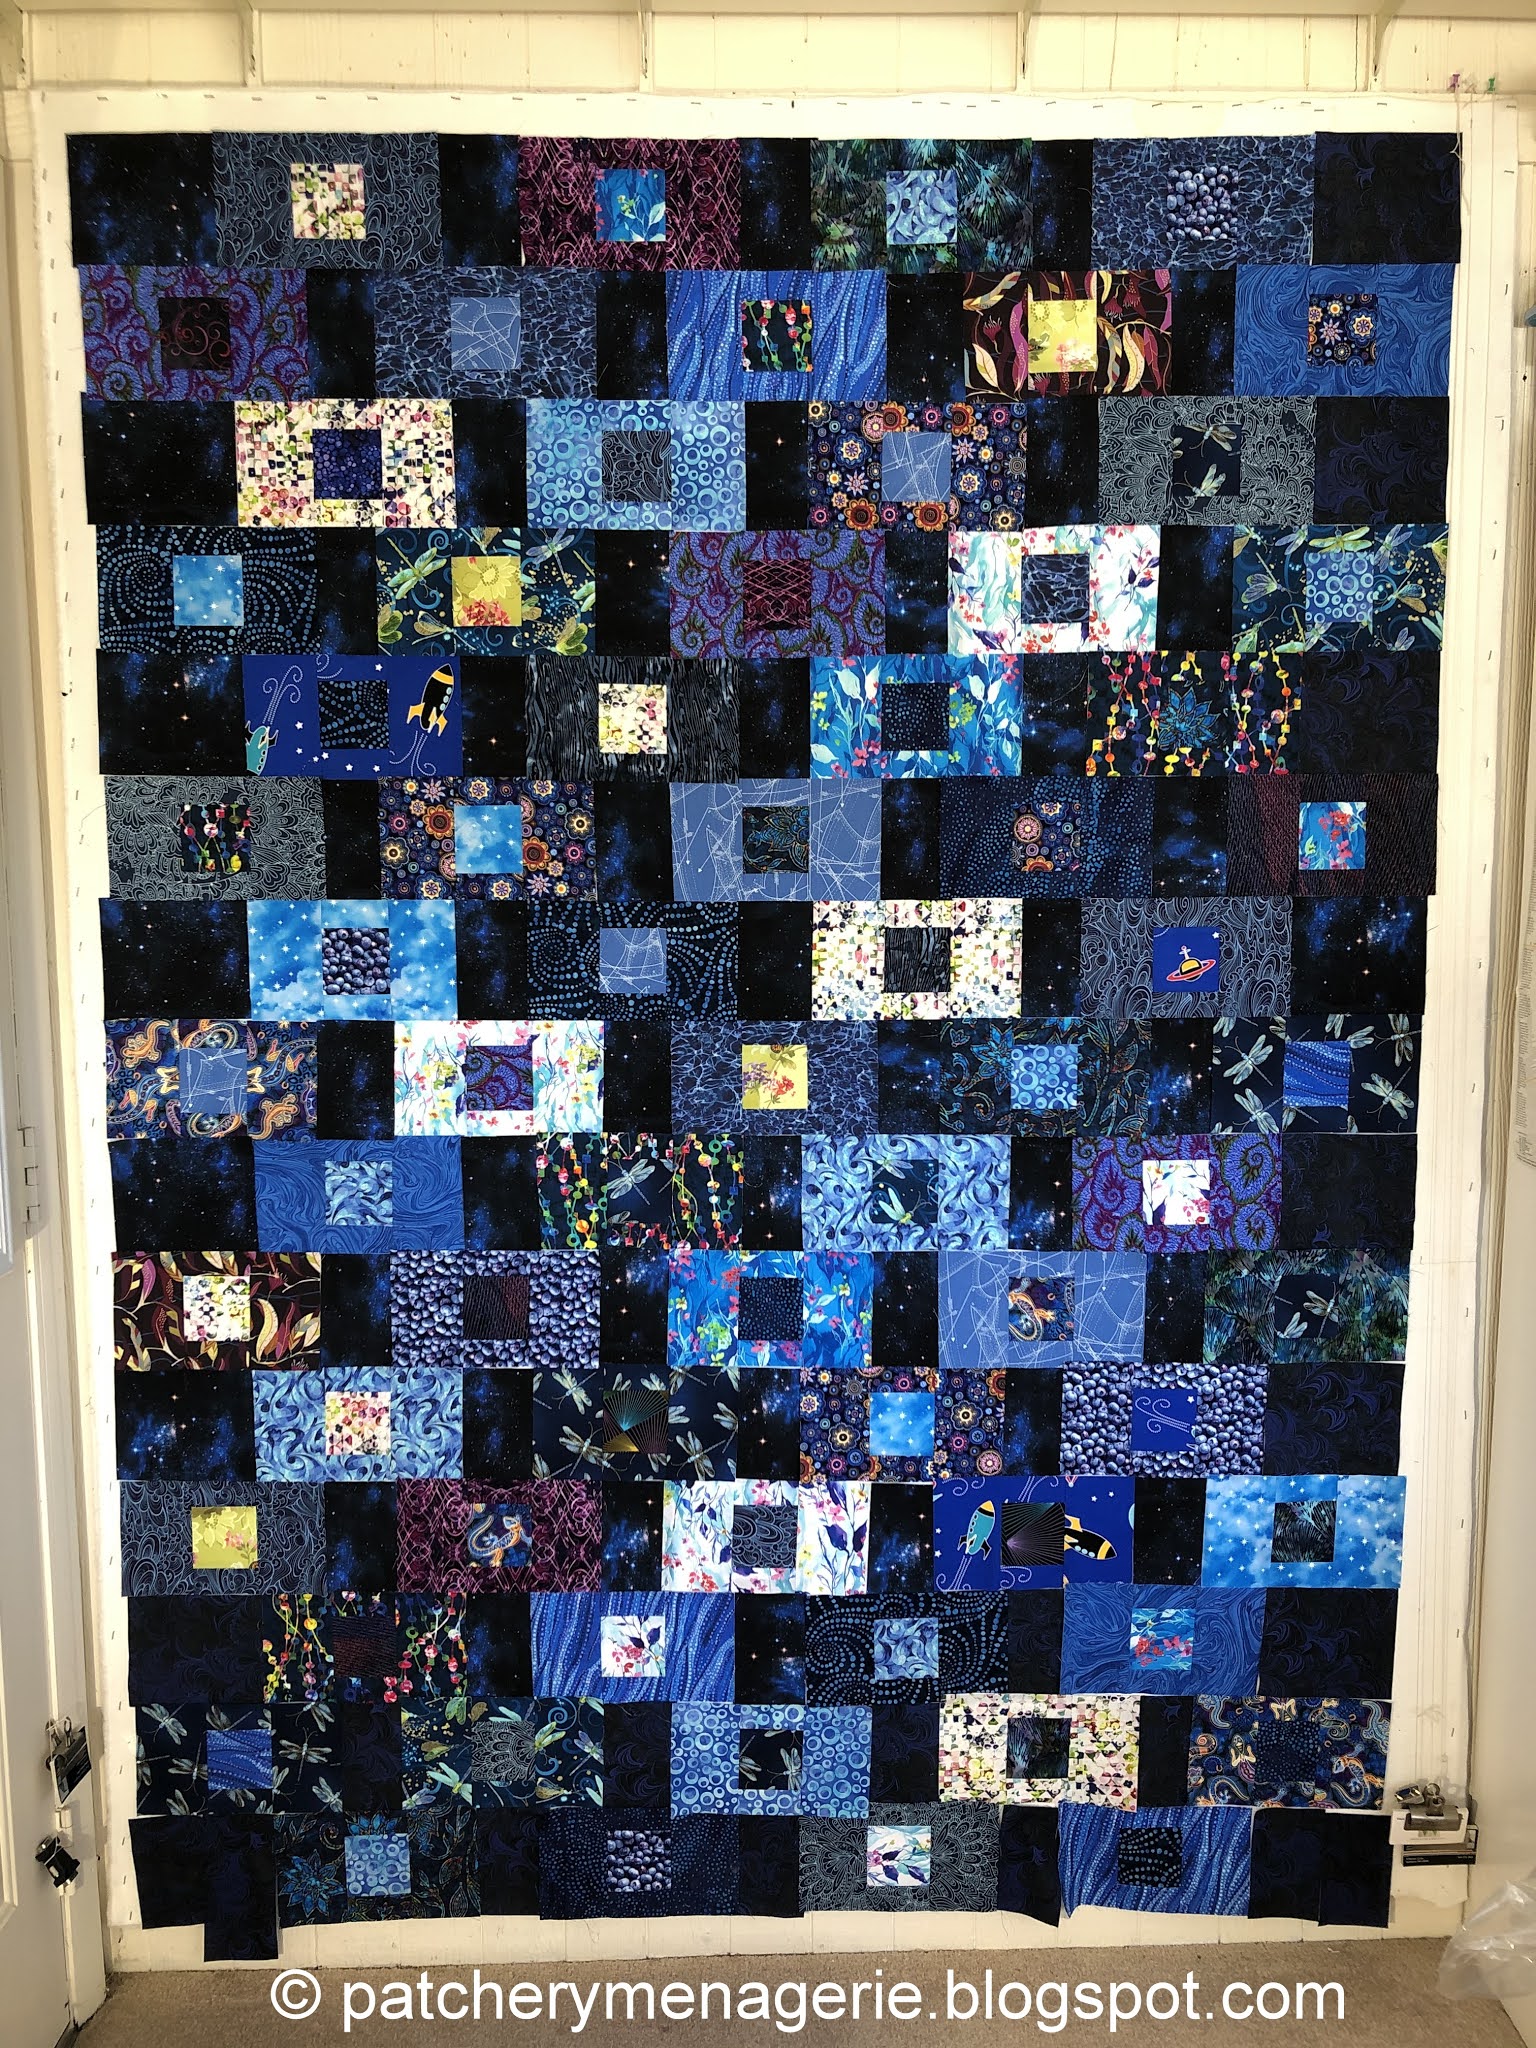
I got up on Saturday morning, and went into the studio where I worked for three hours. Gail is right, the big light green block went. It was a warm green, closer to yellow-green than blue, and this is a predominantly blue quilt, that if anything, leans closer to a cool blue, and the light warm green was also a temperature contrast that just didn't fit in with the rest of the quilt.
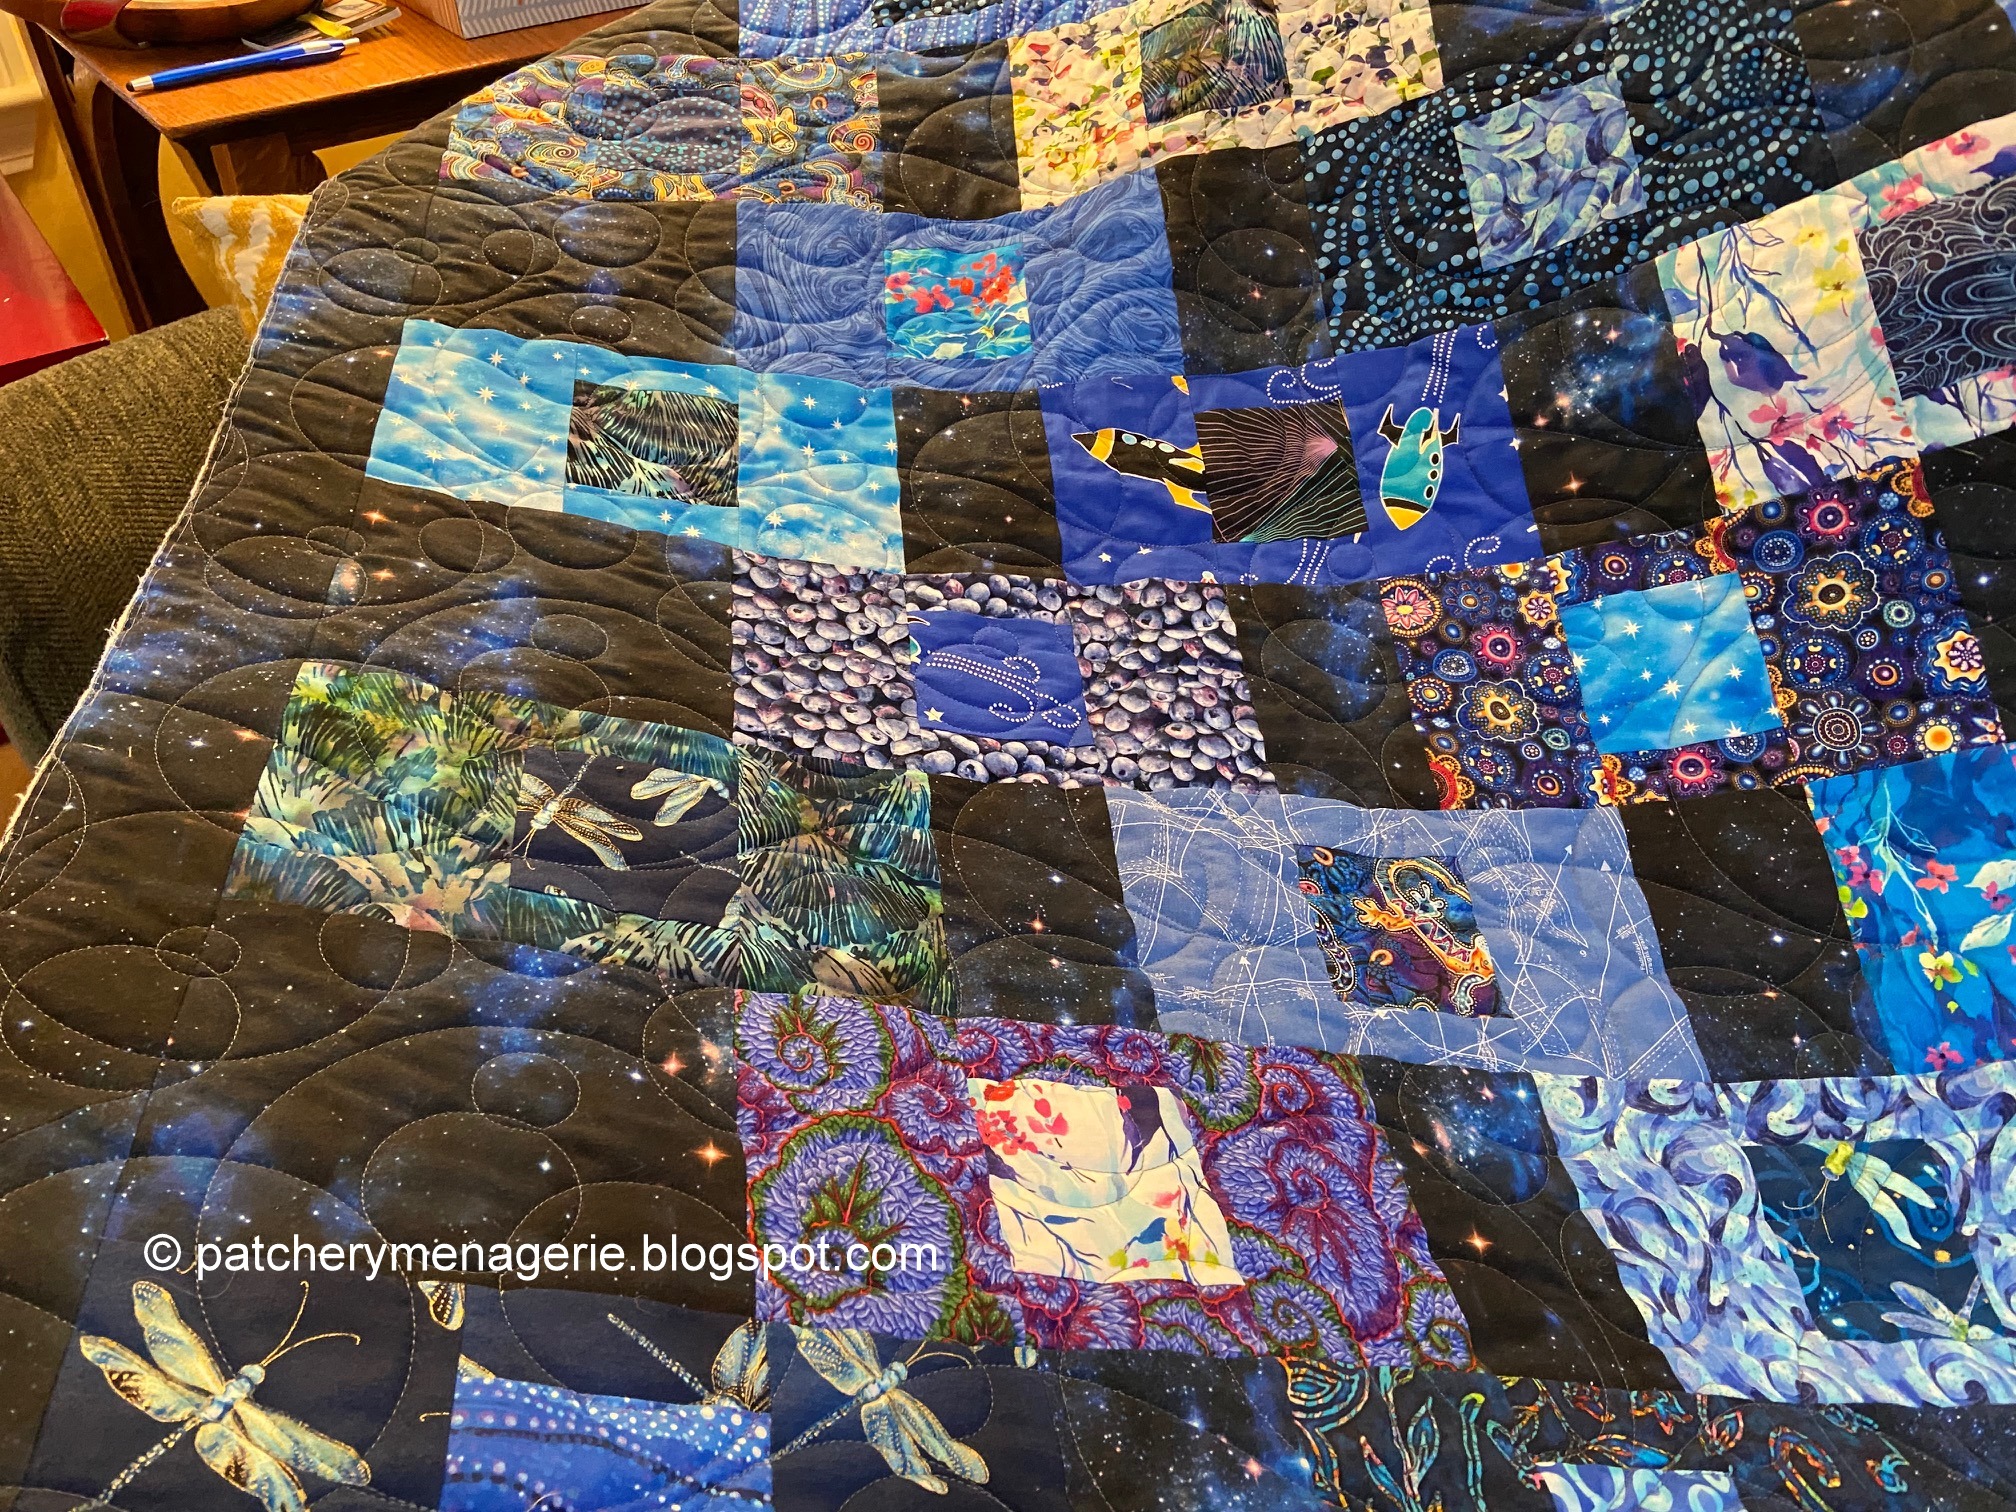
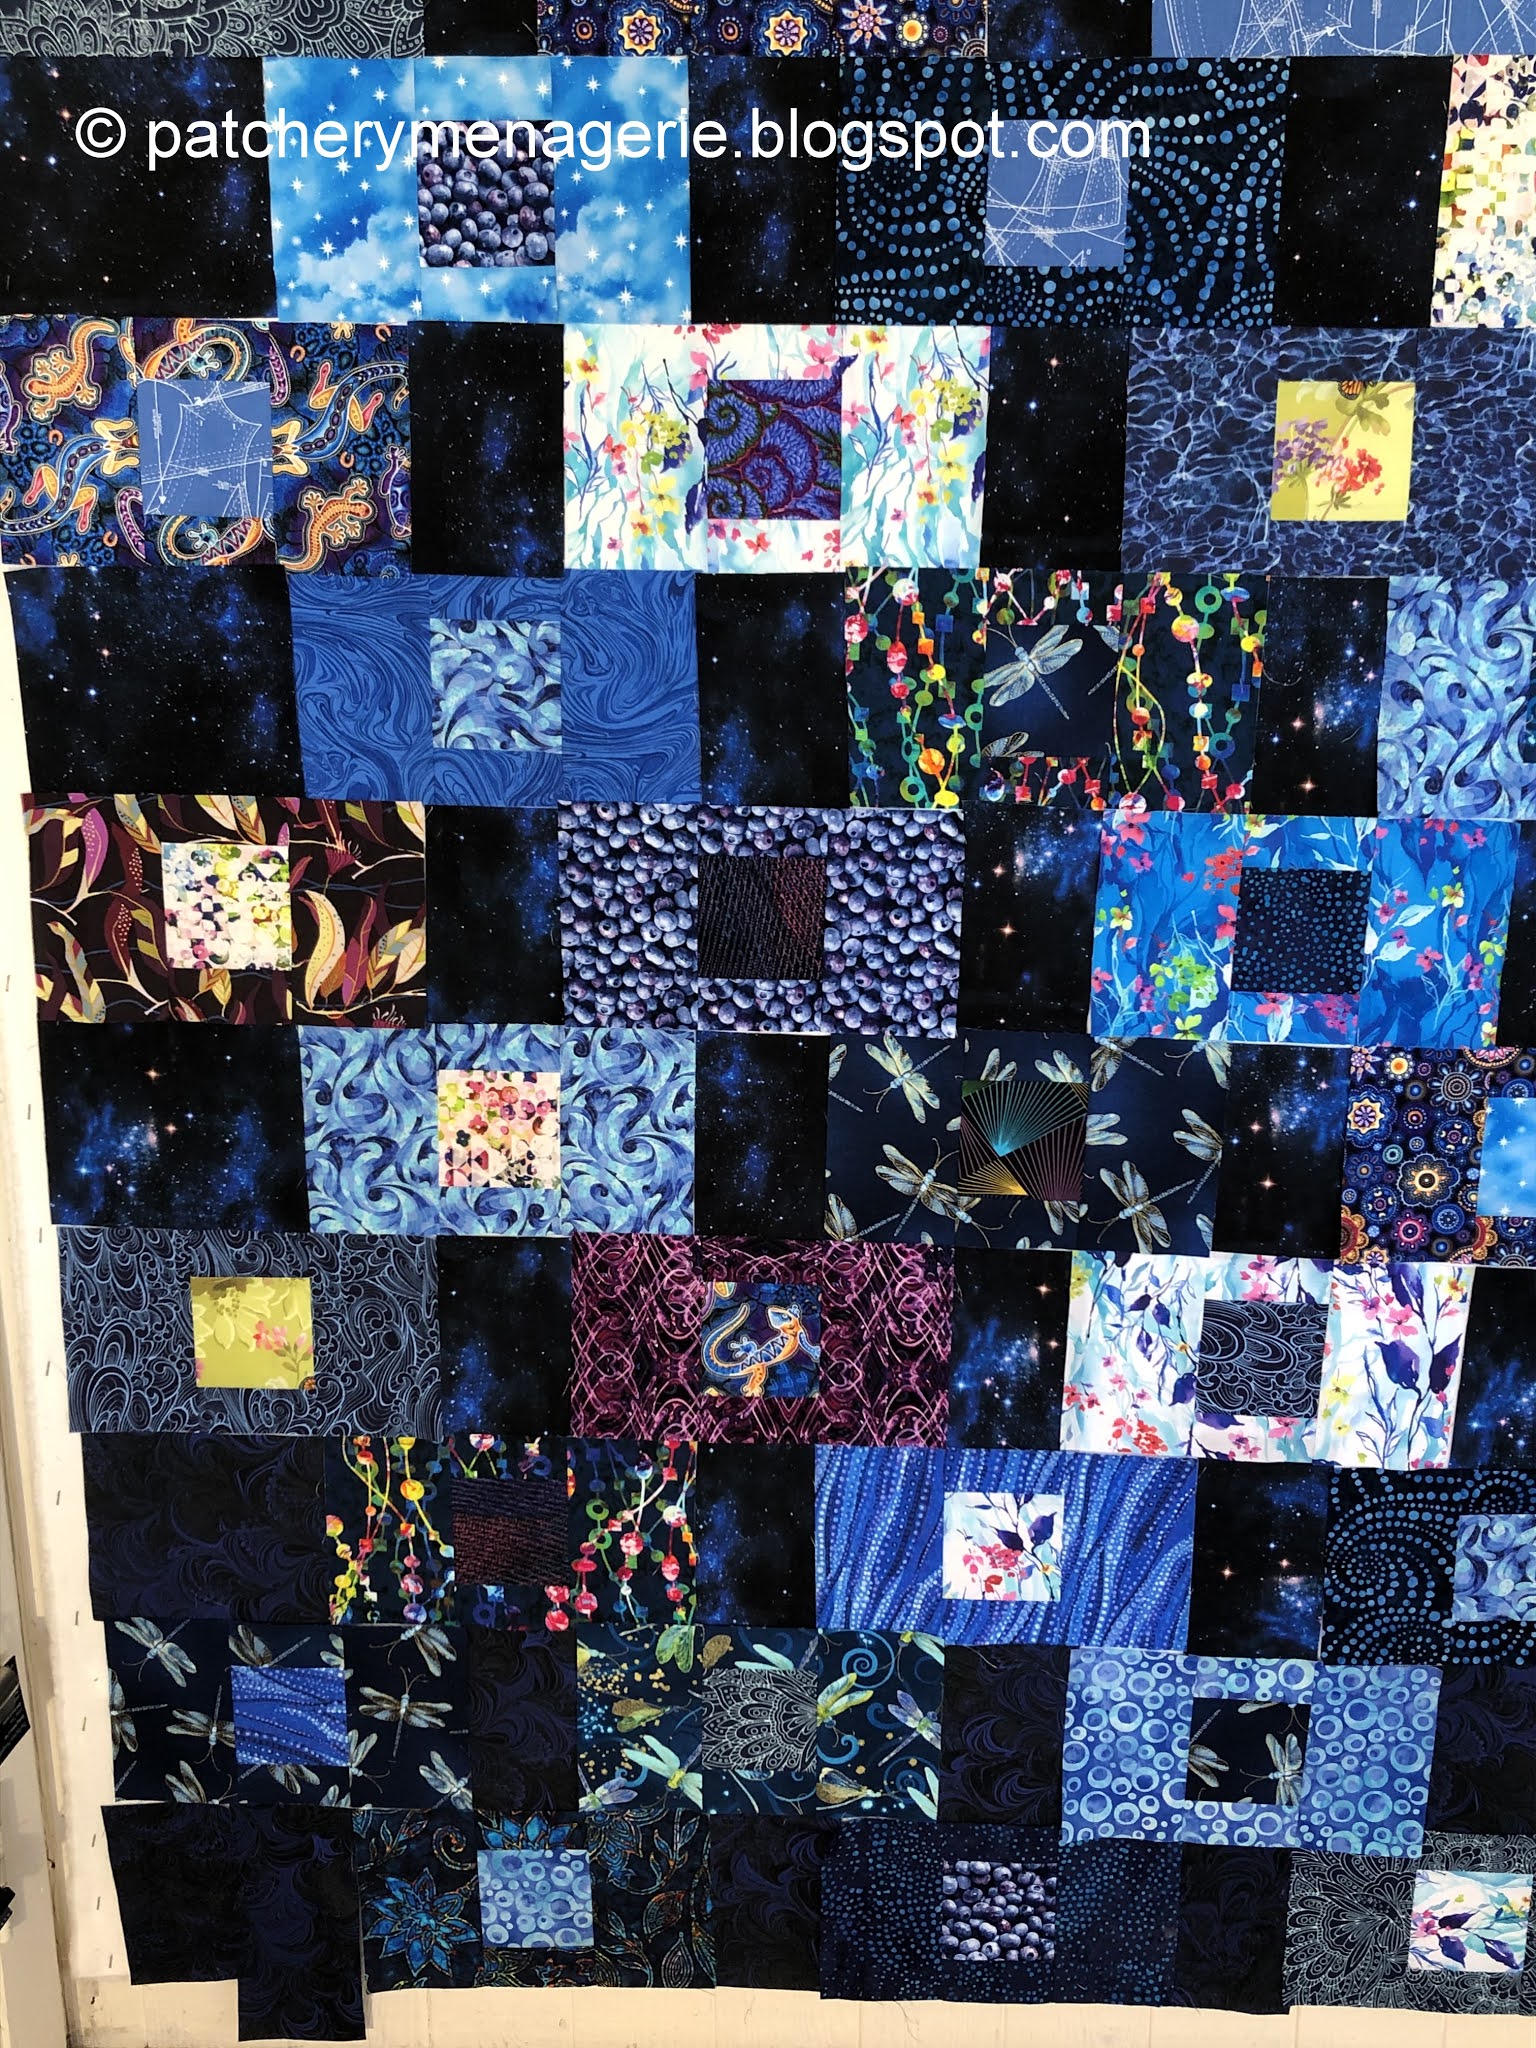
The cream and whites work because they have a lot of blue in them. There IS a lot of green in the quilt, but a greenish blue is a cool color, so all those blue greens fit right in. There is also a bit of blue-purple in the quilt, which is shown in the purplish fabrics - even the blueberries. So this quilt features blues that are in the green-blue, blue, blue-violet range. There are also some fabrics that fall closer to violet.
The photographs in this post are full-sized, so the resolution when you click, and then click them again allows you to see all the details of the fabrics. There are 44 unique fabrics in this "blue" quilt.
You don't know this, but when I was cruising through my books looking for an easy pattern to play with, I wondered if I would make another version of Ola Pola, a quilt I made five years ago. Ola Pola has some unexpected fabrics in it, so that idea was in my head before I picked this pattern.
Ola Pola (named for a Ukrainian candy, the quilt lives with my friend Daniela, who is Polish and loves sweets) is a quilt that is predominantly orange, pink and cream. Some of the pinkish fabrics had bits of blue in them, so that is why I have some blue center blocks. But they also have some green, so I decided to include a green block. But the OTHER surprise in this quilt is that I added a light green center fabric to the center of an Orange block. The RULE for this quilt was the colored blocks had cream centers, the creamish blocks had colored centers. The light green in the middle of the orange block was chosen because I wanted it to look like a light color.
I knew I wanted to play with this same idea in the Blue Ice quilt even before I started cutting fabrics. In the end the warm green block didn't stay (it probably would have worked if it was a cooler green), but the warm green looks just fine as the center of some of the blocks. Remember I also cut some pink and red violet fabrics for blocks in this quilt, and I just felt they didn't work either. The plan for this quilt was "dark blue" and the pink and purples and warm light green didn't fit. Neither did the red rocket.
One final note about the purplish brownish fabric on the right - I KNOW it doesn't LOOK blue. I don't care that it doesn't. I don't want you to think it is. I want you to SEE it is different. My point in this quilt is that it is close enough in VALUE that it can WORK even though it is DIFFERENT. It does fall into the color range I decided to use in this quilt, but it is just enough outside the range to catch your attention and make you say, "Wha..?"
My Number One Goal when I make my quilts is to draw the attention of my viewer and to Make. You. Look.
Gotcha!
Saturday, March 13, 2021
Blue Ice Grows
I made another set of blocks and put them up on the design wall.
So I straightened everything out, and then filled in the sides with the dark fabrics. I need two rows at the bottom to get this the size I want. And I am 90% sure that green box in the lower left is going to go, but when I got this far, and stepped back, I thought it was looking rather good.
I picked out some of my favorite of these fabrics, and then chose center fabrics for them and made about fourteen blocks, the set them up on the design wall and started tinkering. An hour or so later, I had this, and felt I was making progress.
After another hour, I had this. It isn't perfect, and I want to look at it in the computer before I start sewing it up, but I am getting closer. This is a LOT harder than it looks.
Also... It is so interesting to work on something like this and NOT get any comments. I can practically hear you all thinking, "I'm not sure about this." Or, "I'm going to have to wait and see what Lynne does." Or, "Gee, it's kinda dark." Naturally it is a lot prettier in real life, and I know I will have to make some changes. I can see blocks that don't really work, and I know I have to make more. I will talk about the fabric "spacers" in my next post, and which fabric works, which doesn't, and why.


