Showing posts with label the gardens of our imagination. Show all posts

Wednesday, June 5, 2024

Beauty Shots Asterisk Quilt

 Got home from work on Monday and I did not feel like making dinner. It was sunny, so I packed some quilts in the car and went out to take some beauty shots.

In the full sun you can lose a lot, but this looks pretty good.

It's really nice to see all the true colors in this.

It always interests me that a photograph you almost didn't take, or think will totally not work, turns out to be the definitive shot. Like this one.
.
After I was done, I brought the quilt home and washed it. It is now soft and wrinkly, and if possible, even prettier than it was before. I wasn't quite sure if this was a quilt for cuddling, but now I am convinced.


Incidentally, although I wash every single piece of fabric before it comes into my studio - and I wash it in WARM water no matter what the label says, I always throw a couple of color catcher sheets in the washing machine when I wash the finished quilt. These two pink sheets came out after washing the Asterisk quilt. And I washed it in cold water.


Wednesday, May 8, 2024

Asterisks & Birds


The asterisk flower quilt, The Gardens of Our Imagination, has been quilted and I have chosen the binding.

White was an obvious choice for the binding, but in the end I decided to go with the fabric I chose for the back.

I wanted something with some color, but not too much. Now I can sew it down while I watch television. Lately I've been streaming Top Chef. I have watched every season since the beginning. so now I have been working my way through them again. All the angst is still there.

The pink bird quilt, Yakkety Yak, is all squared up and the backing is ready. I'll bring it to be quilted in another week or two. 

Janet-Lee has Awash in a Sea of Blue finished already (fun fact: that blue quilt will be quilted with a sage green thread. It's the color of the ocean from close up, so for me, it works.) She will bring the Noel Holiday banner to the talk I am giving next week at the SeaBreeze Quilt Guild in Exeter NH.

I have SO much binding in my future! (I have a tute for that!)


My eye is much less swollen and feels almost normal. I am extremely sensitive to Benadryl, so I couldn't take it, but believe it or not, ibuprofen helped with the swelling.

You can make birds: Get my tutorial here.

You can make asterisks too: Tutorial for those is here.


Sunday, May 5, 2024

No Good Deed...

 In the "No Good Deed Goes Unpunished" department, I got bit by a bug on Friday while I was working out in the yard bagging leaves for the spring clean up. The problem is WHERE I got bit...

It doesn't so much hurt as it is uncomfortable. I can see just fine and have no other symptoms. The swelling will eventually go down. 


What's buggy (pardon the pun) is the effort it takes to keep that eye open and the fact that the nosepiece on my glasses rests on a swollen spot; so that is annoying. I've been putting cold compresses on the area. Do you know how uncomfortable THAT is? 

Anyway, my get-up-and-go has been seriously affected. 

(And yes, that is Wanda Hanson's quilt Sparkling Stars on the wall behind my left shoulder in the top photo.)

However, there is other good stuff happening.

I visited Janet-Lee, my long arm quilter, and picked up The Garden of Our Imagination quilt. I will bind it in white (duh.)

I left Scribble Scrabble, the Noel Holiday Banner, and the Awash in a Sea of Blue quilts with J-L for quilting.

Just a reminder that I will be speaking to the SeaBreeze Quilt Guild in Exeter NH on Tuesday May 14th about my word quilts.


Monday, October 26, 2020

Asterisk Tutorial Is Live!


My asterisk tutorial is live. You can get it here at my Etsy shop. It's an instant download, so you can get started adding nifty asterisks and asterisk flowers to your quilts right away.

Tuesday, October 13, 2020

Not On The Edge


This is an asterisk I made, but did not use in the final Asterisk quilt. I'm sure it will find a home somewhere.

I am finished my preliminary version of the Asterisk tutorial. Now it is in the hands of my crack team of proofreaders. I'll piss and moan when I receive their comments, and then I will very likely implement every single one of them. My tutes are good, but with their suggestions they get so much better. 


 Last week Gail asked if I had considered placing an asterisk along the very edge of the quilt, to suggest that it was really flying away. It's one of those things that SOUNDS like it would work, but it's actually an example of bad design. 


Why? Because you should never have an area of high contrast along the edge of your quilt (or picture.) Why not? Because it will attract the viewer's eye and lead it right OUT of the quilt or the picture. You do NOT want that. Good design grabs the viewer's eye and leads it around to what the Artist wants it to see. (YES, that IS being sneakily manipulative, but not as bad as say, - advertising - or - propaganda.


Friday, October 9, 2020

The Gardens of Our Imaginations


This is it. The Garden of Our Imaginations is a flimsy and it measures 66" x 78". There are 61 asterisk flowers, about 80 different flower fabrics and 26 different WOWs. This is the quilt on the design wall.

This is the quilt from the back.


This is from the front with the light shining through so you can all see just how I put it together. Can you find the three set-in squares? They are all the same fabric.

From the front again, with even light so you can see all the different WOWs.

I have to decide if I want to add a couple of inches of white all around. I think I do. And it will fix that notched area over on the right side just below the blue bird.


I'm pleased that it really is so neat on the back and the thing hangs so straight and is so flat. Neither of those is an accident. I work hard at that stuff. It's the way I was taught to sew when I was 10. I've always said that if you know how to make (sew) clothes, then making a quilt will be a cinch because you know how fabric behaves and you have mad sewing skills. If you have never sewn anything, learning how to put a quilt together will be harder. 

After I straightened it, and trimmed it, I stay stitched all around the edges. It locks the edge, stabilizes any bias edges and prevents and seams on the edges from coming apart.


Now I will go back and finish writing the Asterisk tutorial, and this quilt will be shown in it. HOWEVER... there will NOT be specific instructions on how to make this quilt. They will NOT be included in the tutorial, and I'm aware I'm going to have to put a disclaimer in the description of the tute that instructions for this quilt are NOT included. I can say with 100% certainty that I will NEVER write instructions for it. 

Yes, it looks easy. Well, that's an artist's job. To make it LOOK effortless and simple. It takes a lot of skill and knowledge to make that happen, to make it look like it flew out of the ends of your fingers.

Or like the wind blew the flowers away. 


Thursday, October 8, 2020

It's a Onesie!


Pin, pin, pin, pin, pin. And YES, when I sew big pieces like this together my pins are one inch apart.

Also known as "quilt wrangling."

The infamous "set in square." Honestly, if you do these the right way they are a piece of cake. Unfortunately it took me three tries before I figured it out remembered how to do it.

This is the wrong side. Notice two things. 1. It is neat. My threads are trimmed and my seams are pressed neatly. 2. This sucker lies FLAT with no bubbles or wrinkles. Ask me how I do this. (Oh wait, it's in the letters tutorial.)

This is a closer-up view of part of the back. Remember you can click, then click the photos again to enlarge them for more detail.


I have to trim the quilt, and then photograph it properly. I'll show it off tomorrow.


Wednesday, October 7, 2020

Almost, But Not Quite


It is getting a lot closer to being a flimsy.

This is what is on the design wall.

A few days ago I realized I had made the big panel above the bird on the right wrong. I had put the asterisks too close together. That meant that the placement of some of the others didn't seem right. I toyed with adding an additional asterisk in the upper right, but even though I added it to the plan (above), it will not be in the final quilt. I decided to raise the panel above the birds and do some minor tinkering.

I will add a WOW fabric strip above the bird, and then I can sew the set-in square (above, it's the wavy fabric) that will join the right side panels together. I have to figure out the sequence of what to sew to what to do that, and then I can add the extra fabric to the top and sew in the last asterisk.

Then the flimsy will be done.

You know, "all I have to do..."


Sunday, October 4, 2020

Almost There...


This is the last big complex panel.

Everything that is colored is a panel, and the elements in each panel are sewn together, but not all the panels are sewn to each other. This is the best way to show you where I am, but because the quilt is mostly white, and my design wall is mostly white, it's hard to see what's what.

You're welcome to give it a go!

Now, even though this is close to being all sewn together, don't expect to see the finished flimsy quite yet. I've been staying up too late each night working on it. I'm tired, I need a break but I let a lot of the household tasks slide, and it's time to pay the piper.


PS, Ruth Ann W., I owe you a response to your letter, and I promise you'll get one, but it might be a few more days.


Saturday, October 3, 2020

So Far, So Good


The three big sections have been sewn together. So about half the quilt is complete. I worked on the left sections yesterday, the bird and the area above the bird. Next up is the complicated six-asterisk section in the middle.


Thursday, October 1, 2020

Adapt, Improvise, Overcome


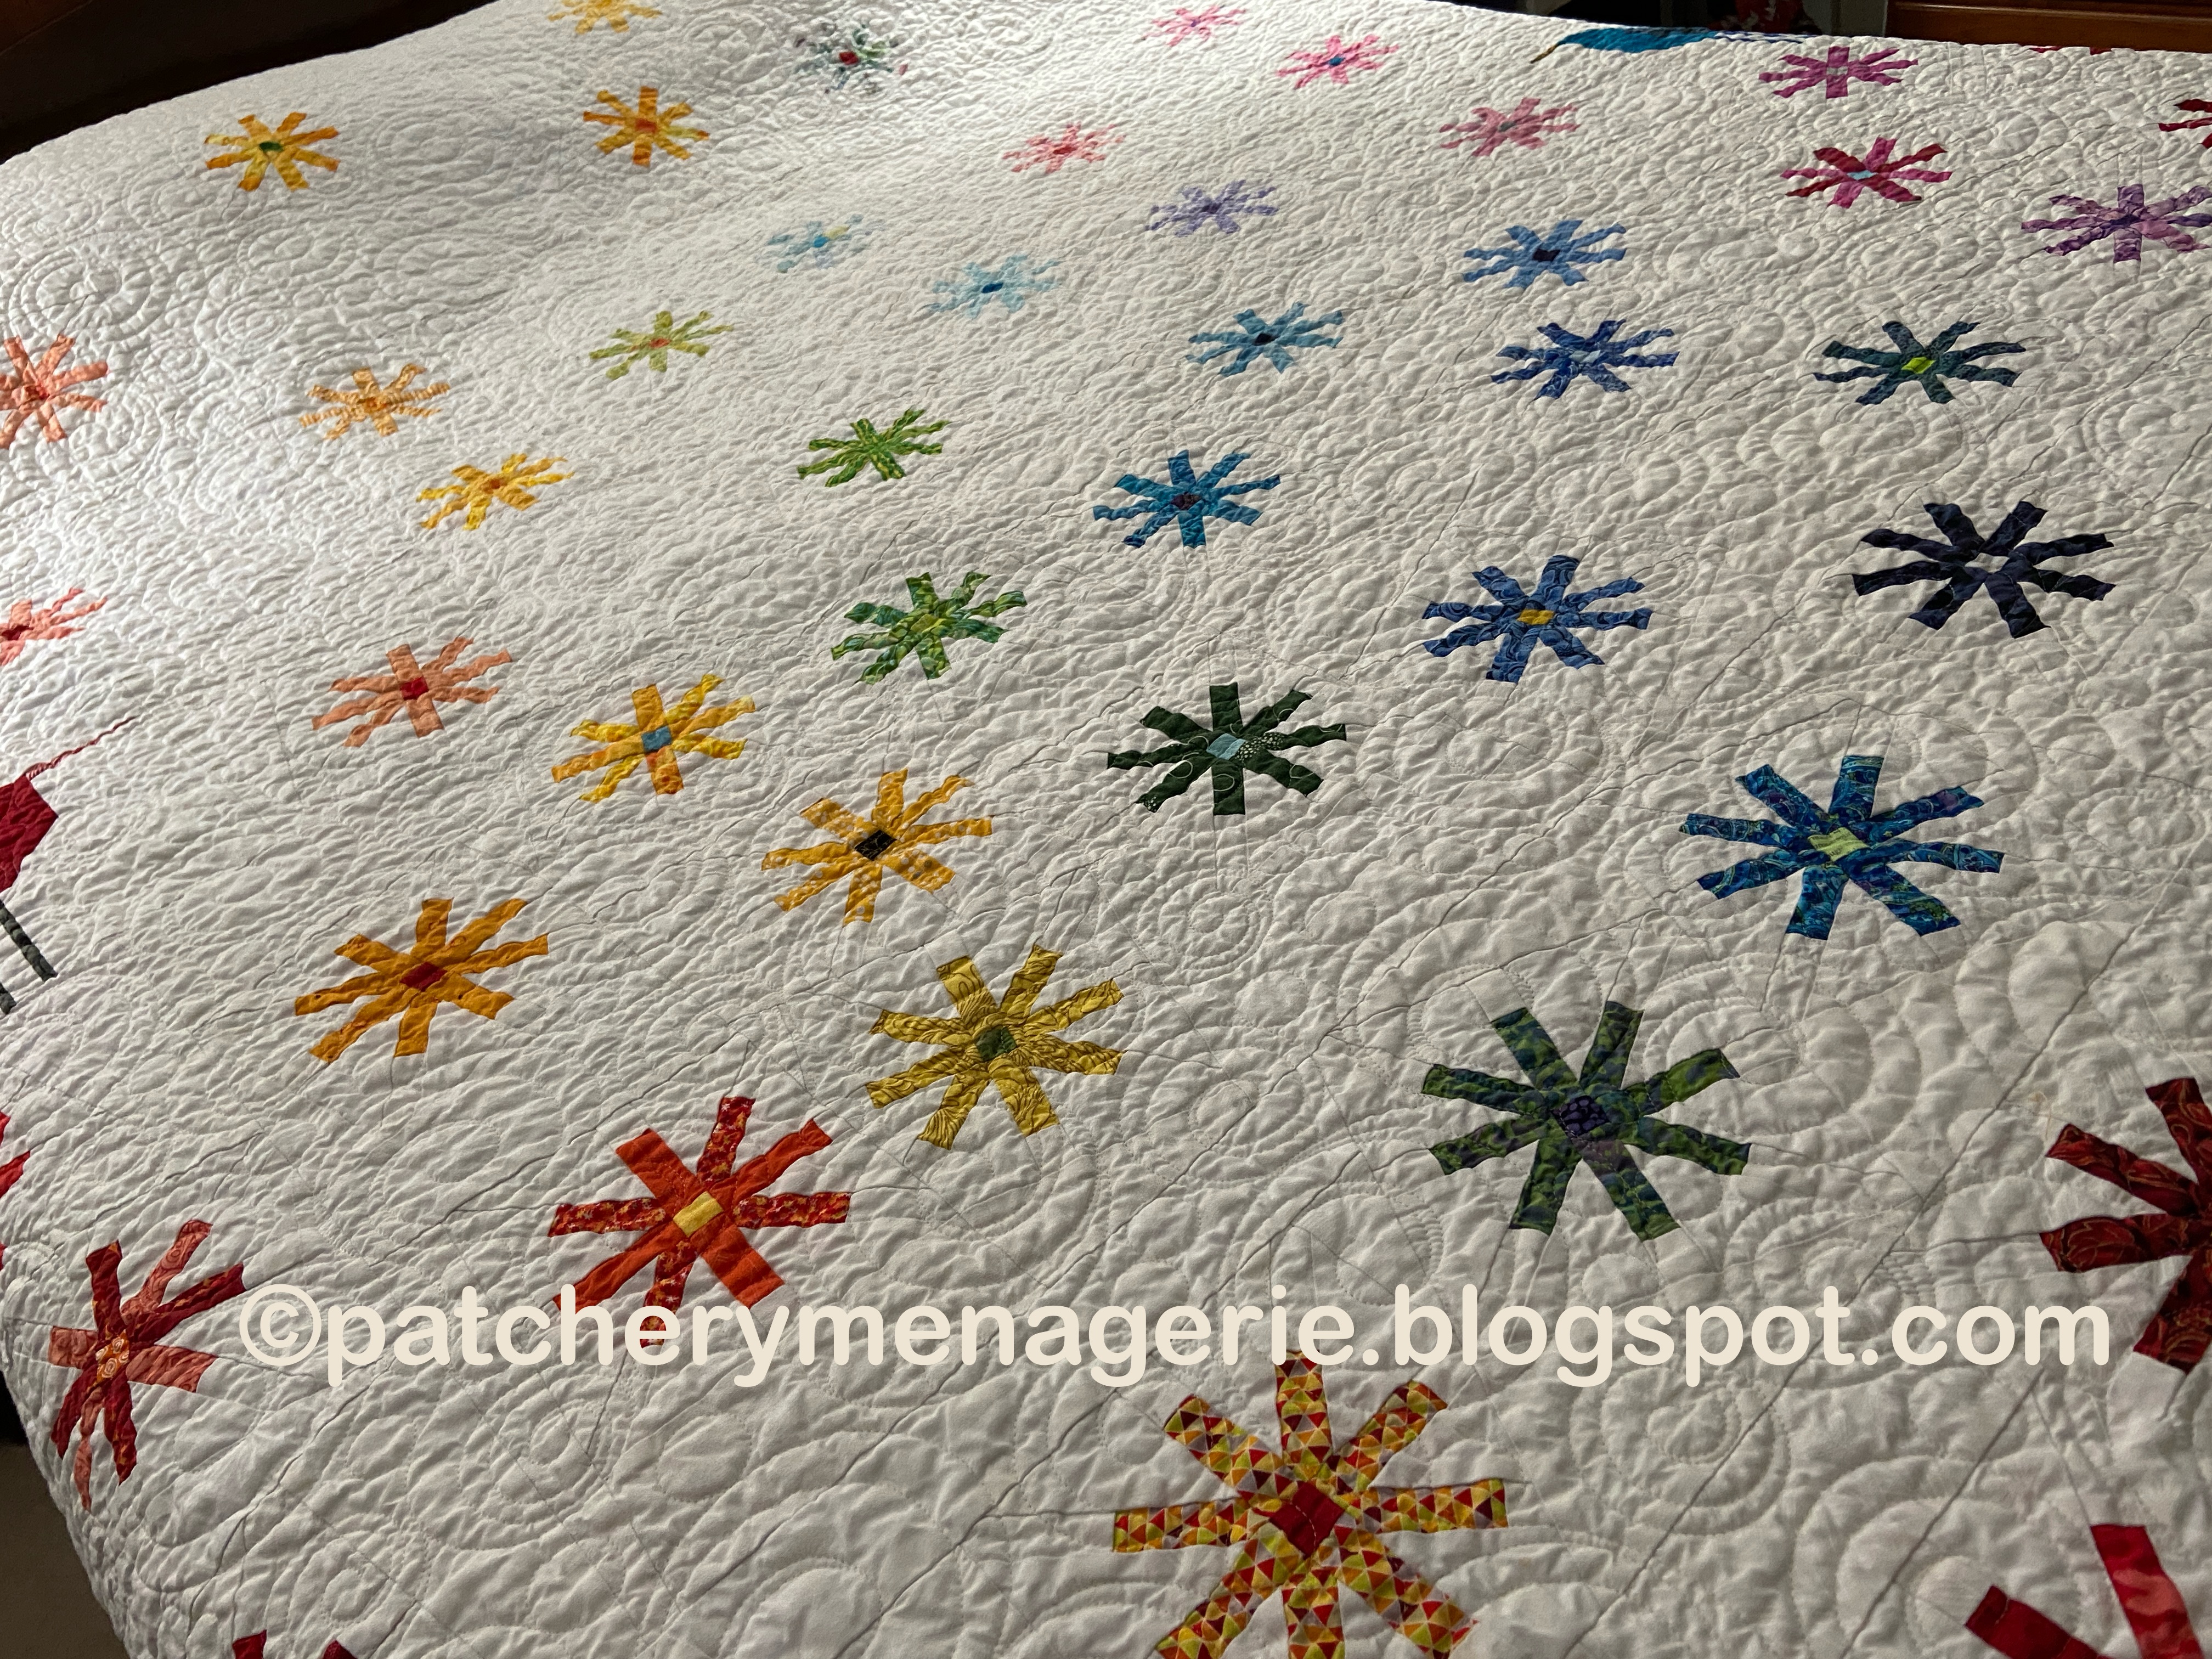
All of these (formerly six sections) are now sewn together into one big panel. The two blues got spread apart (directly above the .com in the photo above), and I made some other changes. (Hey, nothing is "set" until I hand it off to the longarm quilter.) You can really see how I've sewn the components together.

This is three big sections. The one I showed you above, the bottom two horizontal-ish rows of asterisks are sewn together, and the panel to the right with the pink asterisks and the bird. I rearranged a couple of things on those bottom two rows and they did not sew together as I had planned. Oh well. Adapt, Improvise, Overcome.

I really had to do it. As I worked my way sewing other sections I kept having to find my photos and locate my position (the disadvantage of NOT having a color printer.) And since the sections were not sewn together, everything changed as soon as I touched something, so I decided I had to figure out if they looked the way I wanted them to, and then put them in the final places. 

 Since each asterisk's position is in relation to the others around it, it would be easier if I just "nailed them down" so to speak, before I moved on any further. This meant taking a good hard look at what was happening on my design wall, completely separate from what was on my "plan." Since I what I was interested in was happening on the design wall, I had to focus on THAT. There were asterisks that were too close together and seemed to create a logjam. There were a few that were too perfectly lined up, and some of them were now too "low" and left "holes" in the spaces of  asterisks above them.

I'm always interested in both artistic and scientific approaches to "creativity" and have read a lot about it. What I know, both from my reading and my own work, is that the piece you are creating will change as you work. And if you do NOT respond to those changes, and modify your direction and approach, your final piece will NOT be as good as if you followed your original plan. 

You've all heard me say it before, I start with half a plan, or less, and let it evolve and develop as I go. That doesn't bother me in the least, but it freaks some people out big time. I tell all my students and I say it whenever I give a lecture, "There gets to be a point where the quilt will tell you what it wants. And you better listen. What the quilt wants, the quilt should get." That is nothing more than the quilt, as you are making it, showing you that there are other possibilities.

There's one other tricky thing. Every decision you make, every piece of fabric you set down, every shape, every color, every print will inform and limit every successive decision you make. In other words, every decision you make points you toward something, and the farther along you get, the more specific the something becomes. You are, in effect, quilting yourself into a corner. The corner is not a place of no escape. It is the logical conclusion, the logical representation, of every idea in the quilt.

If you have followed that path, and responded appropriately, then the quilt, (or artwork) will look "perfect." Not perfect as in technically perfect, not perfect as in uniformly loved, but the perfect in that the idea is complete and doesn't need anything else. If viewers look at it and get it, then it's perfect. If they look at it and think, "I don't understand ...." then it doesn't "work." If you have to explain it, then it doesn't work. If you have to tell somebody what they're looking at, then it doesn't work. It can be technically perfect and still not work. Never confuse the two.

I know what I want with this quilt. I want the feeling, the look, of asterisk flowers lifting up and floating away in the breeze, like blowing a dandelion. If I do it right, every single person who looks at it will FEEL that lightness, that airy-ness, that JOY...

that PERFECTION!

Tuesday, September 29, 2020

A Man, a Plan, a Canal... Panama

On the design wall.
.


Translated into fabric. I -try- to get the edges on the straight of the grain, but sometimes I just get tired.

Four panels trimmed. The yellow and green are sewn together. The two green asterisks should have been farther apart, but they are OK. The overall "feeling" of how they float together is more important than following my guide to a "T."
.

What I have sewn into panels is colored on my guide.

What it all looks like on the design wall. There is one thing I don't like and will change later.


*Gail, that seam you saw on the edge of that panel is there because I tend to leave these bigger than I need them. It allows me a bit more flexibility when I start sewing them together. It's always better to have too much fabric than too little. (Ask me how I know this.) I will do the final trimming down to size when I start sewing them all together.

*Mickey, I live alone. If the house is clean, the dishes are done, the bills are paid and Millie is fed, the litter box is clean and the laundry is done, then I head into the studio and sew. Working in the studio is what I love to do best, so you seeing me "work fast" is really me using all the available time I have to do what I love.

* "A man..." is a pangram palindrome (Thanks, abelian. I really did know that but it slipped my mind). It reads the same backwards and forwards. It also loosely describes my process, and so I thought it was a fitting title to today's post.


Sunday, September 27, 2020

Progress


It was a gorgeous day on Saturday, so I drove up to my favorite quilt shop, Quilted Threads, and bought some WOW fabrics for my Asterisk quilt.


I have sewn together all the colored areas in the drawing above. I haven't sewn them to each other yet.

This is the section in yellow from the illustration above. Even for me, this is very slow going.

Saturday, September 26, 2020

This is the Same as That

 The thing about the asterisks is...

They are symmetrical.

AND LOOK! When you rotate it a little bit it it is STILL symmetrical.  Check this out:

An asterisk where the block tilts LEFT looks exactly like...

An asterisk block that tilts RIGHT.

So when you're trying to put some blocks together and you get this klunky thing in the lower left, 


You just rotate that sucker so it'll be easier to sew. 

It isn't rocket science, but it is definitely a brain twister. To somebody like me, who lives for puzzles, this is a fun nut to crack, even if the air does turn blue when I am doing it.

Here are a couple of in process pictures to show you how it's coming along.

That hole in the picture above is where a set in square will go.


Now about those comments yesterday:

Dorothy: Thank you, you are too kind.

Linda: It's just a one step at a time kind of thing. One thing at a time, one little bit. Don't worry about the rest.

JustGail: You go girl! What you said. DAMN I hate spoon feeding people who won't step up and try to figure it out for themselves (translation: THINK).

Julie: the seams look great and add interest when the quilt is in flimsy stage, but as soon as it's quilted those lines disappear. Even I can't find the three or four set in squares on the Flight of Fancy quilt, and I walk by it every day.

Mrs Goodneedle: You are so right. A very wise woman said to me once, "When it's important enough, people will find a way to do just about anything."


Here's my road map. The colored sections are done, and you can see me changing my mind as I go. There is no right or wrong, and no matter how I sew it up, nobody will know (or care) if I followed my plan exactly.