Showing posts with label Holiday Quilt. Show all posts

Friday, January 19, 2024

It's Funny How Things Work

Way back in early December I drew this in my little notebook.


Now you have to understand, I drew this in about three or four minutes. CLEARLY I didn't stress over it.
Small star, smallish birds, asterisks at the very bottom.  

???

So OF COURSE I had to try it out.

Because THIS was clearly not working.

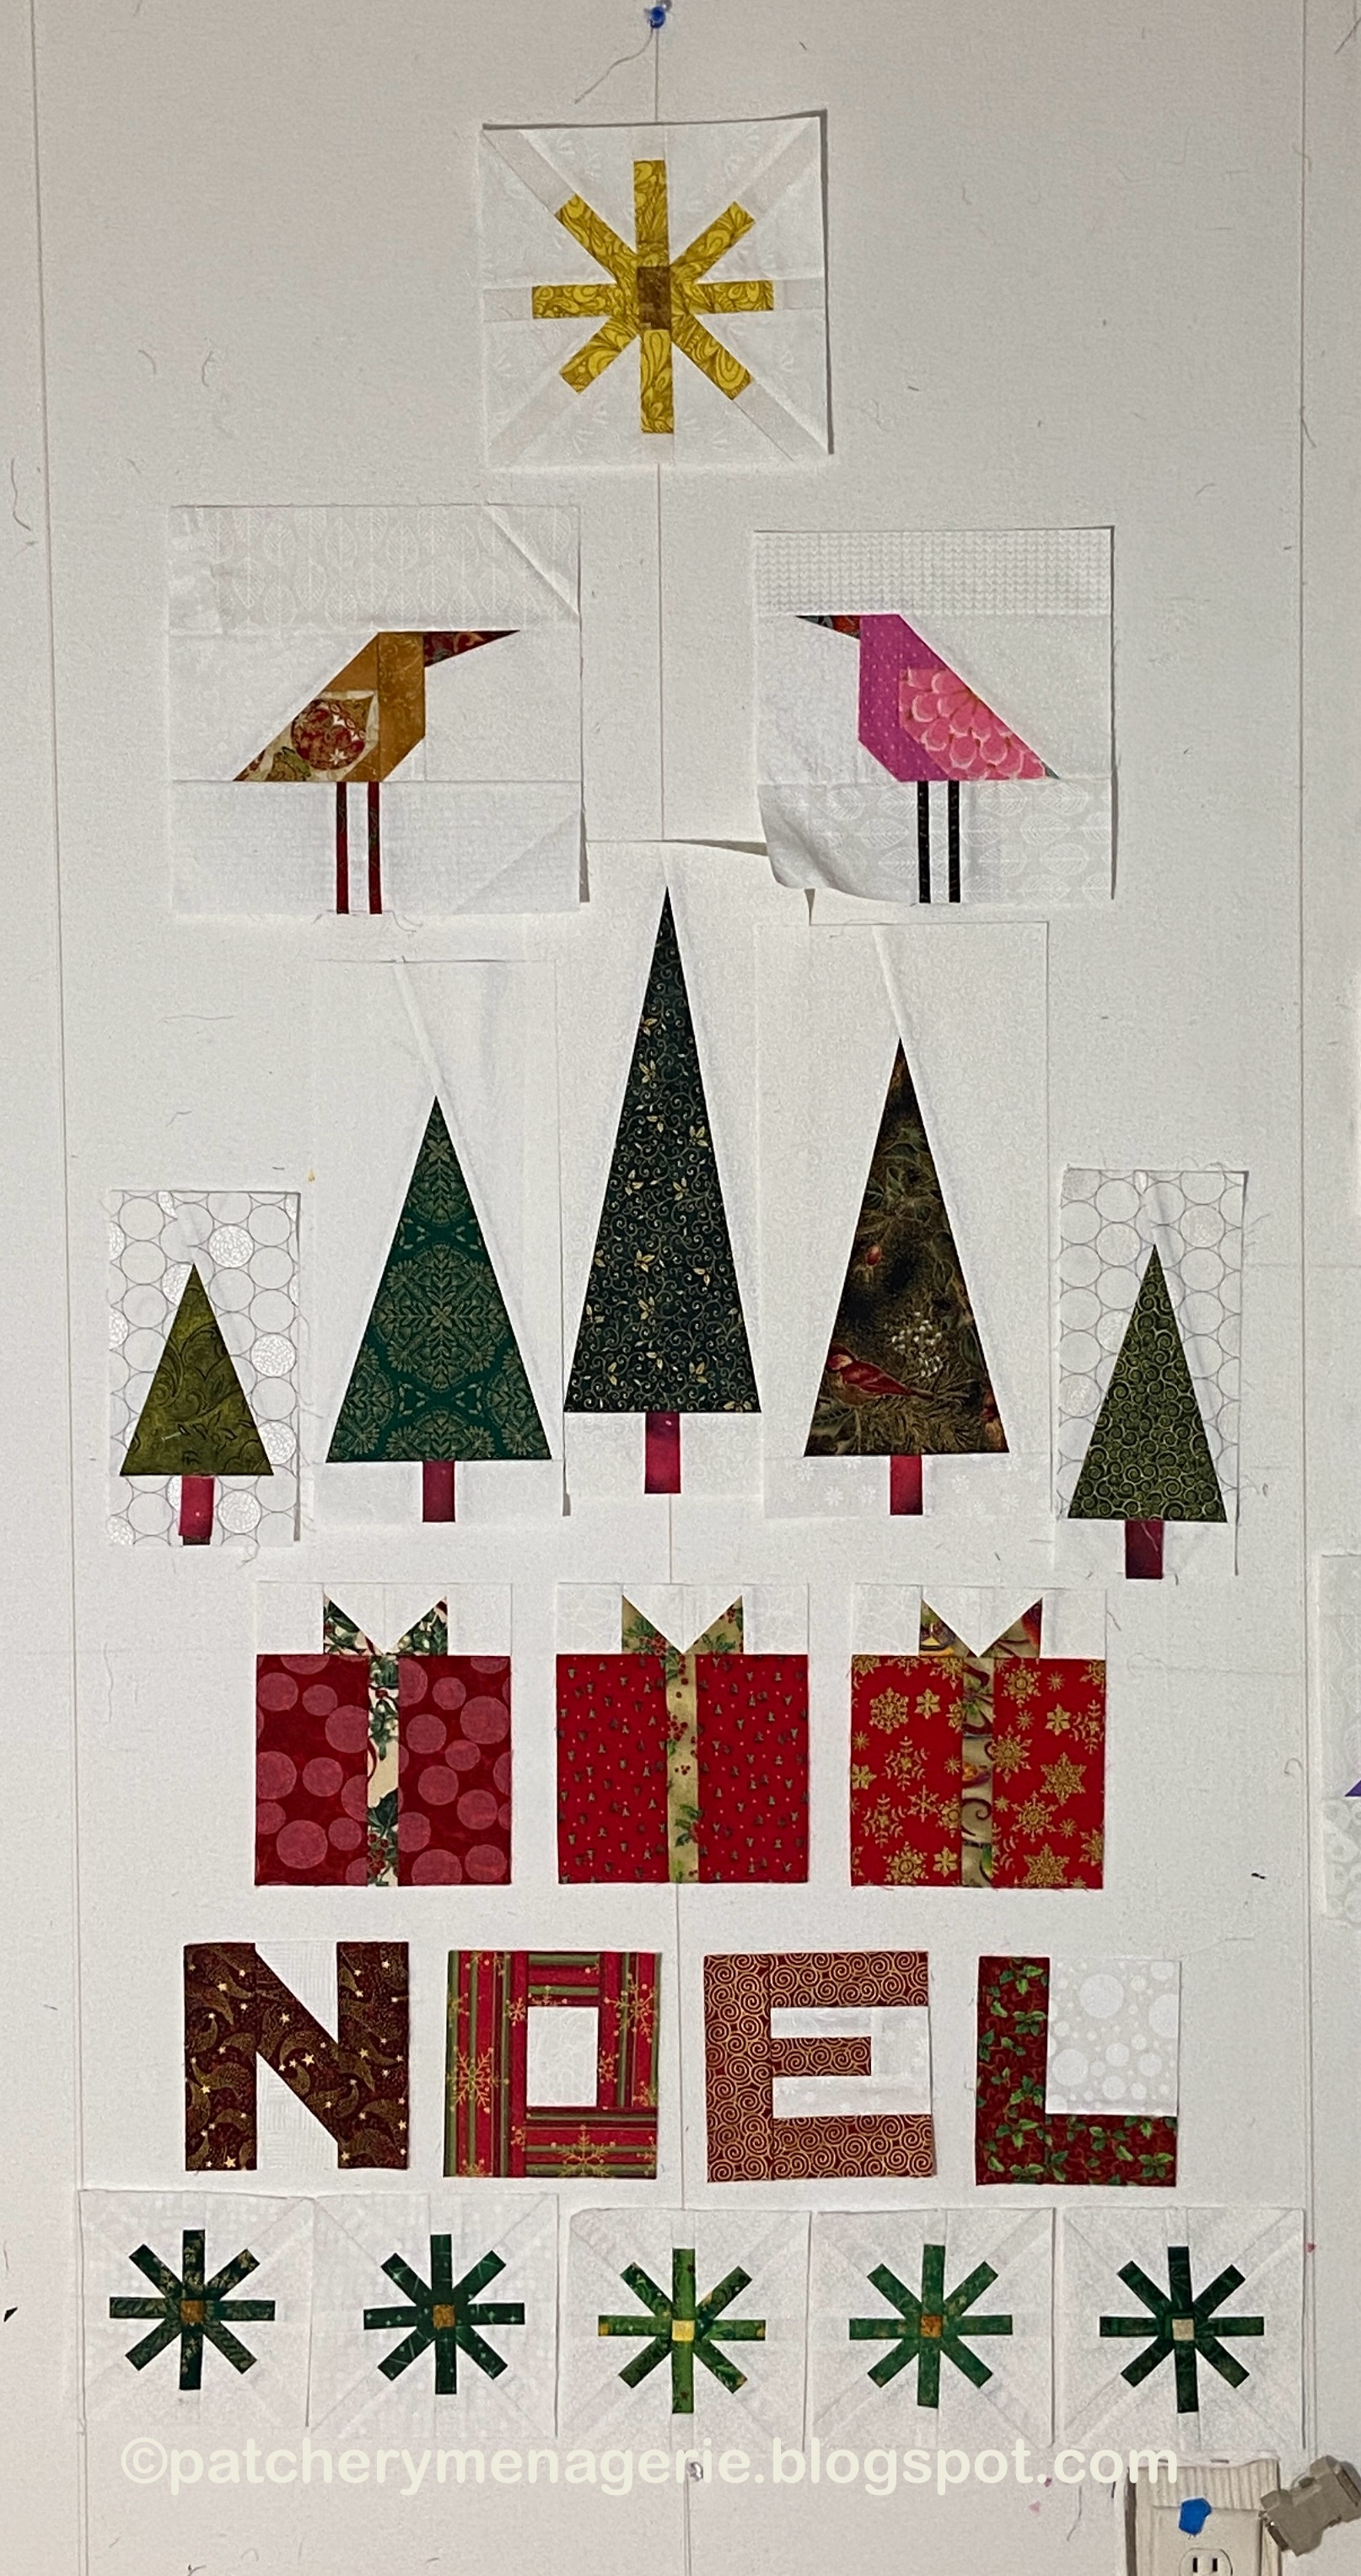
So I moved the asterisks to the very bottom, then I put the letters above them, and then the boxes, but only three because four made the row too heavy visually. Then I put my trees, and I made them arch a little from the bottom so they wouldn't be to visually heavy, then the birds, and then I threw up some leftover asterisks, because may be I needed some very pale silvery or gold up there in the sky to fill up that empty space.

Then I went across the room to look at it.
Nope. Birds are too big.
Rummage around to find medium birds.


Wellll.... dunno about that. Let's try small birds.

THAT's not right. The birds and the asterisks can't decide who's the boss. Nope.

Gotta get rid of those extra asterisks...


Oh yeah, that's better. But I should probably make my trees the same size. Because, that's the way they are in the original drawing...

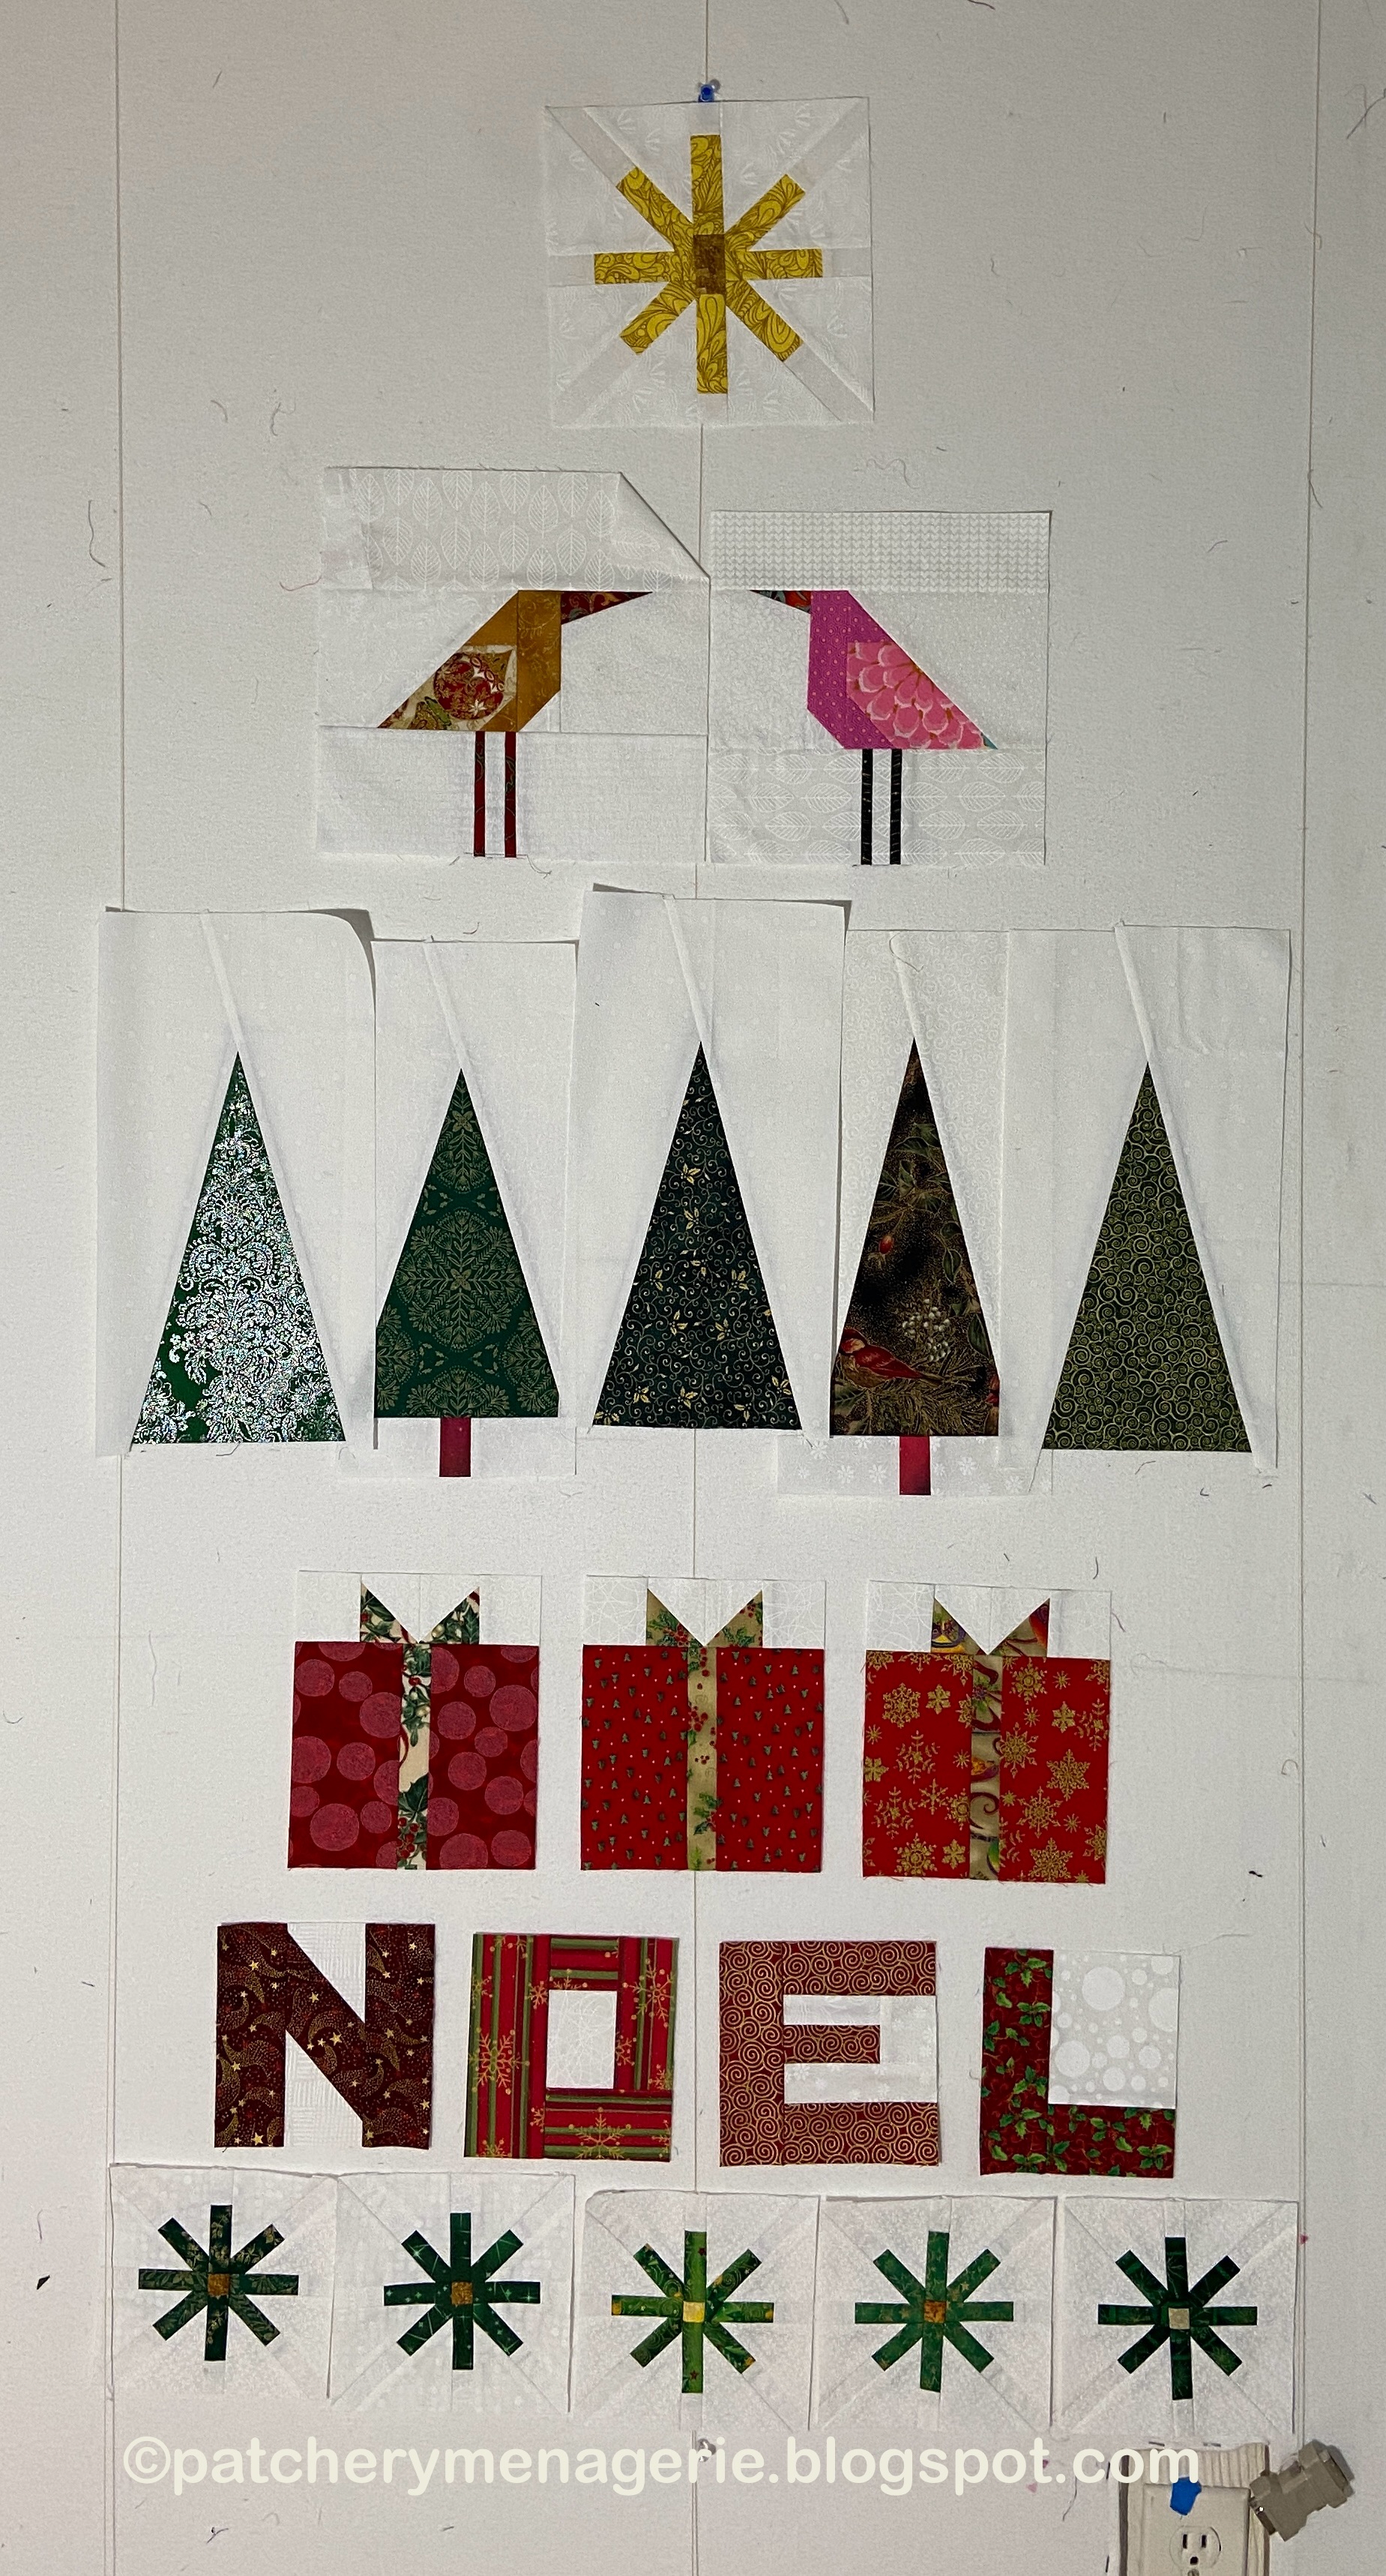
Ok tree fabric chosen...

Oh hell no.

Okay, this is better.

But now I wonder, there's an awful lot of nothing above the trees. Do I REALLY need the birds?

Apparently not.

So I will make my final elements (I need a couple of smaller trees on each end with red trunks and I think I need a replacement bulb in my spotlight), and then I will sew this together.

THIS GOES TO SHOW that THINGS CHANGE and you have to let them. You cannot FALL IN LOVE with any element because you may have to sacrifice them. In writing, they say "Kill your darlings."

I may fine tune this a bit. I may make the center box a bit bigger than the other two and see how that looks. I've wondered about putting an umlaut above the O in Noel, and that would mean making it a bit smaller. It would also throw off the symmetry, so I am not sure about it. And it adds an element of "cute" that I am pretty sure this does not need. In writing Kill Your Darlings means to get rid of that overly crafted piece of writing. I would say "Don't get too cute." I don't want Cute in this. I wanted a simple banner that would proclaim the holiday season.

Message accomplished. Now I have to finish it without mucking it up.


Sunday, January 14, 2024

Oh Christmas!


I have been working on the bits and pieces for a new Holiday quilt. I plan to make it narrow and long. I like the boxes. The asterisks are okay. The birds are too big and the trees are too small. The star is miserable. So I tried making another one.

But this wasn't right either. I thought I could rip the pieces out and replace them


Obviously I wasn't thinking right. This one is just as bad.


So I will go back to the drawing board, as it were.


So I switched gears and sat down to sew the binding on the PRIZM quilt.

Saturday, November 27, 2021

Catch Up


After a day of food food food, Friday was a day of playing catch up. 

After I planned my menus for the coming week, I placed my grocery order before I went to bed on Thursday. It was ready by 9AM the next day, so I had a quick breakfast then went to pick it up. I filled the car with gas then did another errand and went home. I made a big batch of tomato soup for my lunches during the week, made a grilled cheese sandwich for lunch and then packed the Christmas presents into their gift bags, calculated all the shipping costs, printed the labels and then drove to the post office to drop them off. Back at home I did all the laundry, folded it; changed the sheets on the bed, cleaned up the kitchen and made dinner and ran the dishwasher.

I switched out the pink pillows and quilt for the Holiday Boxes quilt and silver pillows, hung the Happy Holidays quilt and switched out Millie's summer tent for the winter version. As you can see Millie wasted no time in covering it with her furs. I'll put up the Christmas decorations a little at a time over the next few days.

I still have to clean off the dining room table and cover it with the Christmas table cover, pay a few bills and move some garden tools to the shed. It's snowing as I write this, and although it won't stick around, it does mean the end of the garden season, so it's beyond time to put the garden tools away and bring out the snow shovels.

I've got a few more bags to make too.

My mother was so funny. She saw the bags I made for my son, DIL and DGG and said, "So Lynne, where is MY bag? Am I going to get one...?"


Sunday, January 24, 2021

All Lined Up


The Holiday Boxes quilt has reached flimsy status. It is 74" tall x 62" wide.

Here the flimsy somewhat crumpled on the couch. It was a bit tricky with Millie also on the couch giving me the stinkeye.


Monday, January 18, 2021

Three More Rows of Boxes & an Amaryllis Update


I'm working on the fifth row of boxes. I sewed the blocks of rows three and four into rows yesterday. Sewing the birds into the rows is a little bit fussy because if I want them to stand in for boxes, they have to be positioned properly (meaning they have to be centered),

Here I am sewing row five to the bottom of rows three and four.

Here are rows three, four and five sewn together. For those who missed it, you can find the pattern here.

Here is an Amaryllis update. Magnum, at left, has had ten blooms. One stalk had four, the other, six. There are three left. In the middle is Bogota, which took it's sweet time to grow and bloom, but both stalks had four blooms each and all eight are open right now. At the far right is Double Delicous. It had two stalks, one had four blooms, which have now passed, and the second had six, which are all open. But there is a third stalk growing. Color me big time surprised.

Here are a couple of closeups of Bogota,

It has been a good year for the Amaryllis's.

Thursday, January 14, 2021

Back in the Studio


I cleaned off the work table and set up my new mat, then started sewing the holiday boxes together.

I sewed the top row of boxes together. This photo also shows my old cutting mat. You can see where it was worn out. That area also doesn't lie flat any longer. I rotated the mat so I could get more use out of it, and there is a corresponding worn area just out of sight in the lower right of the mat.

So, the mat. How's it work? In a word, FABULOUS. I always use a sharp rotary cutter blade, and working with this mat I exert very little effort. It is smooth and a pleasure to work on.

I never thought I'd miss the grid, and I don't, but I miss the ruler. but I am going to have to install a ruler along the bottom edge because I used to lay fabric strips along the ruler to know how long or how wide they were. Piece of cake.

The mat is so smooth it is slippery. And since my work table is at an angle, EVERYTHING slides off. Even pins!!! This will probably resolve itself as I use the mat, but in the meantime, I have to set up a little edge at the bottom to catch errant pins, rotary cutters, rulers, scissors, etc. And since the mat does not go up to the top of the table, it isn't held in place up there, so things slide under it. I can fix that, but these are things that aren't the MAT's fault. It's because the table is at an angle. But the mat is a freaking dream. The mat passes my test with flying colors.

The mat has NO ODOR at all, and it's just a pleasure to work with. I'll be ordering one the size of my big table later this week. I will also order some double sided tape to hold it in place.


Here's my mat: 2' x 4' Rhino Self Healing Large Cutting Mat (No Grid.)


Friday, December 11, 2020

More Boxes

 While Life is keeping me busy (I have been trying to decorate for Christmas, but last night I got sidetracked watching The Queen's Gambit), I have decided to show you bigger pictures of the boxes I made earlier, but did not show in bigger pictures. You can decide for yourselves if some of them are too dark, too light, or too bland.

This is leftover fabric from the backing and binding of the Happy Holidays quilt.

I found this Christmas fabric in a box of fabric that was given to me. Because they are complimentary colors, red and green together in one print can cancel each other out, and often look dull or dirty, so it can be tricky to use. In this case, the green trees are small enough that they don't alter your perception of the red.

This print is a variation of the background of one of Gustav Klimt's paintings. The movie about his painting of Adele Bloch-Bauer, Woman In Gold, is really worth seeing.

I made my sister a Christmas tree skirt years ago and used this as the backing. I've used the scraps in many projects since.
 

This is another fabric that came to me in a box. Vertically, this print would have made a good evergreen tree. With the other striped fabrics in the boxes on this quilt running vertically, I wanted this one to be different.

Striped prints are tricky to work with. They aren't always printed on the straight of the grain, and they aren't always parallel, so you have to make some adjustments when you want to emphasize the direction of the stripe. Striped fabric has a very interesting history.

This is the gold box that shows up as solid in photographs when seen from a distance. IRL it is clearly a print, and has some variety. Quiet boxes are necessary in the quilt to balance out the busier ones.

I have always found that if you want good reds or dark greens you should look in the Christmas section of any fabric shop or online store no matter what time of year it is. 

I think this is all the boxes.


The boxes are from a Moda pattern.


Thursday, December 10, 2020

Fine Tuning


I really, really, really did not like that pink box of peppermint candies. It stuck out like a sore thumb, so after finding another surprise in my stash, I made yet another box.

I liked it a lot better. But then I noticed the busy box in the bottom row. (Actually there are two busy ones down there.) ANYTHING close to the edge of a piece of artwork that draws your eye there (usually it is something with strong contrast) is not a good thing. Because your eye will then be drawn OUT of the artwork, and that's bad. It's a Design Rule and it's based on how your brain sees things, so don't bother disagreeing with me. You won't win that argument. If you are making a piece of art (a quilt is a piece of art) your point is to get your viewer to look at it, not away. So YES you want to control the movement of your viewer's eye.

It's kinda funny. When I talk to quilt guilds or students I tell them I want my quilts to shout, "Look at me, look at me, LOOK. AT. ME."

"ME! ME! ME!"

"NOW LOOK AT ME SOME MORE!"

"Don't look at that other quilt, LOOK AT ME! LOOKATME LOOKATME LOOKATME!"

I pause. They shift in their seats uncomfortably. They look askance. "SO are you going to tell me I'm an egocentric crazy lady?" I ask them. "IF YOU HAVE A QUILT in a show, what do YOU think?" I ask them. "You think the same thing, right? Because if you don't, YOU ARE LYING!" Now they laugh.

"You want your quilt to be the CENTER OF THE UNIVERSE! You want EVERYONE to look at it, and look at it, and then look some more. TO DO THAT, you have to follow some basic design rules to keep your viewer's attention..."

That's WHY I take so much time fine tuning the layout of my quilts. Because I don't just want them to just look nice. I want them to be DROP DEAD KNOCKOUTS.

(True story. The Selvage Fairy once commented to me, "It's interesting that you think the worst something can be is nice." Now she'll correct me because I'm pretty sure I have the quote wrong, but you get the idea.)

So I moved about a dozen of the boxes. I rearranged them so I didn't have too may busy ones together. I moved them so there weren't too many quiet ones together. I moved them so the greens and the reds didn't sit next to each other. I moved some so the REALLY busy ones weren't too close to an edge. I moved them so prints with similar shapes were not sitting next to each other. Given the fact that I don't have an infinite number of blocks it's rather tricky, but I did my best.


Sunday, December 6, 2020

Cornerstones... Or Not?


The pattern for this quilt calls for the boxes to be separated by this much space, and cornerstones placed this way. I spent a lot of time measuring this all out to see what it would look like. It didn't take me long to see that I didn't like the cornerstones.

I took them off and immediately I could see this was better. But I felt that now the boxes were too far apart.

This is probably what it looked like yesterday. But if I want this to be a couch quilt that will cover me when I take a nap on the couch, it needs to be a bit wider.

Which means I need to add another vertical row and make more boxes.

Saturday, December 5, 2020

The Third Bird


This is the third bird. I think of holiday colors as red, green and gold. So this red and gold bird really fits.  See that wing? Hold that thought.

I had thought this fabric would make a terrific box, until I realized the scale was all wrong. The box in this picture is 8-1/2" wide. There is no way that print would work on a box that size. It's just too big and the print would be cut up and nobody would know if the box was gold or white or red. And it would grab too much attention.  HOWEVER...

Students are often aghast when I tell them to cut a hole in the middle of a perfectly good piece of fabric to get a fussy cut of whatever they want. YES! I expect you to do that. Do you want a terrific bird (or whatever) or do you want an ordinary, plain one? I know which one I prefer.

Rearranging things a bit got me to this placement of the birds, and I liked it. I don't want the birds in the corners, because there is too much white space around them and the quilt would look like it had a corner chopped off. I like the way they stand in for boxes. Actually, what I like about this pattern is the rhythm of the repetition, one shape after another, but with variation in color and pattern to break it up a bit. Then the birds add a bit of sass. Of course, I needed more boxes, and you can see how I audition fabrics.

This is the kind of fabric you have to be careful with. At first glance it is red with gold, but really it is the other way around. Set on the design wall, it doesn't look as red as some of the other red boxes.

This reads as "pink" to me, and not really Christmas-y. But I was running out of options, and there is already a box in the quilt with a pinkish ribbon, and the Amaryllis print has a lot of pink in it, so I knew I could get away with it. (Translation: it would not look totally out of place.)

I found this red fabric in one of the big bins I had set aside for "other projects." DAMN!

This box was made from scraps. I only had a long too-narrow piece of this green. You can hardly tell where I sewed it up.

This fabric was in a box that was given to me over 10 years ago. I did have to piece this together, and you don't have to look too hard to see where, but I tried not to make it so obvious that it stuck out like a sore thumb. There's pink in this fabric too.

So now that I have enough blocks I have to finish working out an arrangement I like. I am not sure I am going to use the border of the original pattern (in fact, I'm sure I definitely WON'T be doing it like the pattern, but that should surprise no one).